Terminating an Employee - UK
- Infinet Support (Unlicensed)
Enter Time
Prior to entering a termination date for an employee you will need to complete any time entries or leave requests. Once you set a Termination Date, NetSuite will prevent further time entries being made against an employee.
Setting the Termination Date
- Navigate to the Employee Record > Payroll tab > Pay Component subtab and open in edit the current salary/wages payment components (you will also need to do this for other recurring pay components if you wish to pro-rata them on the same basis as salary e.g. allowance employee gets every month)
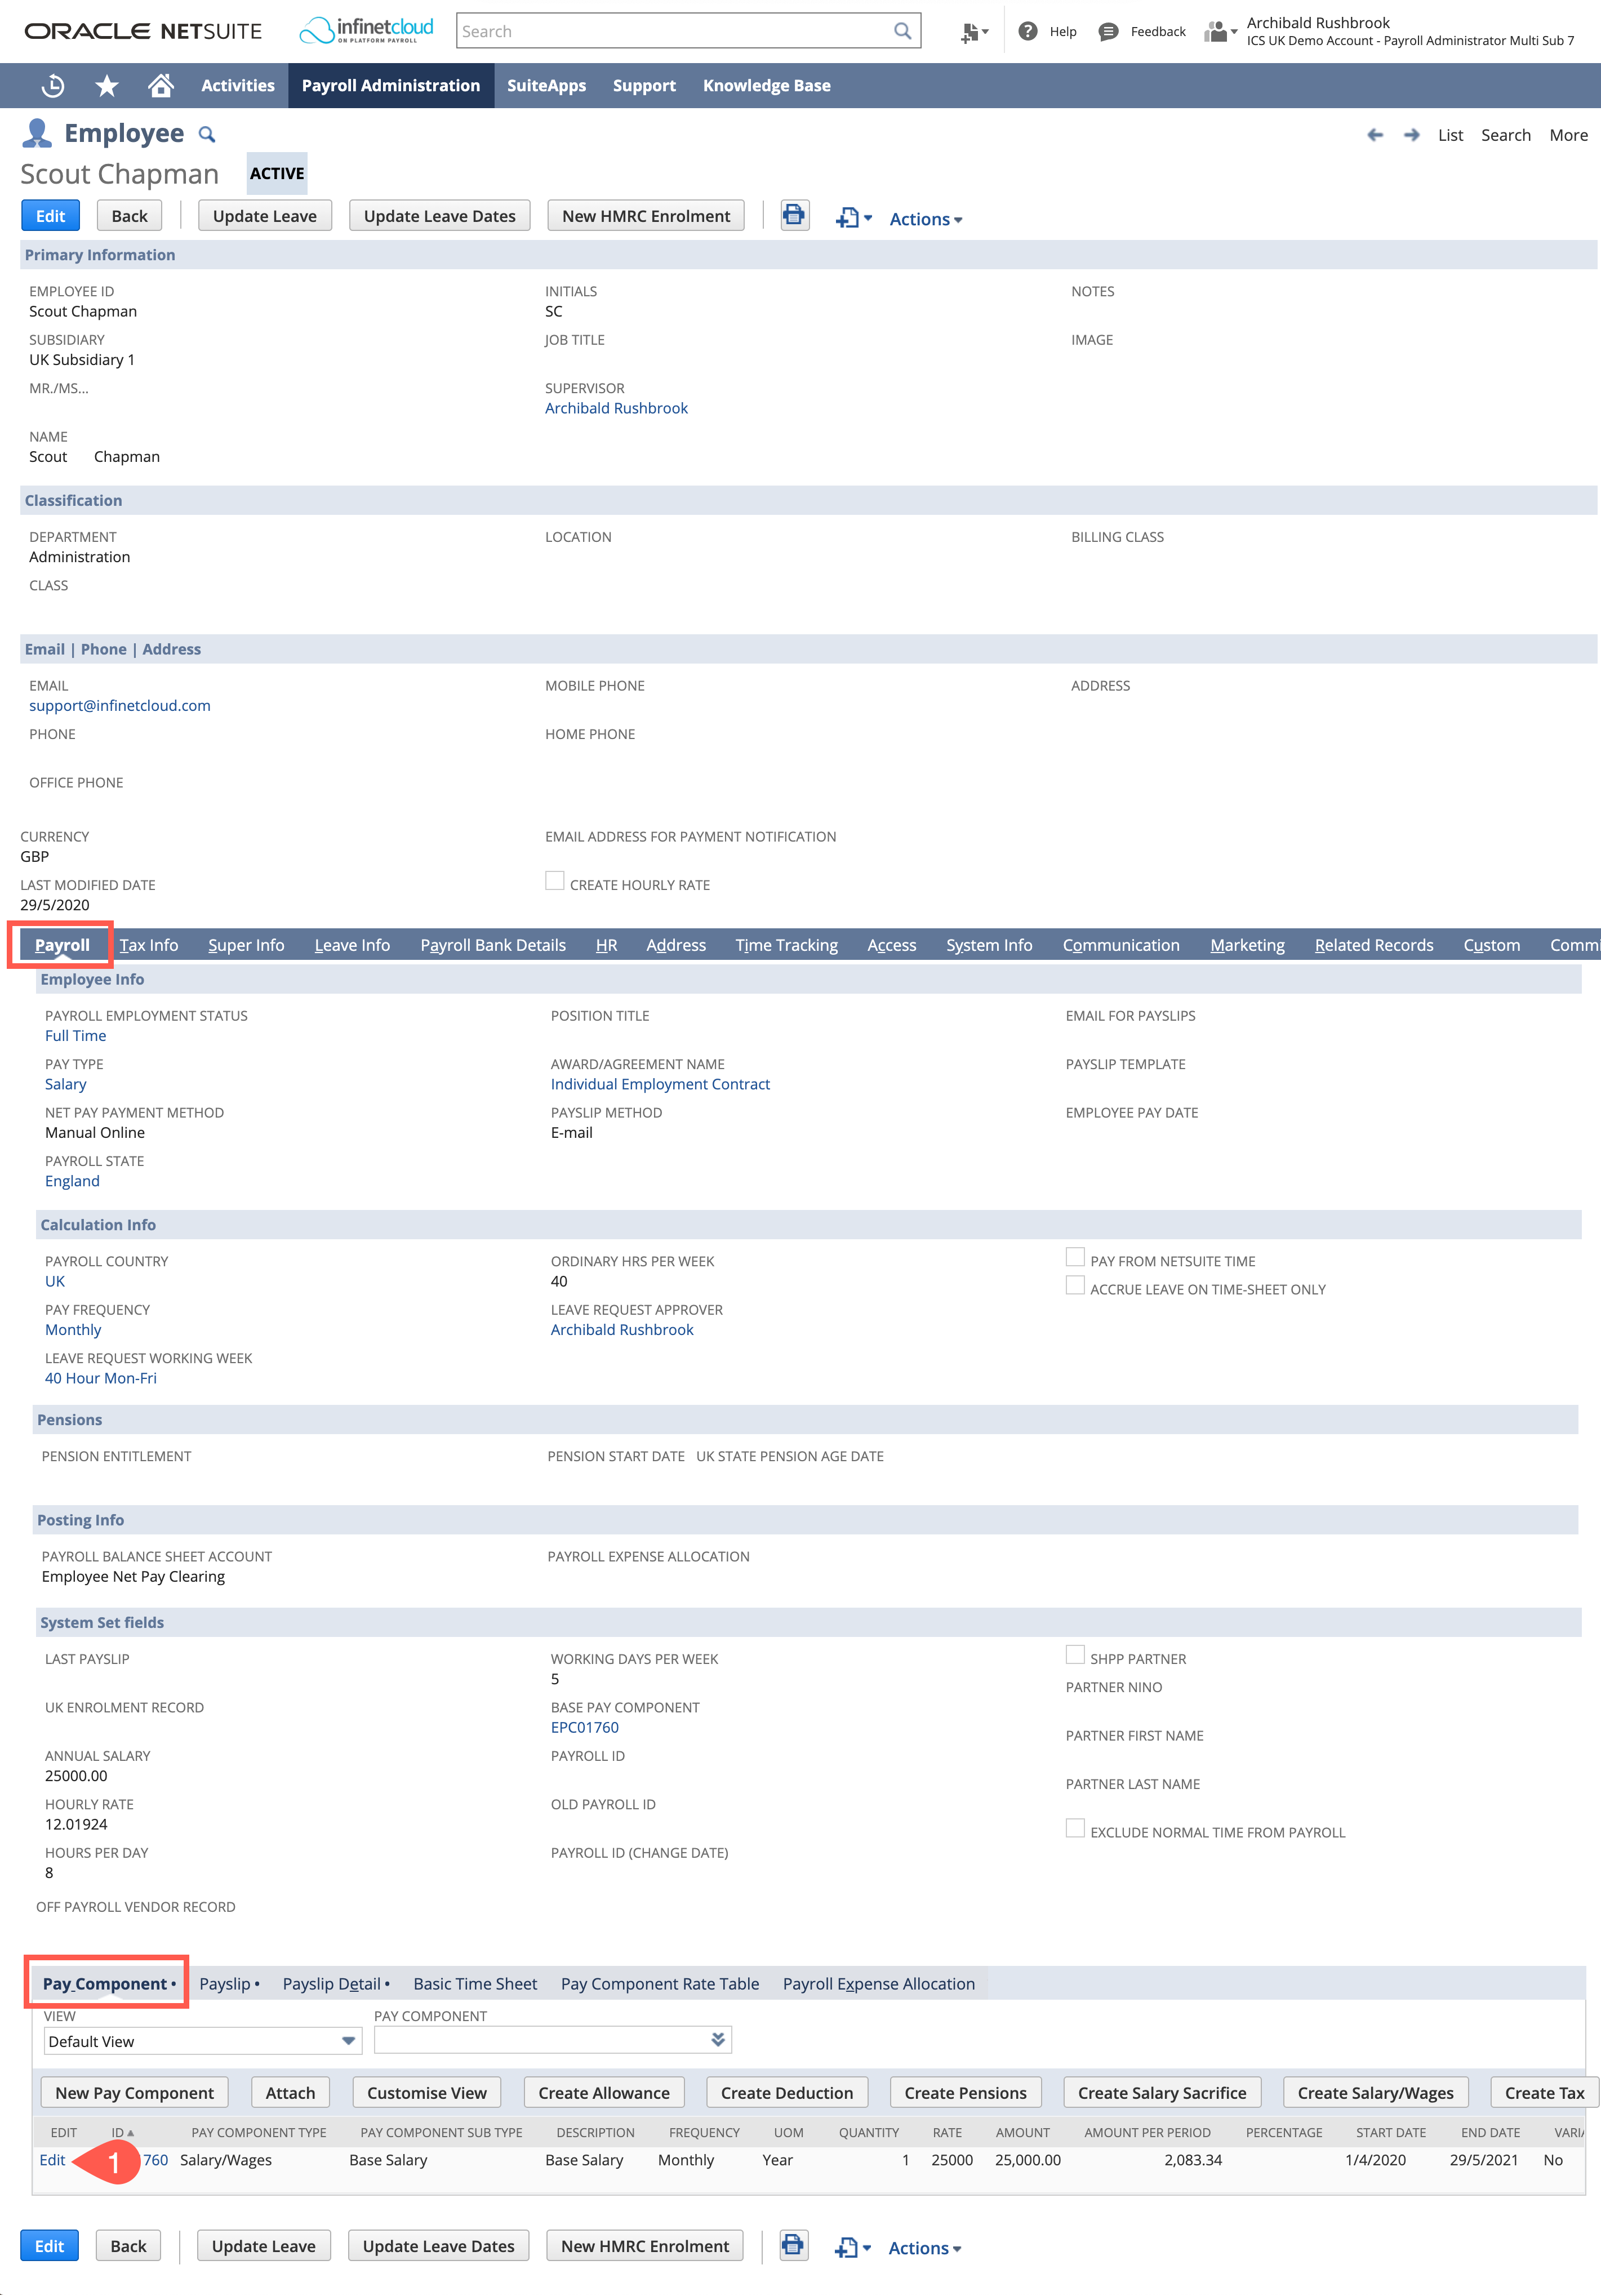
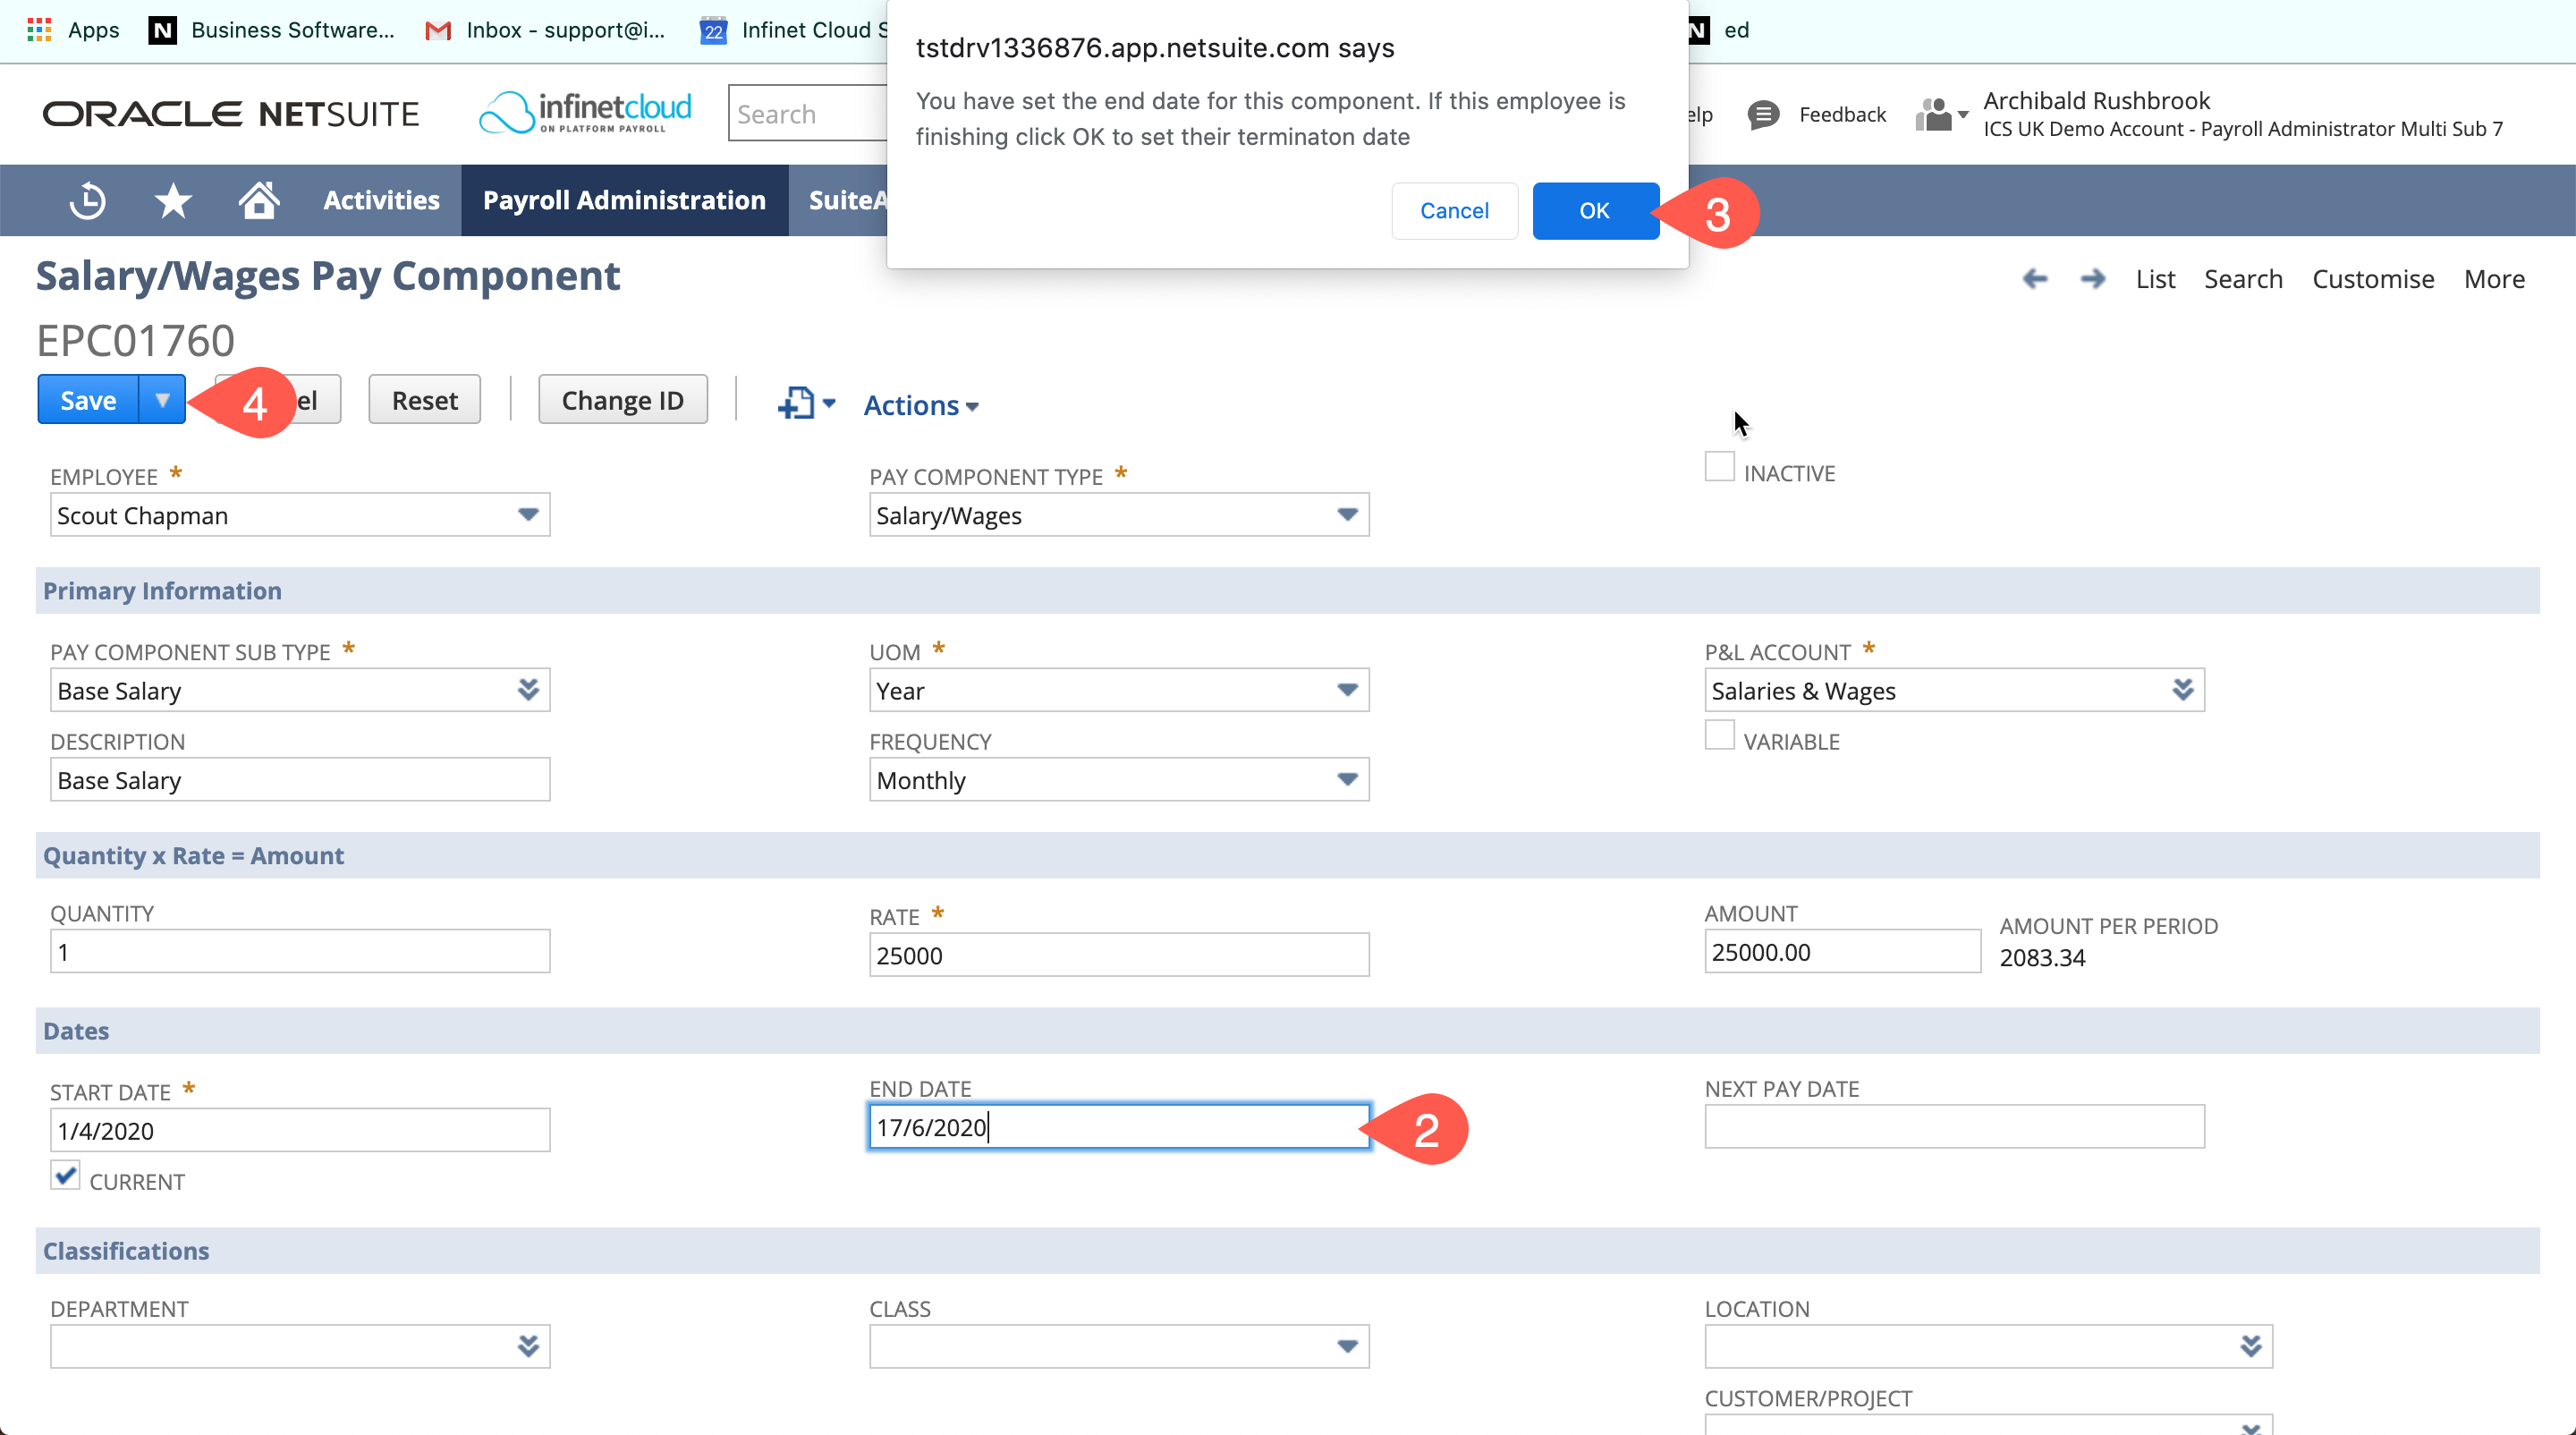
- Enter the termination date into the end date field on the pay components
- A pop up will appear asking if you want to set this as the termination date - click OK to confirm this is a termination
- SAVE
This will set the termination/release date on the Human Resources tab.
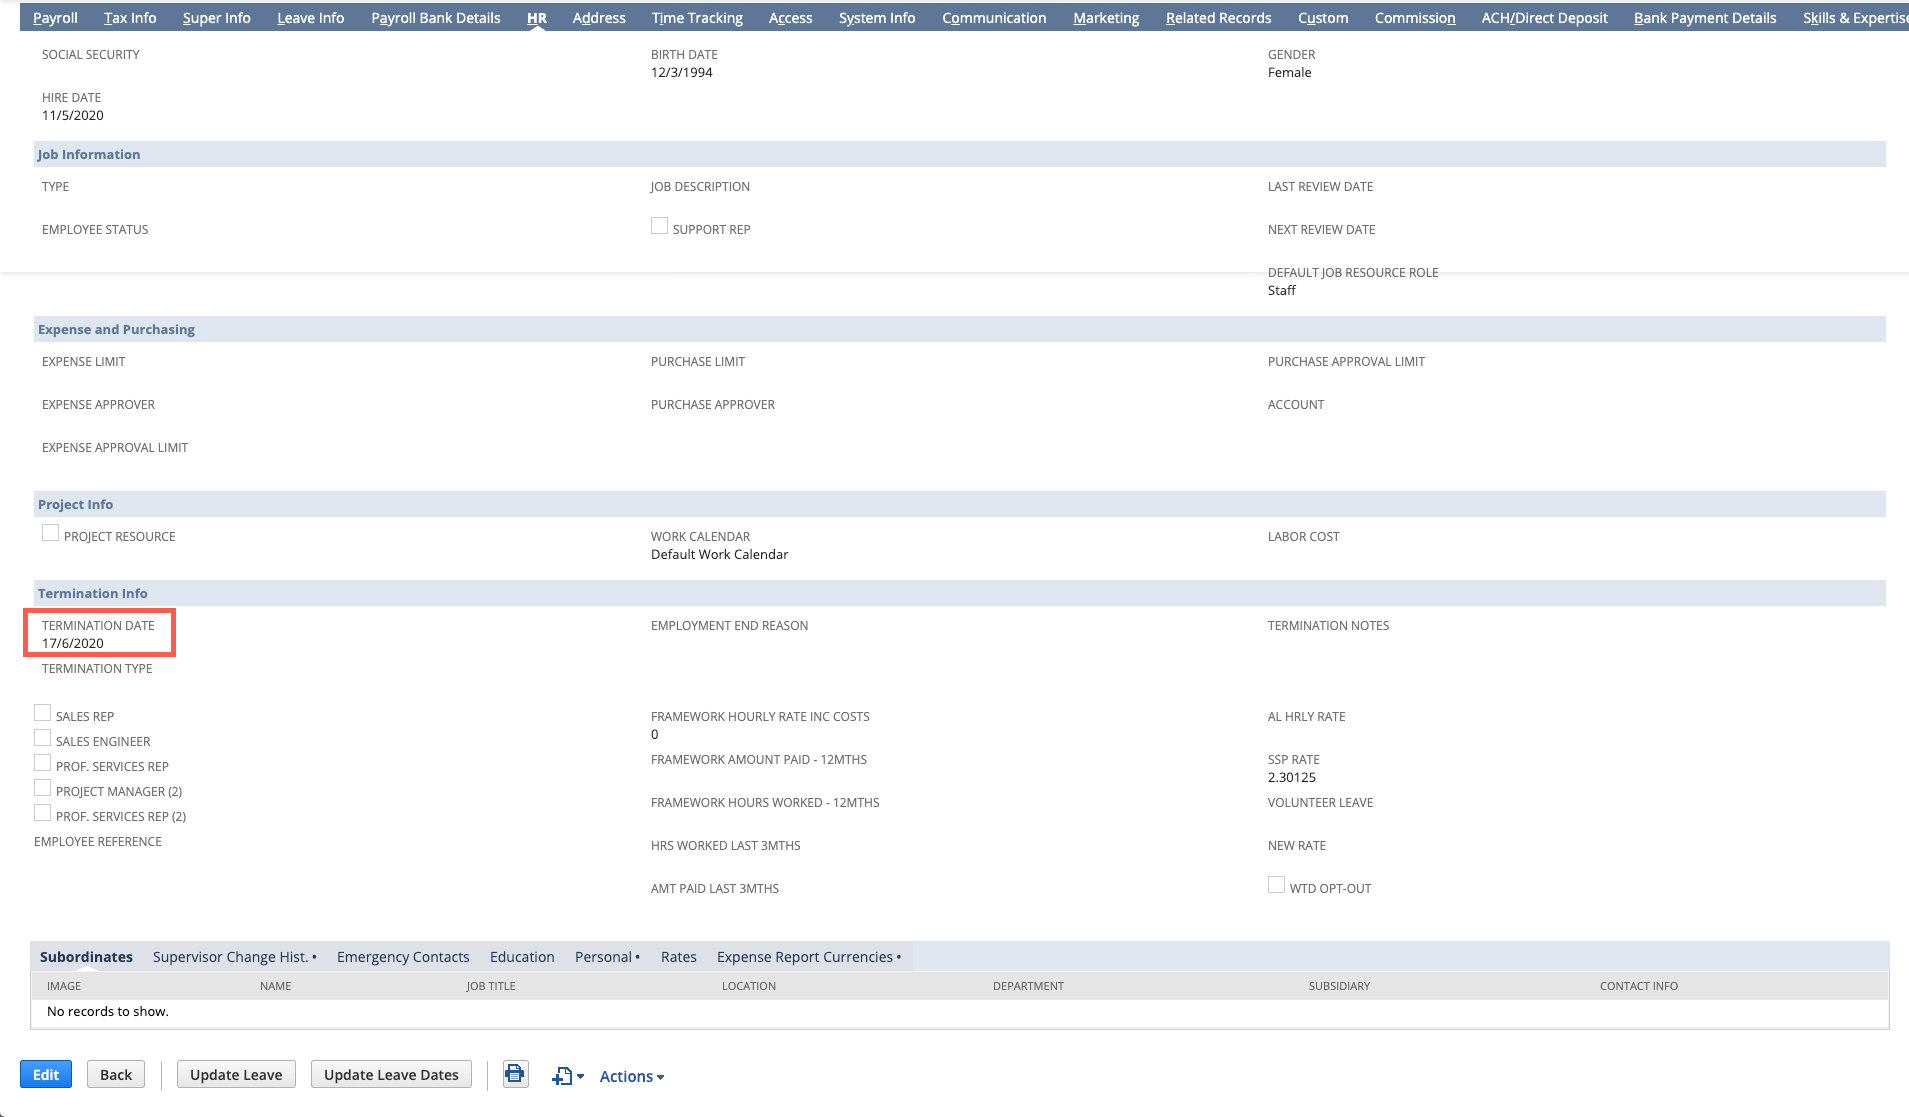
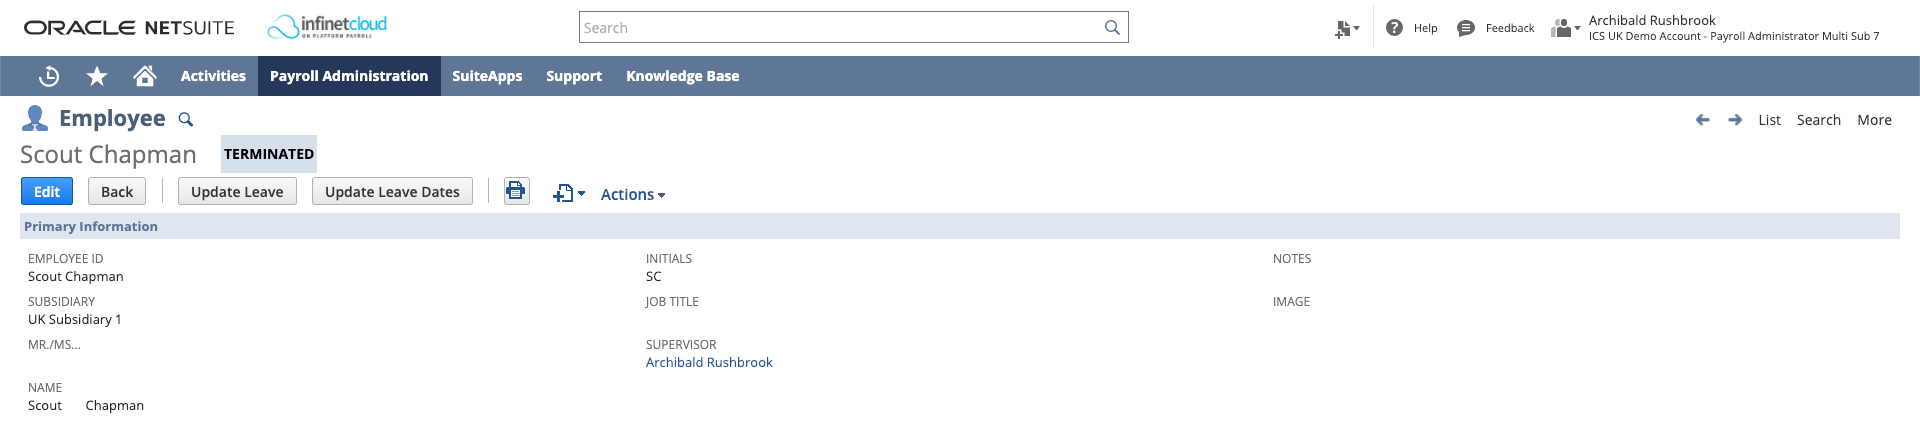
If the employee’s leave date has already passed you will be able to see that the employee record status will change to terminated.
Annual Leave Payout & One Off Pay Details
If applicable to the Employee, an entry for Annual Leave Payout will need to be included in their final payment.
First you will need to work out the annual leave that has been taken and whether this is over or under the pro-rata entitlement (from the start of the annual leave year to their leaving date). For this you will need:
- the number of days/hours entitlement they have accrued
- the number of days/hours they have taken
Once you have worked this out you will need to enter this as a one off pay detail.
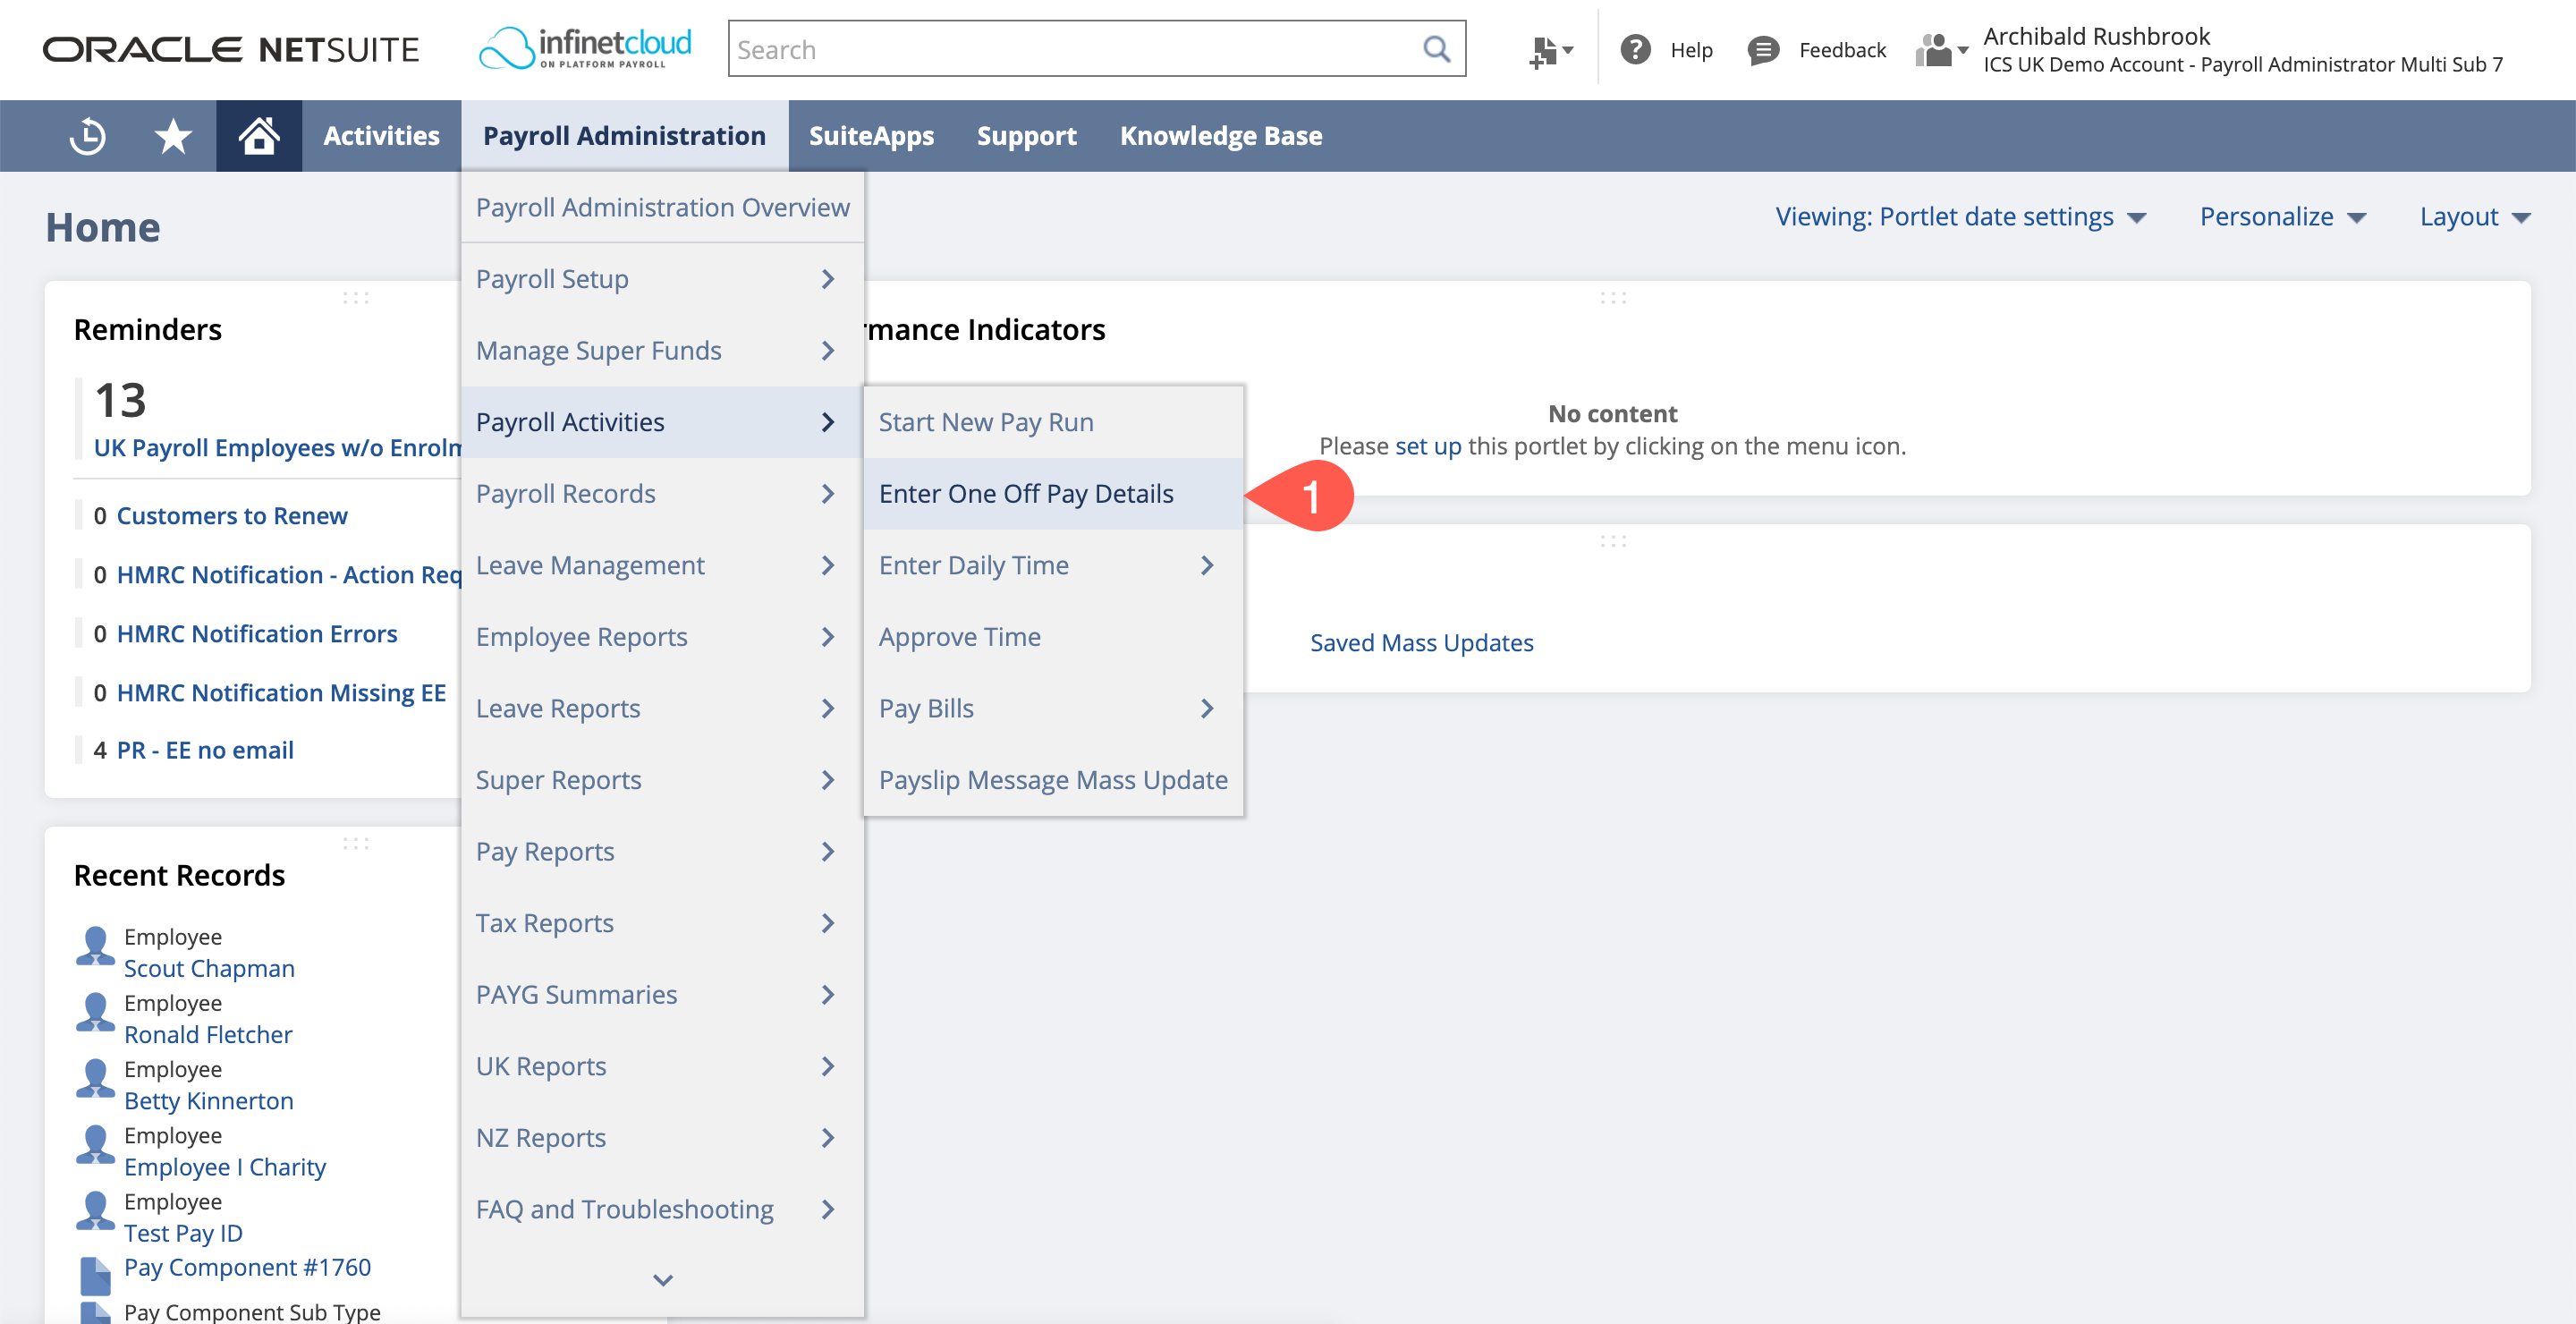
- Navigate to Payroll Administration > Payroll Activities > Enter One Off Pay Details
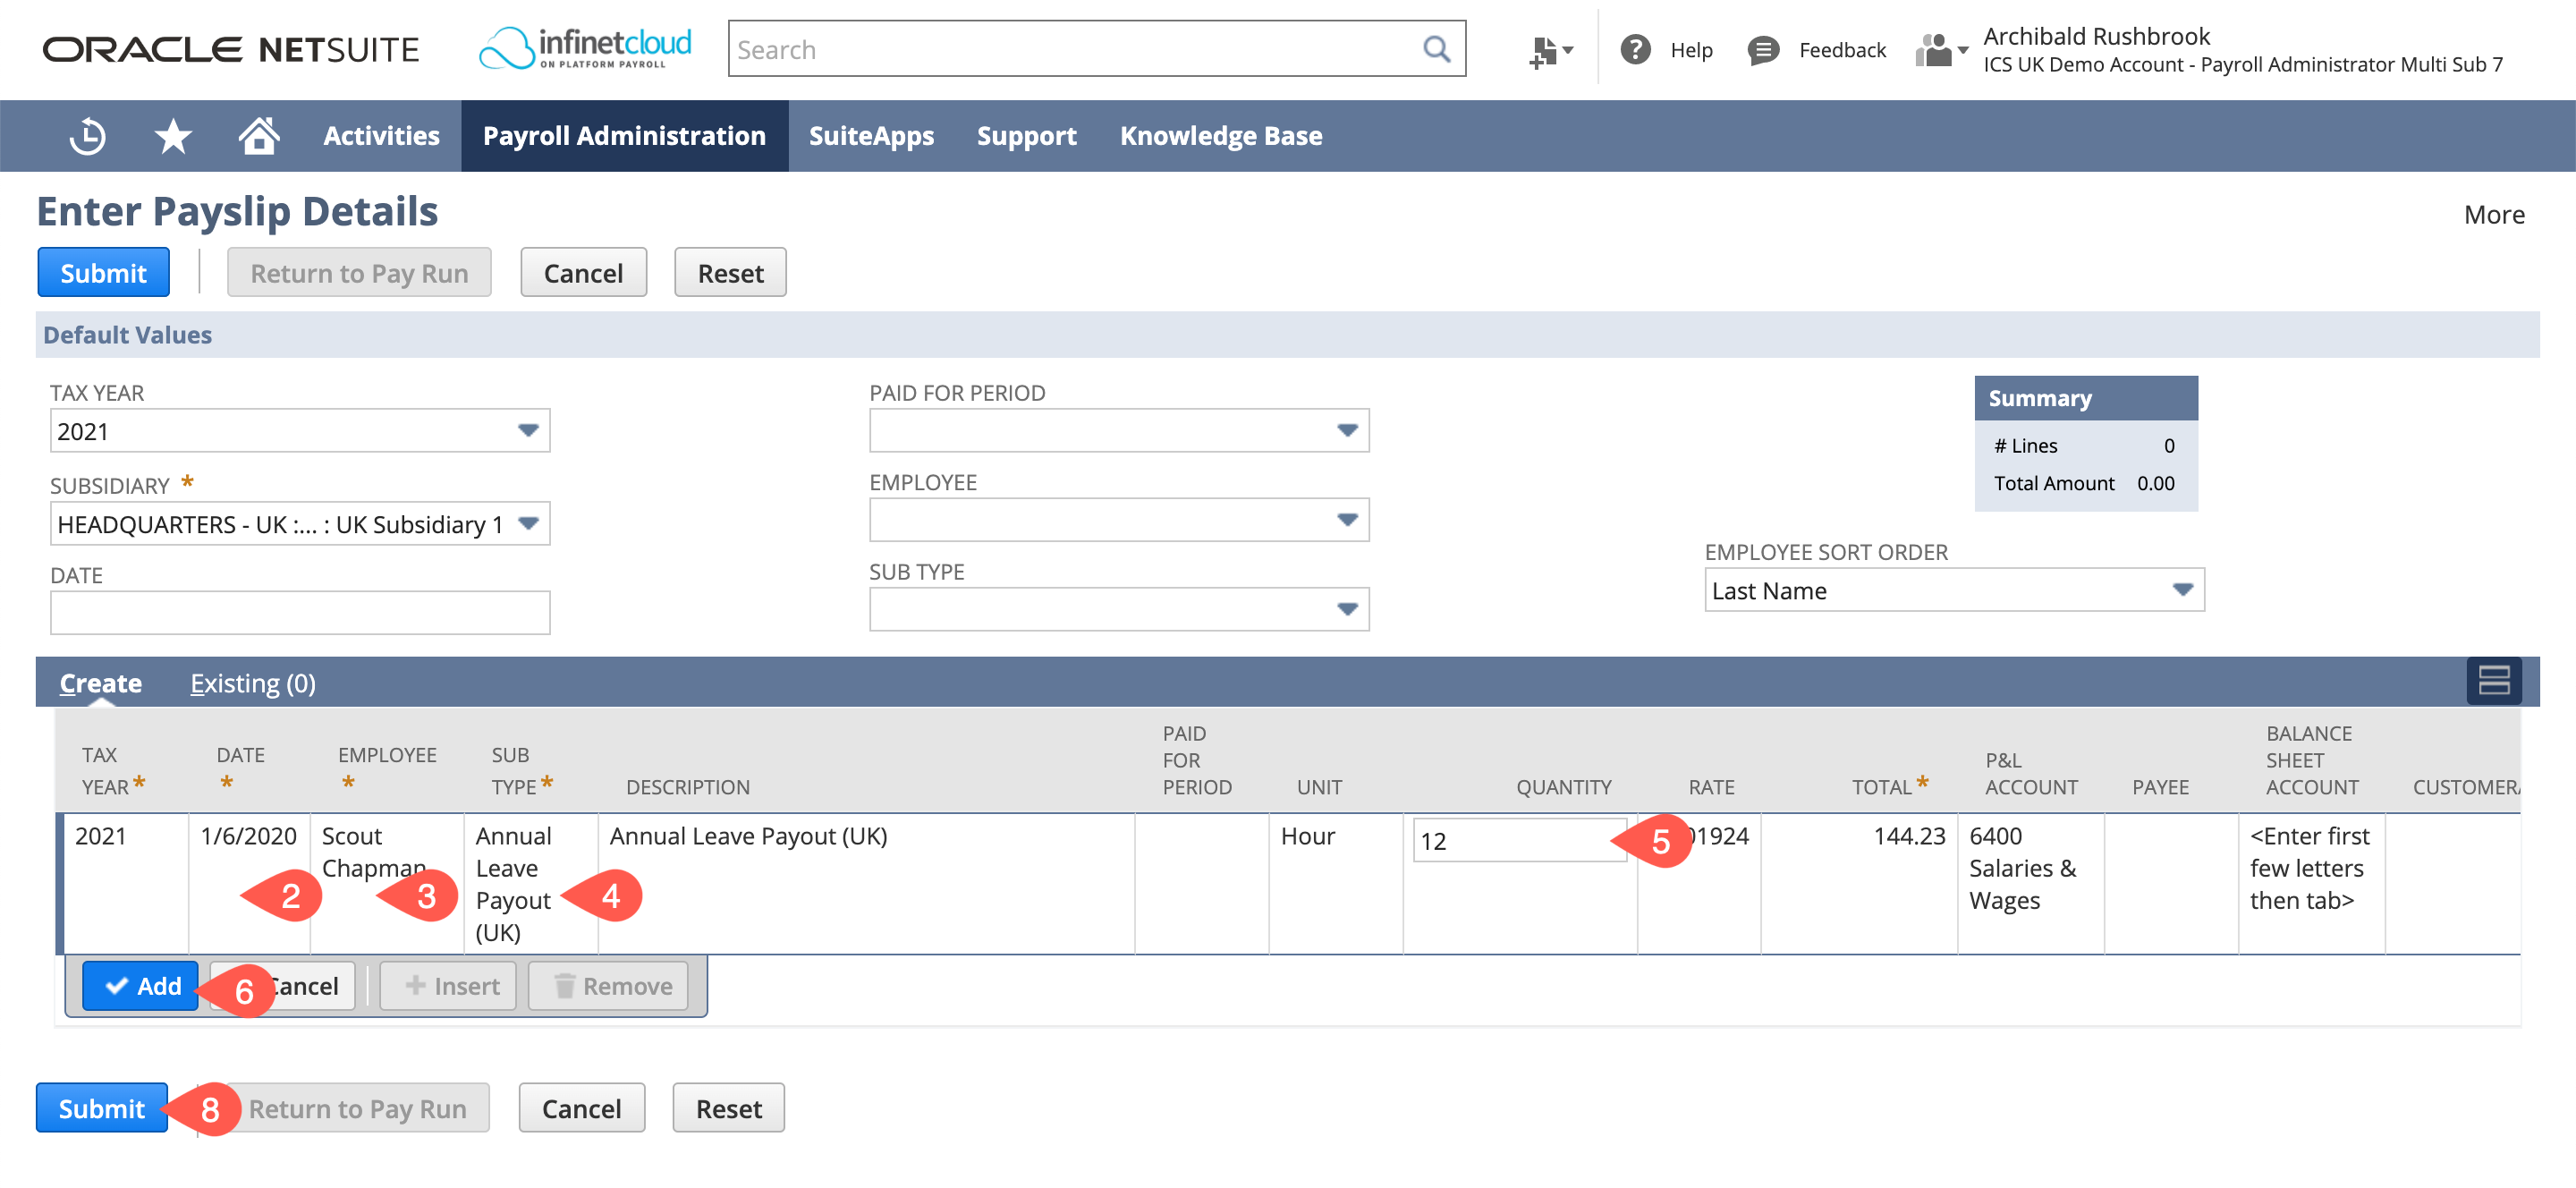
That will bring up the enter one off details page where you have to put in: - A date within the correct period.
- The employee who you are entering the payout for
- Sub Type – “Annual Leave Payout (UK) “
- Quantity – amount of hours you want to pay, you can also deduct annual leave e.g. -8 if employee has overtaken 8 hours annual leave
- Click Add
You may also want to enter further lines at this stage such for payment in lieu of notice or a statutory redundancy payment
- Click Submit
These payslip details will be picked up in the next pay run.
Run the Pay Run as usual - more information on running a payroll on the Pay Run Processing Guide
Check the payslip prior to approval to make sure that the salary/wages pay components have been calculated as expected on a pro rata basis to the leave date and that the annual leave payout and other one off details are present.
Leave Balance Reconciliation
Using "Annual Leave Payout - UK" will also reduce / increase the employees leave balance. If you do not use Infinet Cloud Leave Management this can be disabled.
Reporting
When you’ve run the payroll for the period that the employee leaves you need to make sure you report them as leaving employment on your FPS.
Check this prior to submitting the FPS by sorting the leave date section on the FPS page with dates at the top.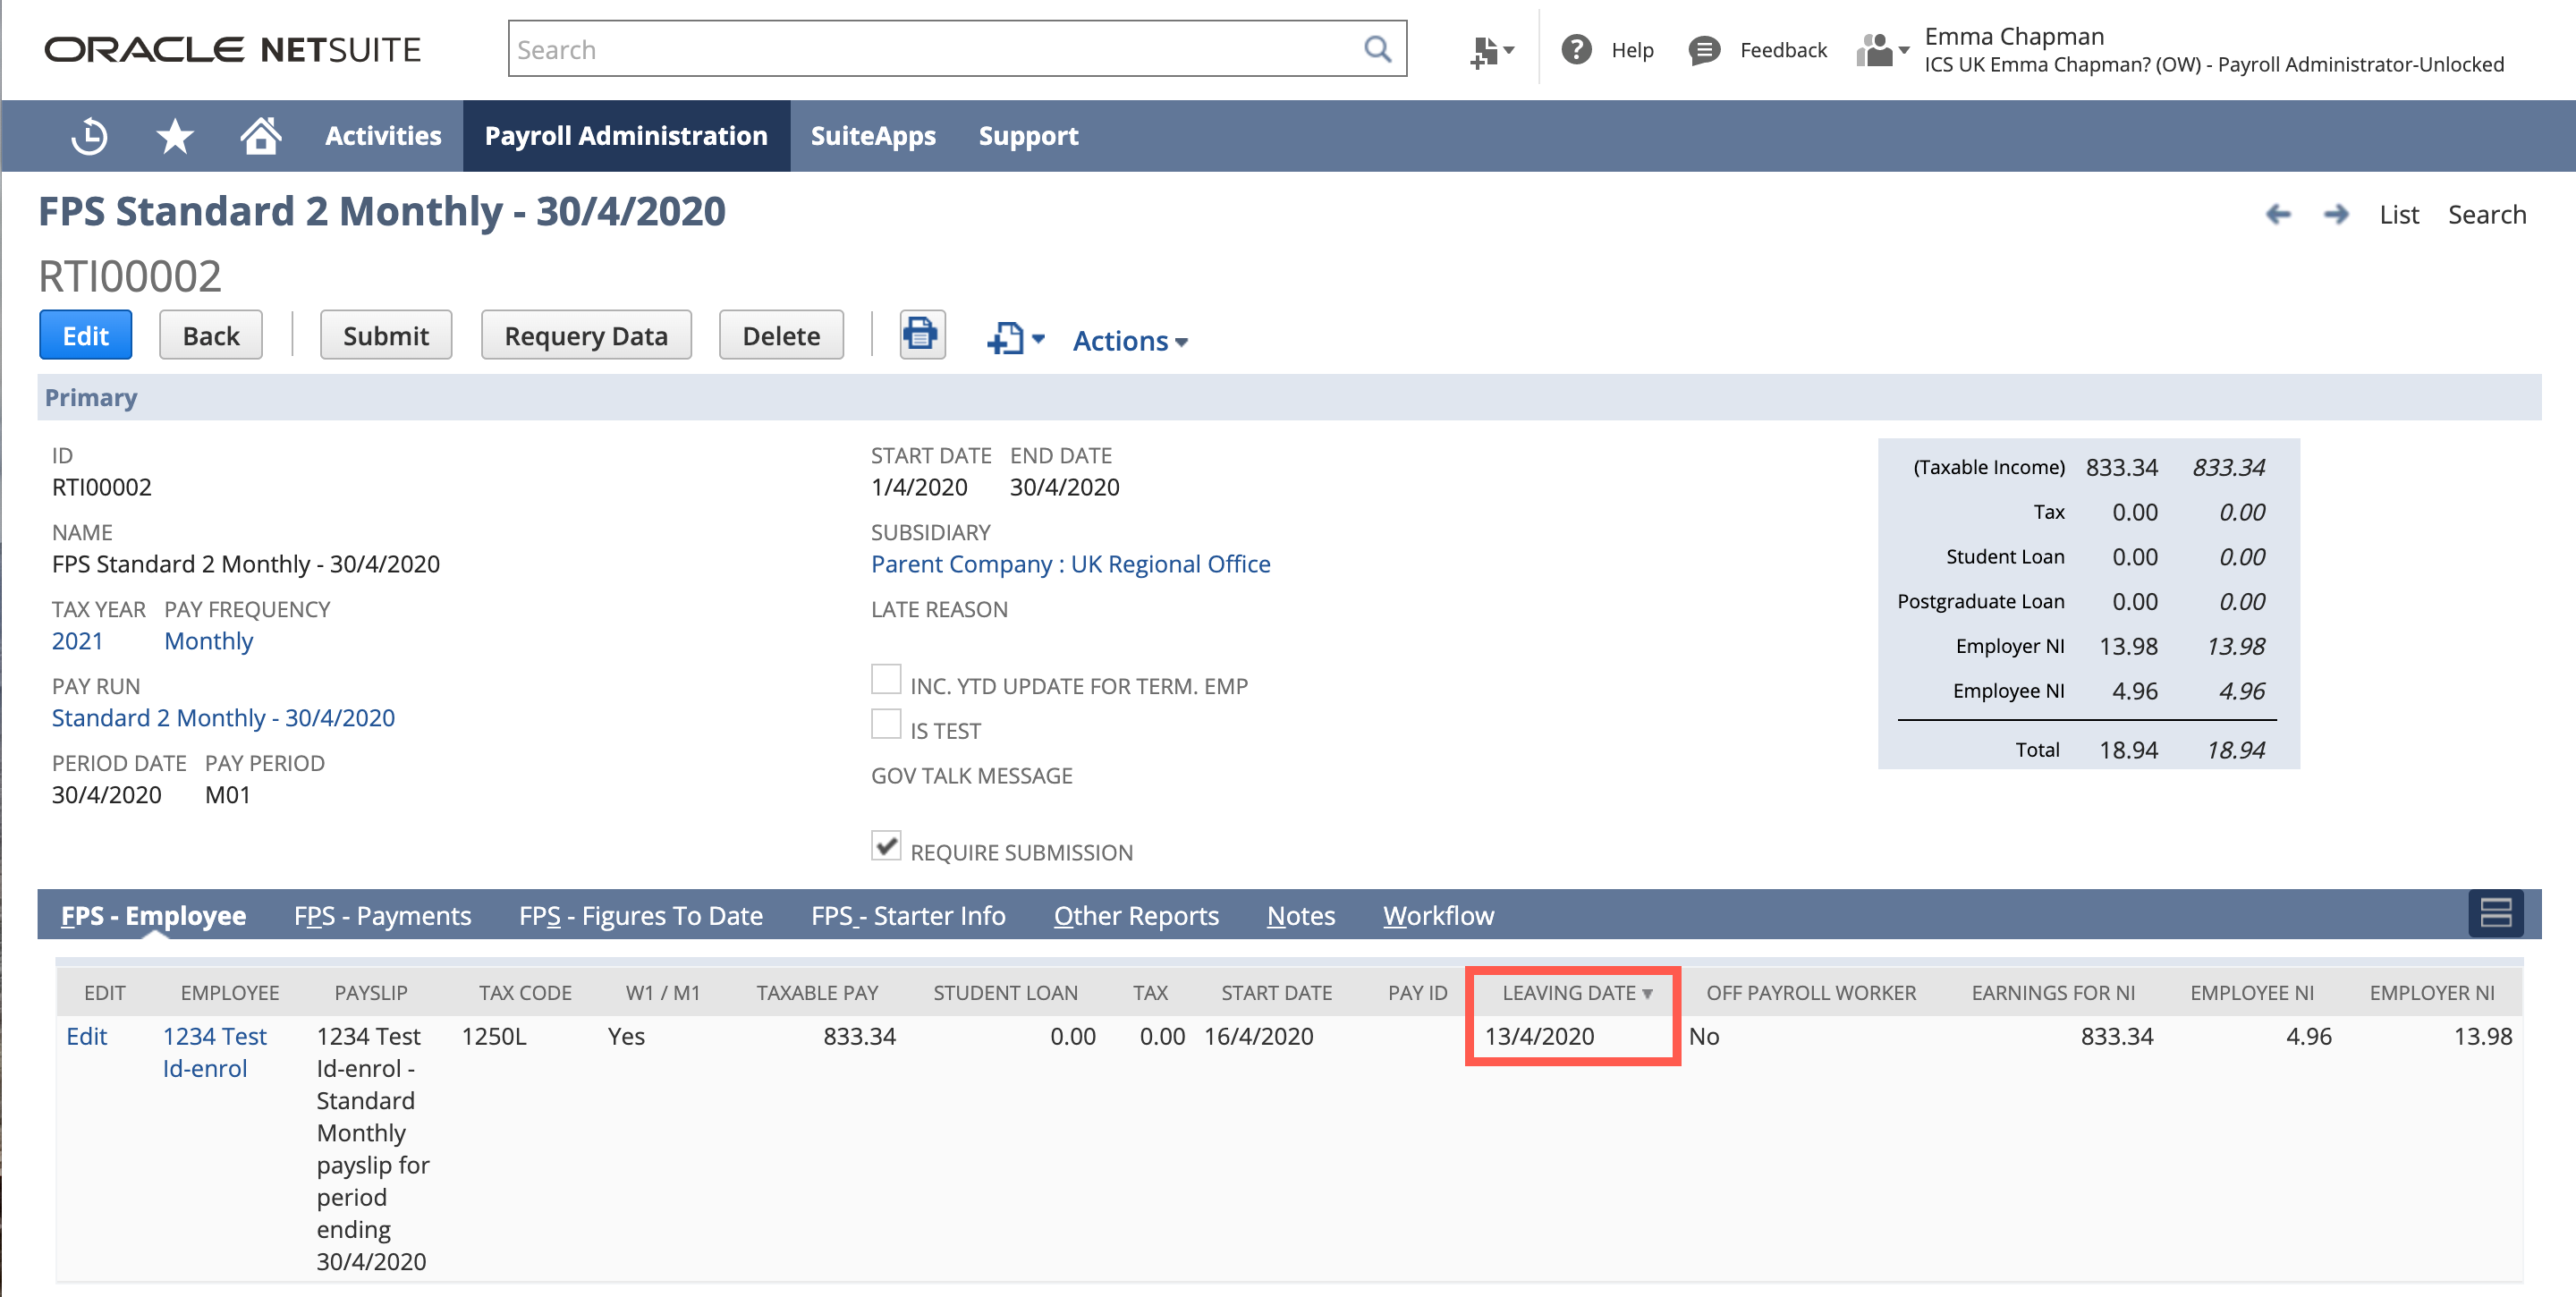
Generating a P45
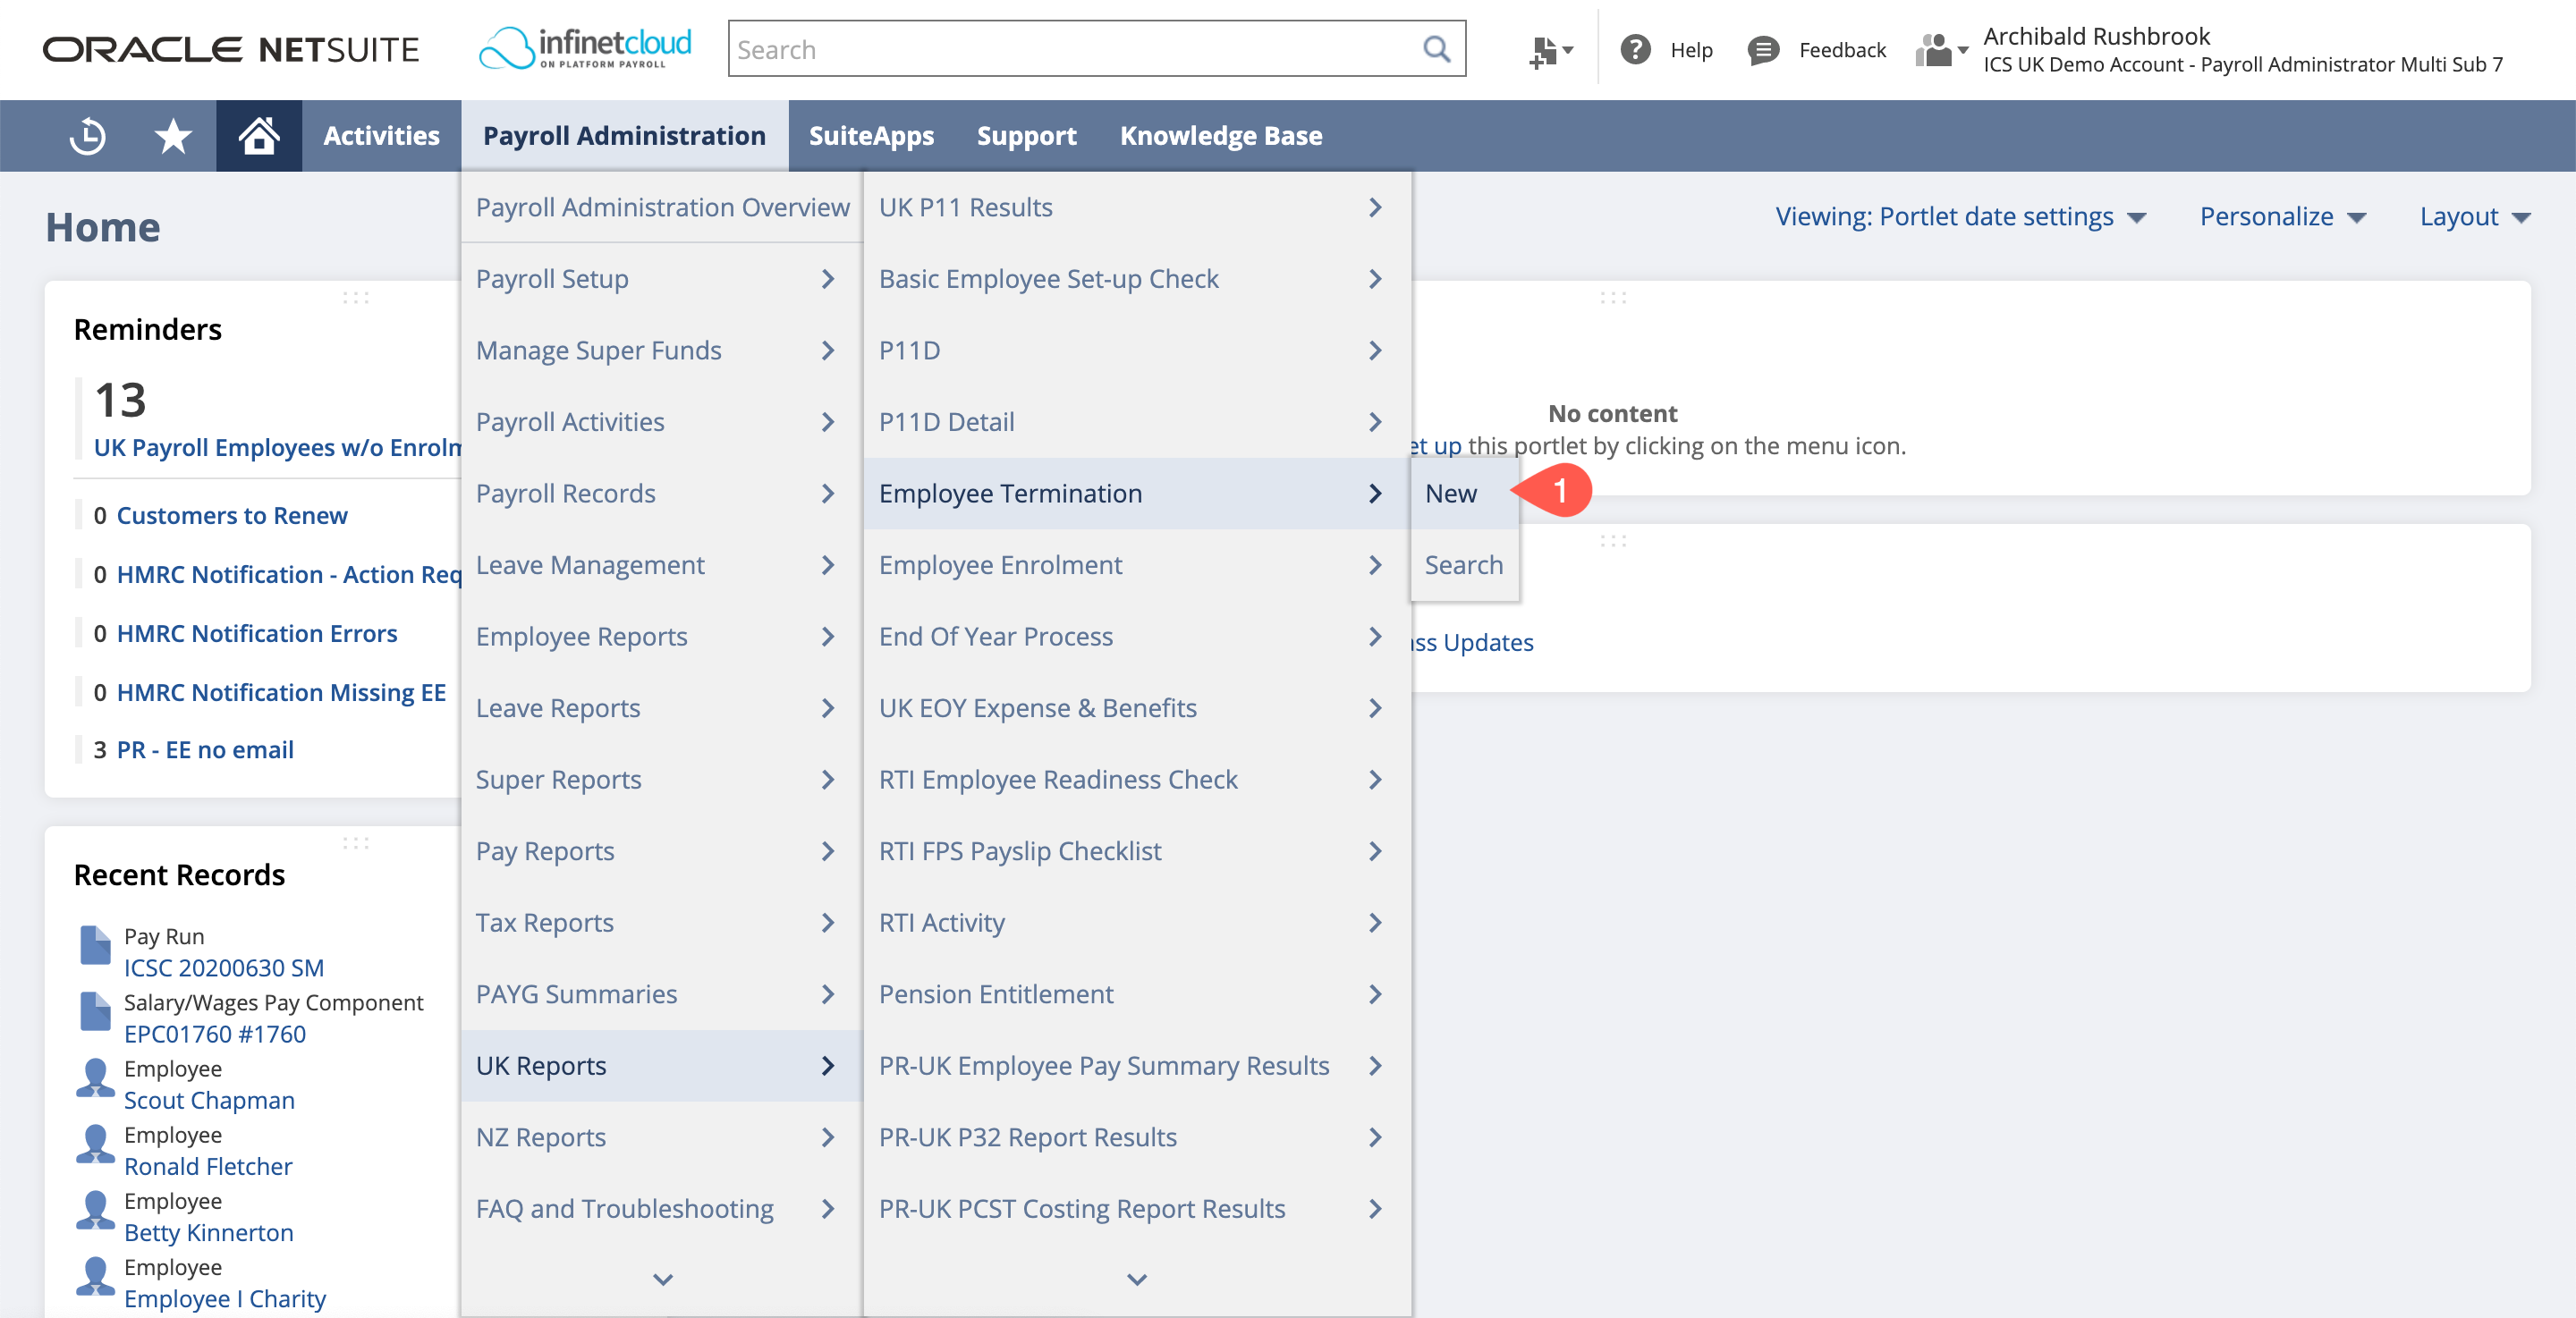
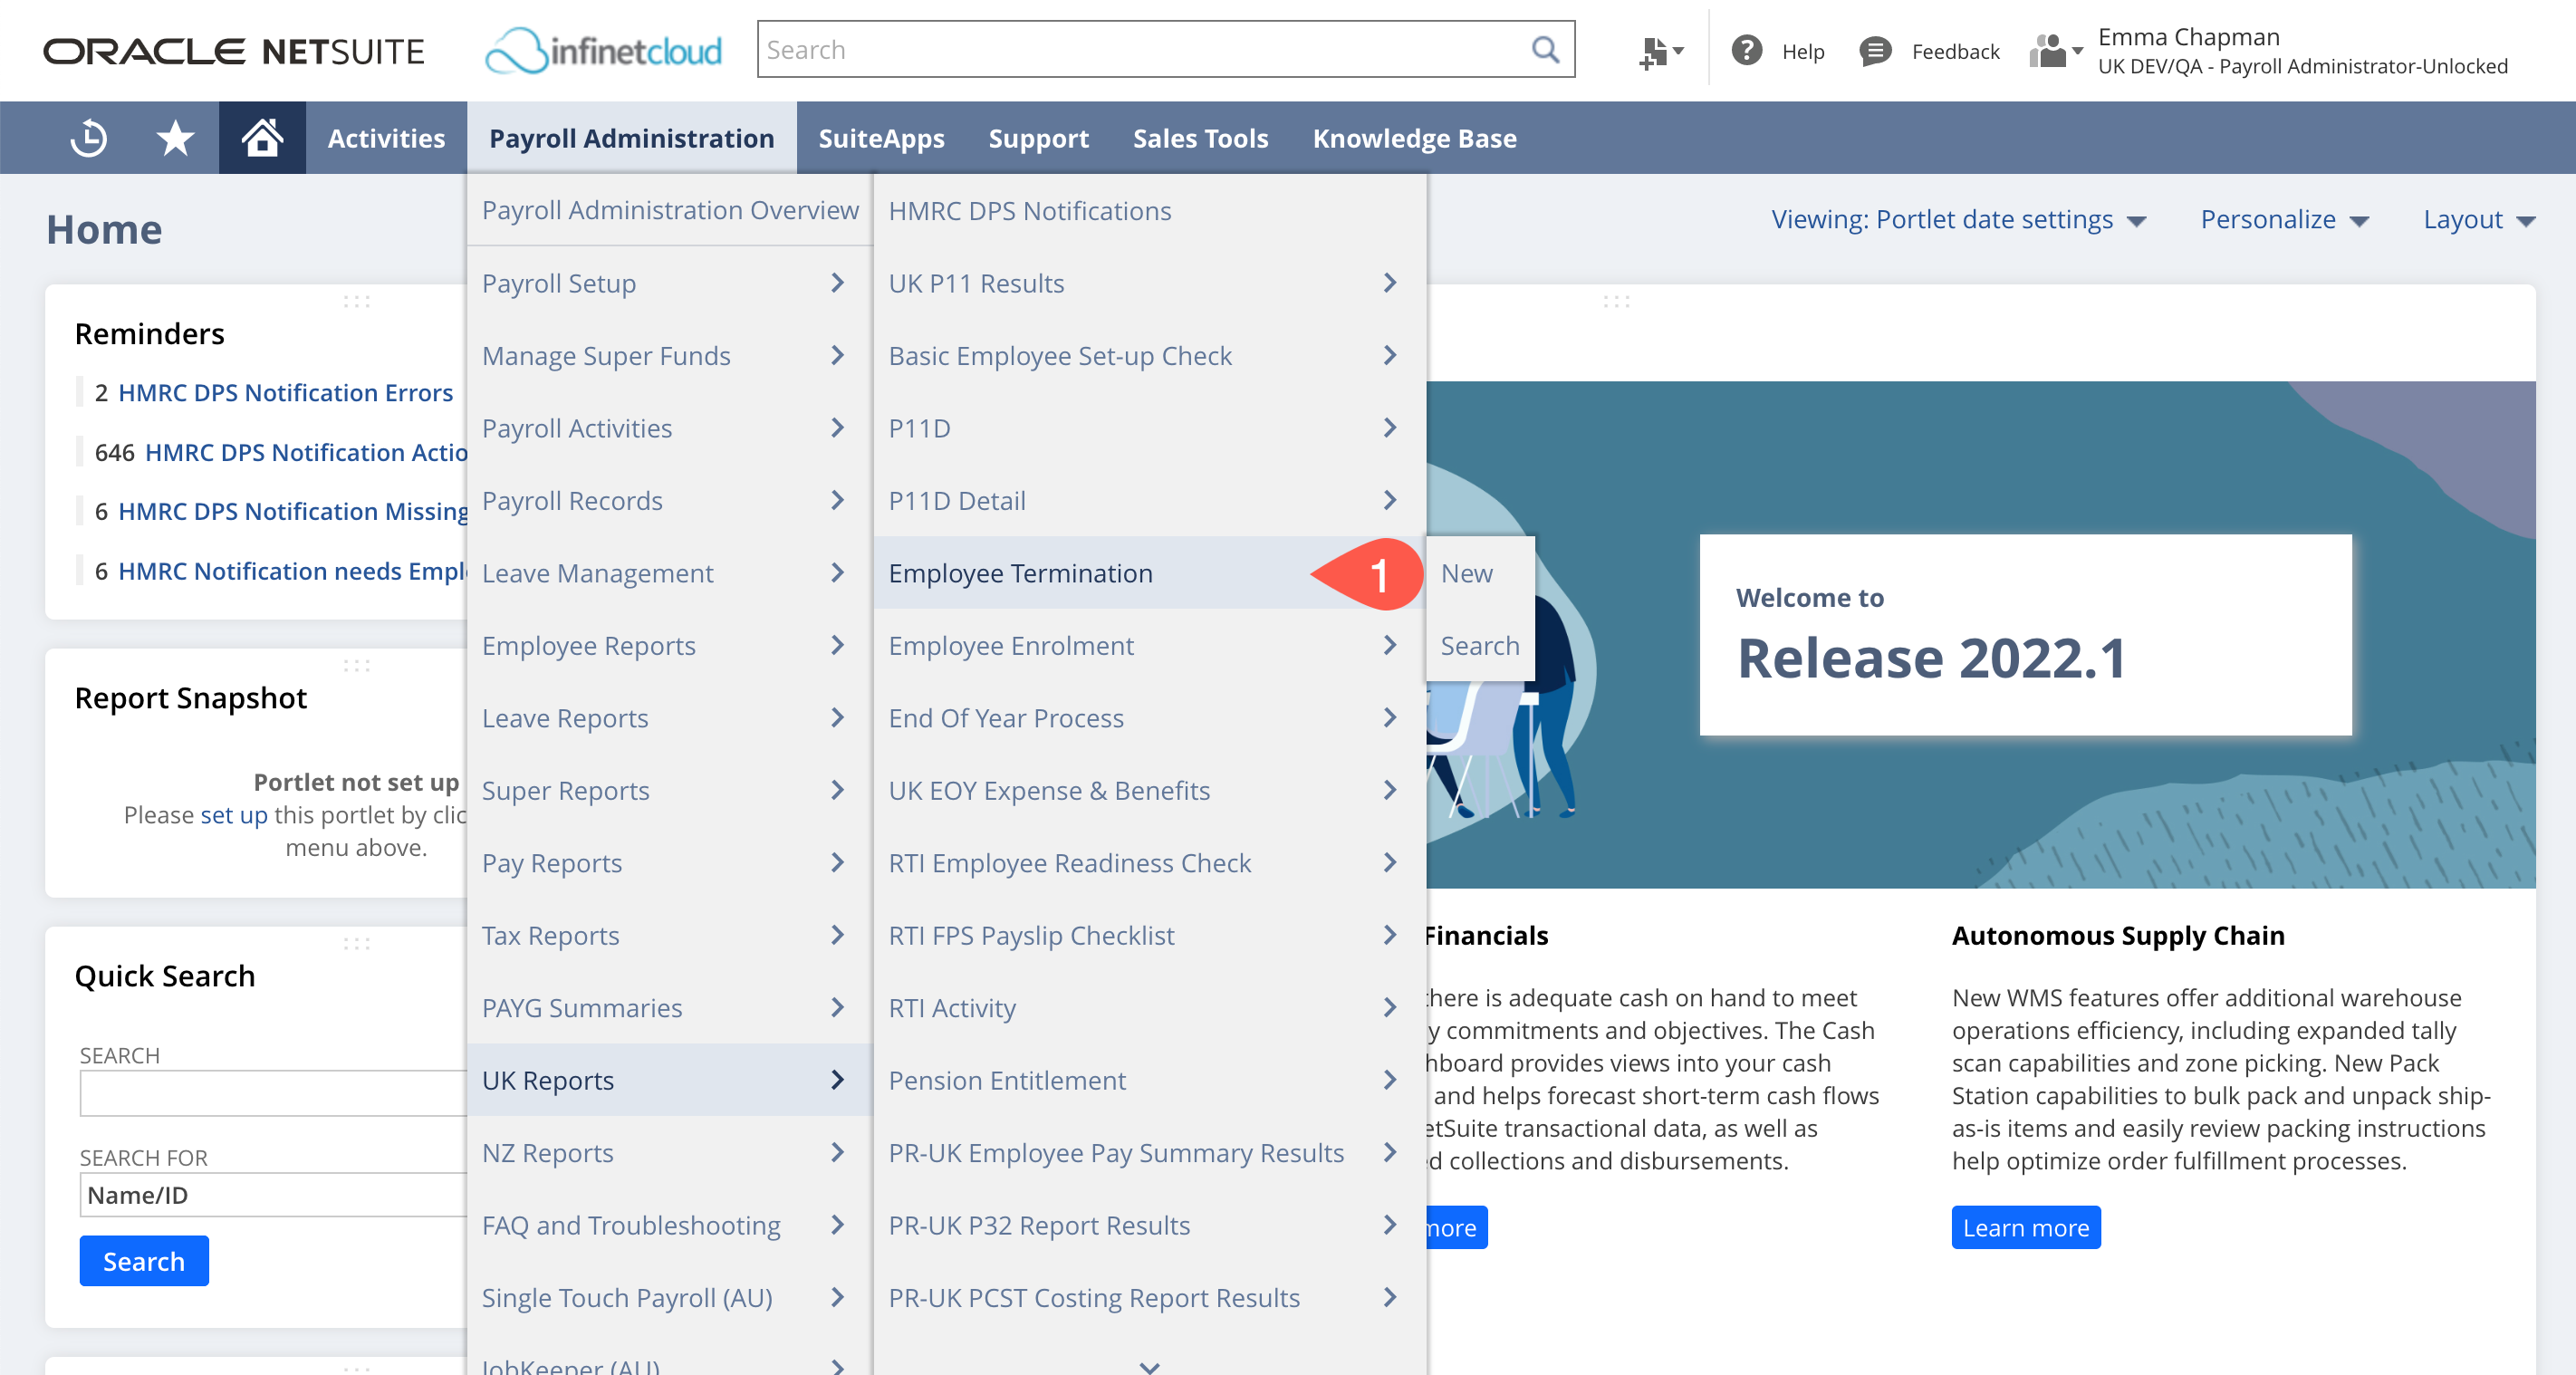
- Navigate to Payroll Administration > UK Reports > Employee Termination > New
- Enter the employee name you are creating the P45 for
By selecting the employee the key data on this page will autofill - If you hold a cumulative tax code for the employee please ensure that Week Number or Month Number fields have a value – if missing please update with the employees last payment week or month
Ensure that the company address has pulled through, enter this if not
The address can be entered in the Payroll Configuration record to be auto-completed in future follow this guide to Add Address to Payroll Configuration
- Ensure that all other information is correct and select Save
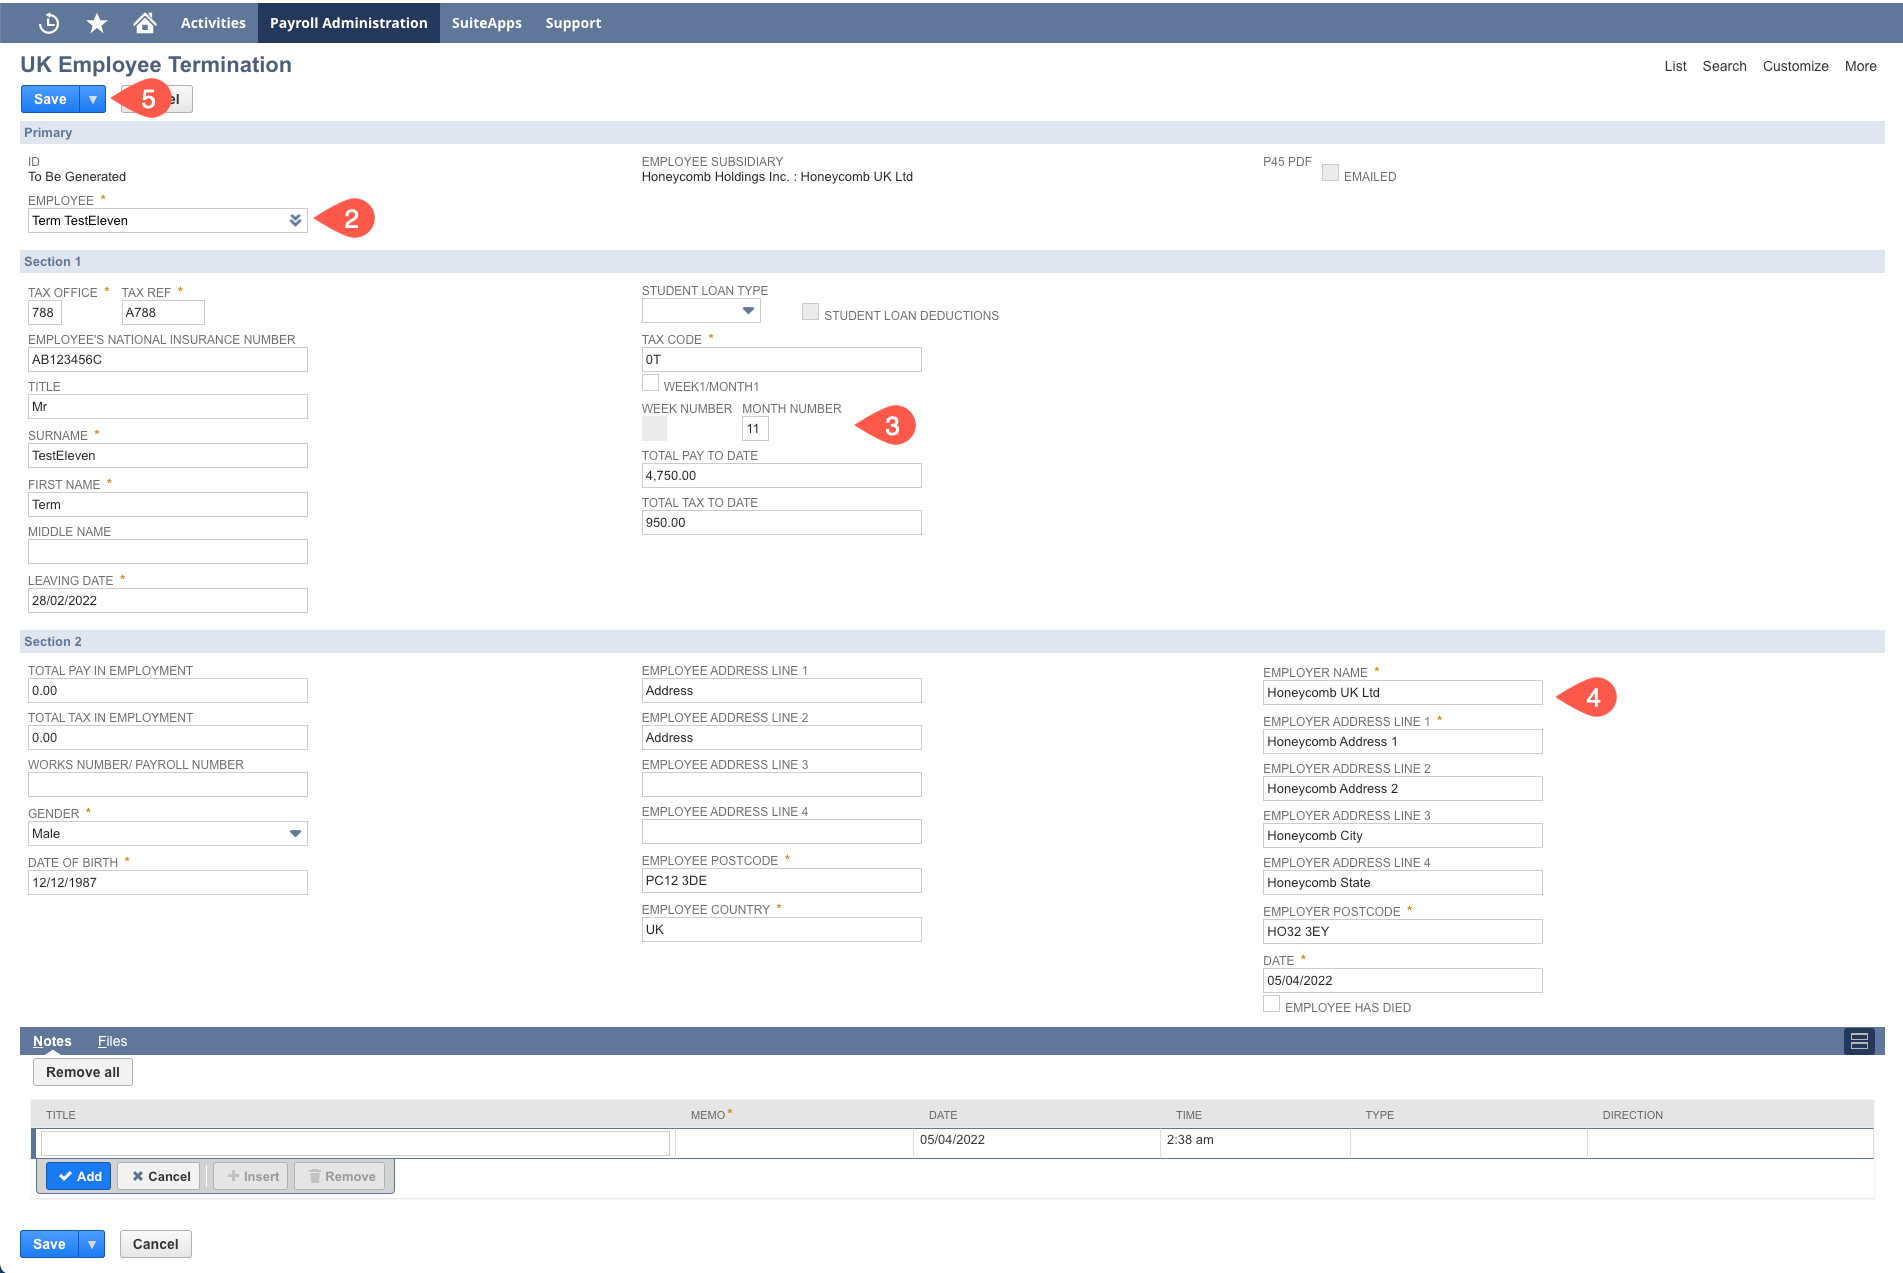
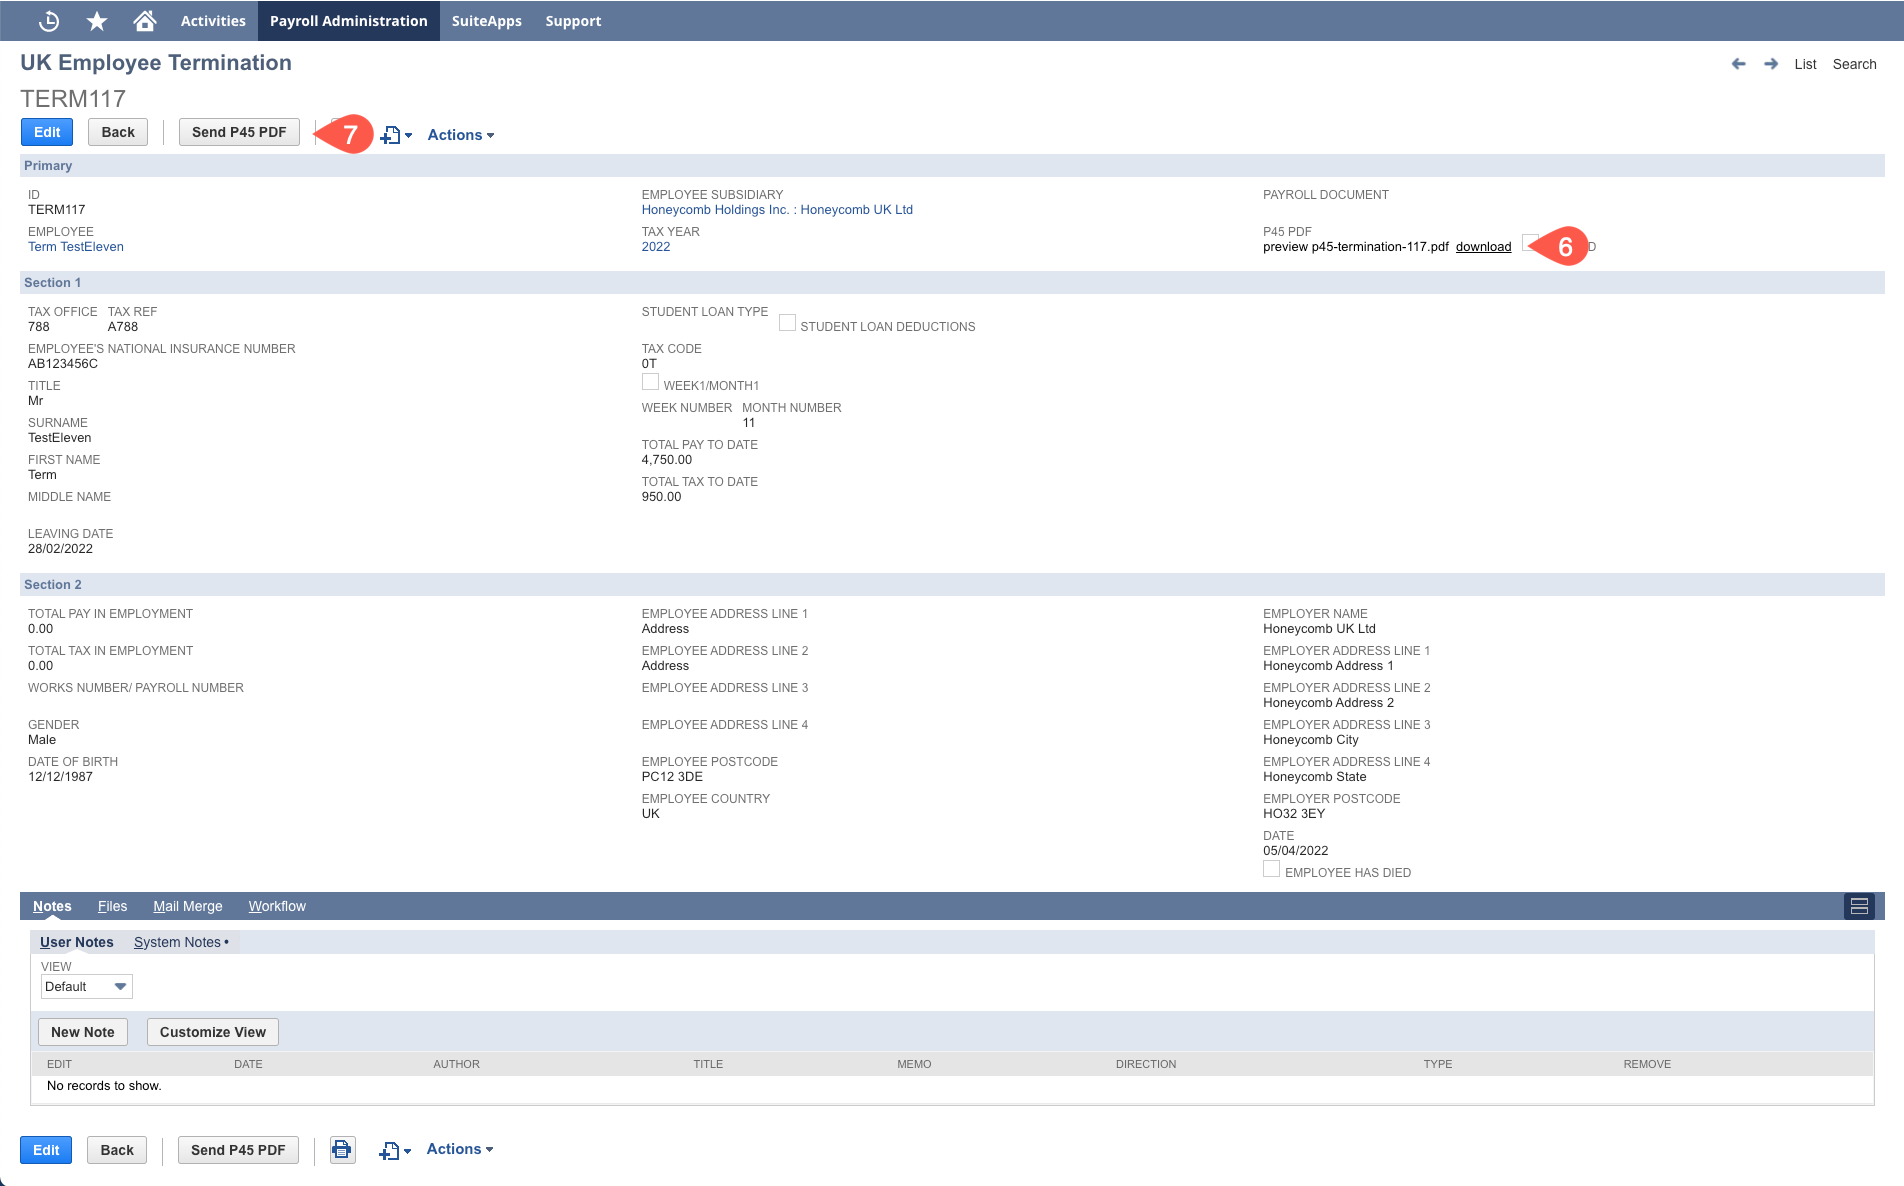
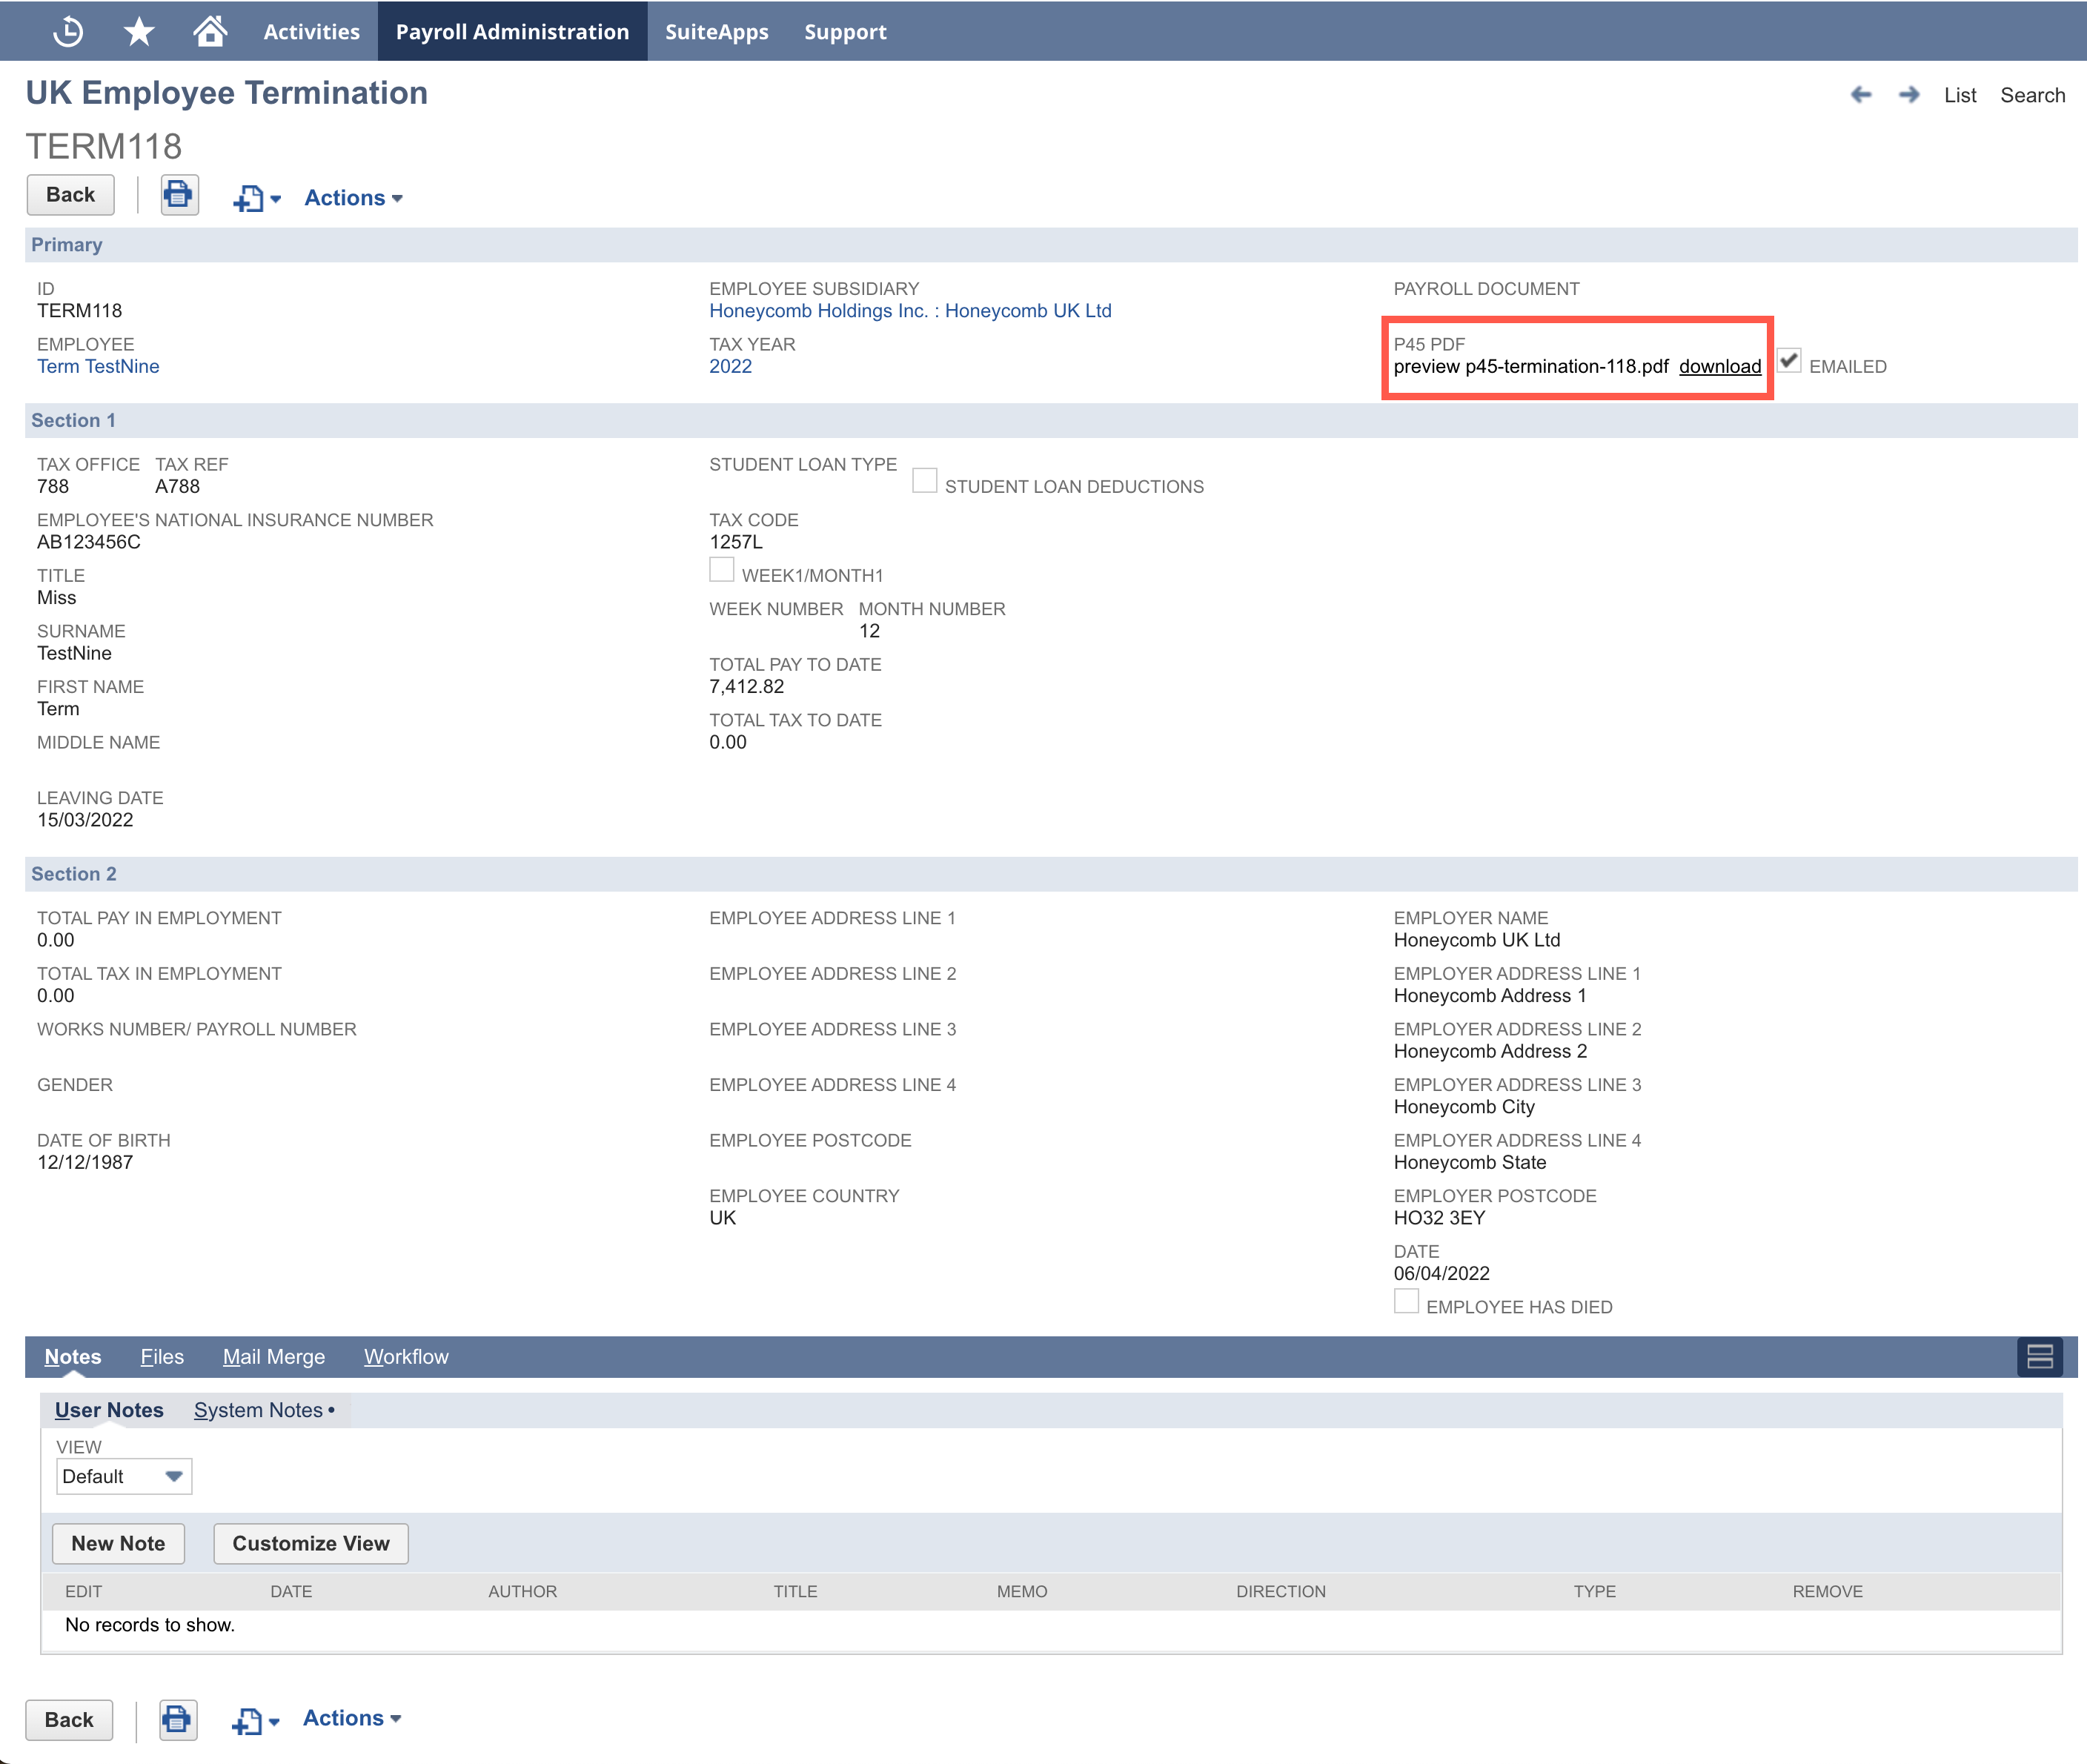
- By clicking "Save" this will have generated the P45 PDF. You can still edit the Termination Record at this point to make any changes if required, each time you save the record a new P45 PDF will be generated to reflect the updated information.
- Once you have saved the Termination Record and the P45 PDF is generated you will see the "Send P45 PDF" button - click this to email the P45 PDF to the employee.
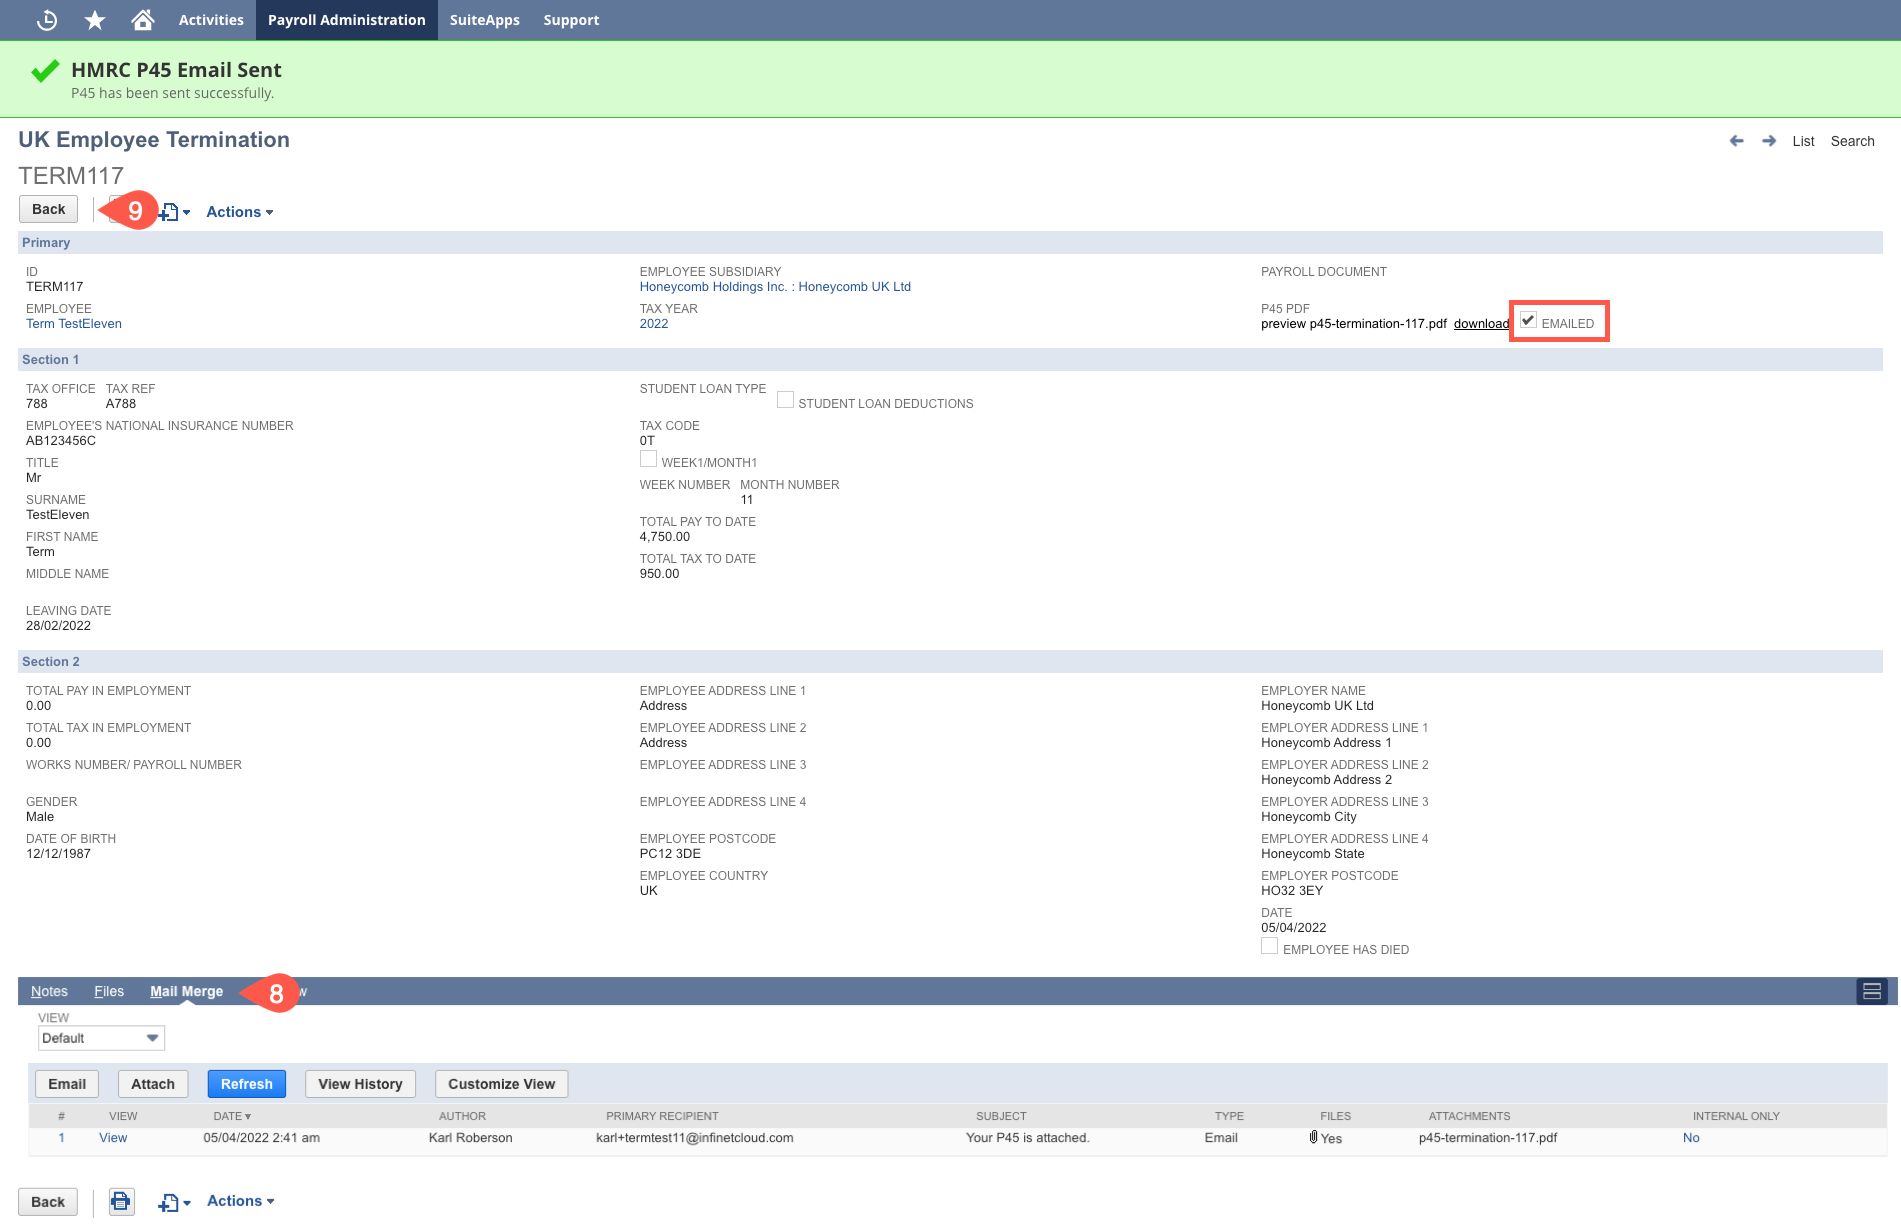
- Once you have done this you will see a successful email message, the "Emailed" checkbox is ticked and the email sent is stored in the Mail Merge Tab
- You will now no longer be able to edit the Termination Record or update the P45 PDF, you will only be able to email the P45 this way once as the button will not be available again, if you need to send a second copy you will need to download and email this separately.
After their final Pay Run and prior to initiating the next Pay Run you will need to follow the Excluding an Employee from Payroll guide to make sure they are not included.
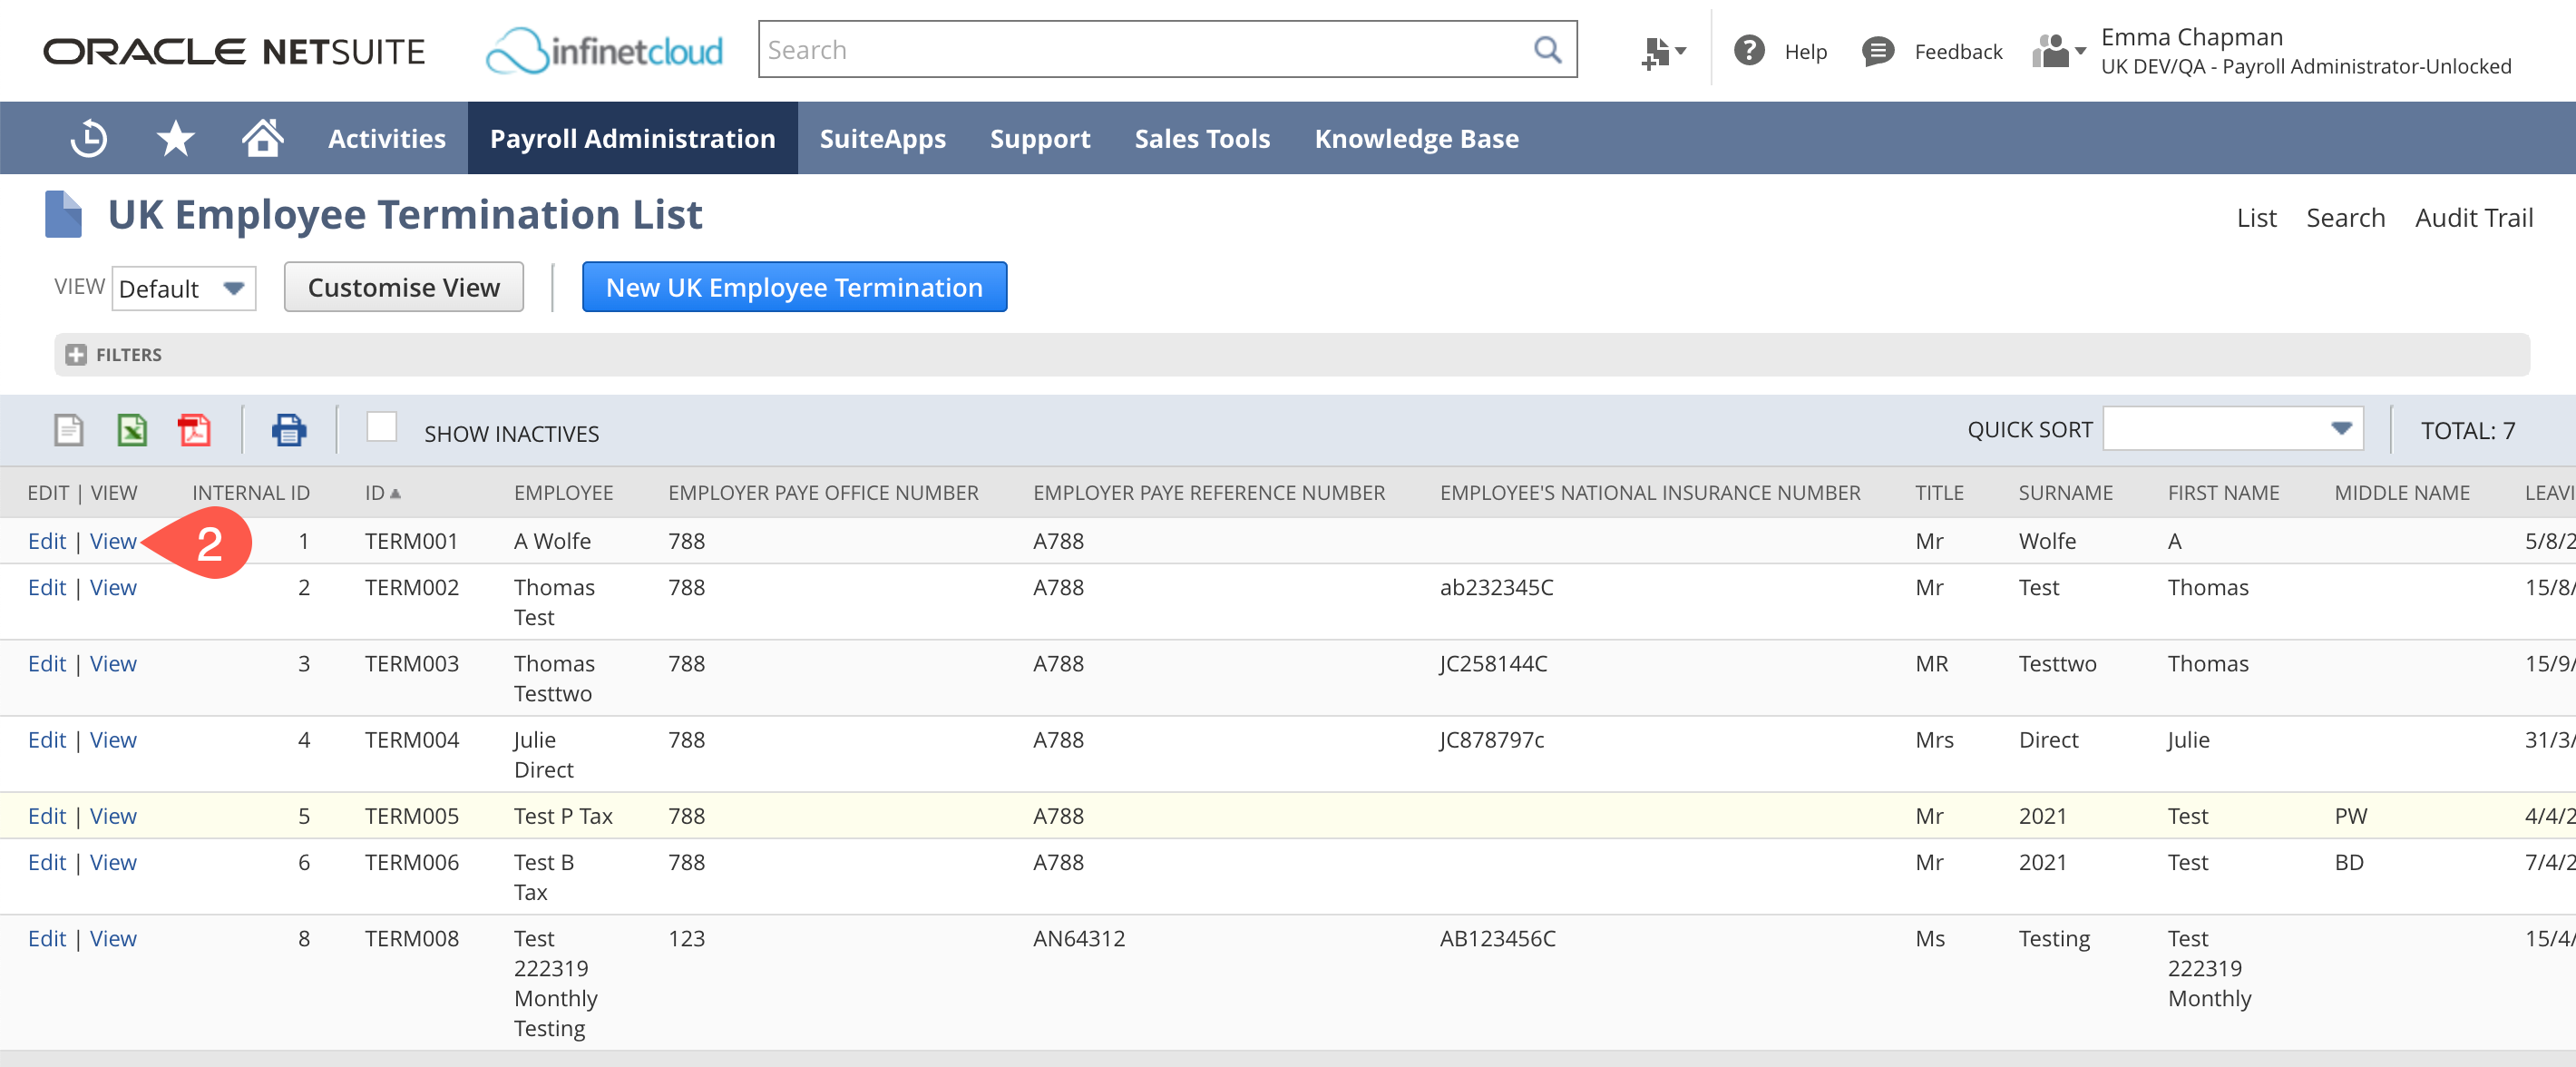
To review existing Termination Records:
- Navigate to Payroll Administration > UK Reports > Employee Termination
- You can then see the list of existing Termination Records. Click "View" next to the one you want to review to open this.
Batch Terminations
If you have multiple terminations to process within one pay run you can use the Batch Terminations process.
An employee will be included in the Batch Termination process during a pay run if:
Termination/Release Date on the Employee Record is on or before the period end date
AND
Termination Field on Employee Record is empty
AND
Termination Record does not already exist against that employee
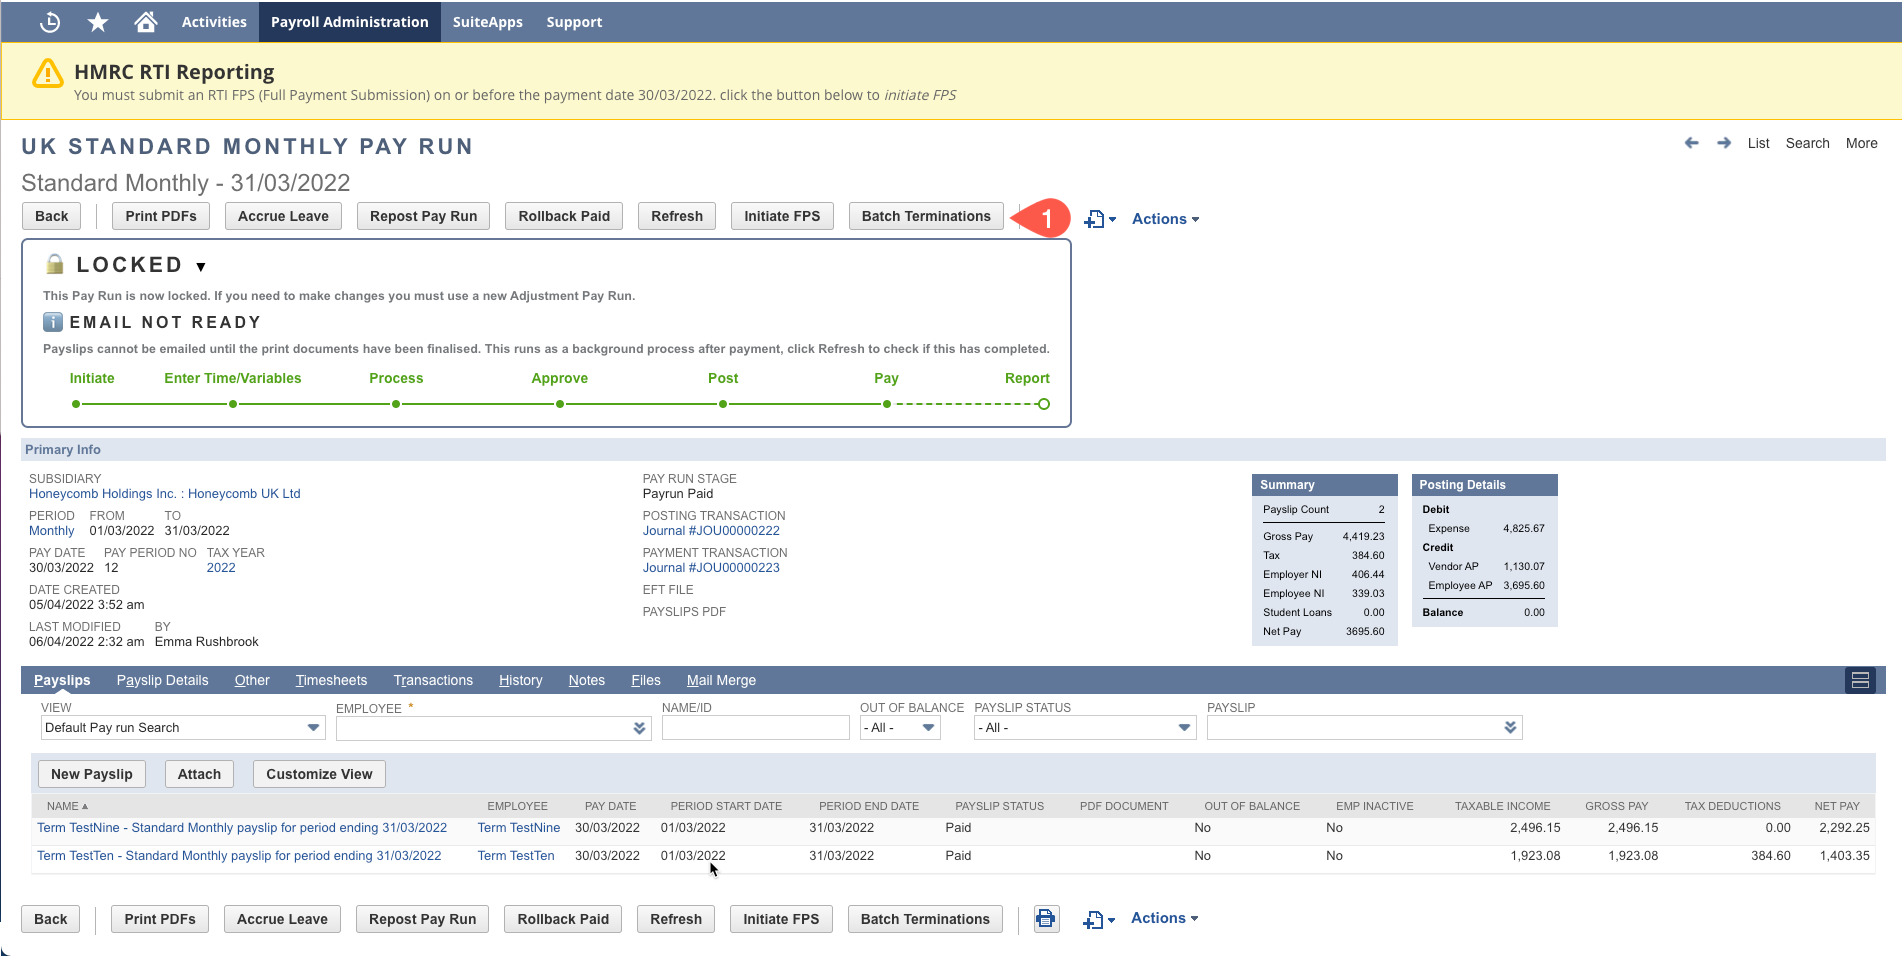
Batch terminations are now available as part of the pay run process. Using this function you can create and email multiple P45s in one step from the pay run.
Review the Terminating an Employee - UK knowledge base article and follow the instructions on how to terminate an employee.
Once the pay run is at the stage “Payrun Paid” the “Batch Termination” button will become available.
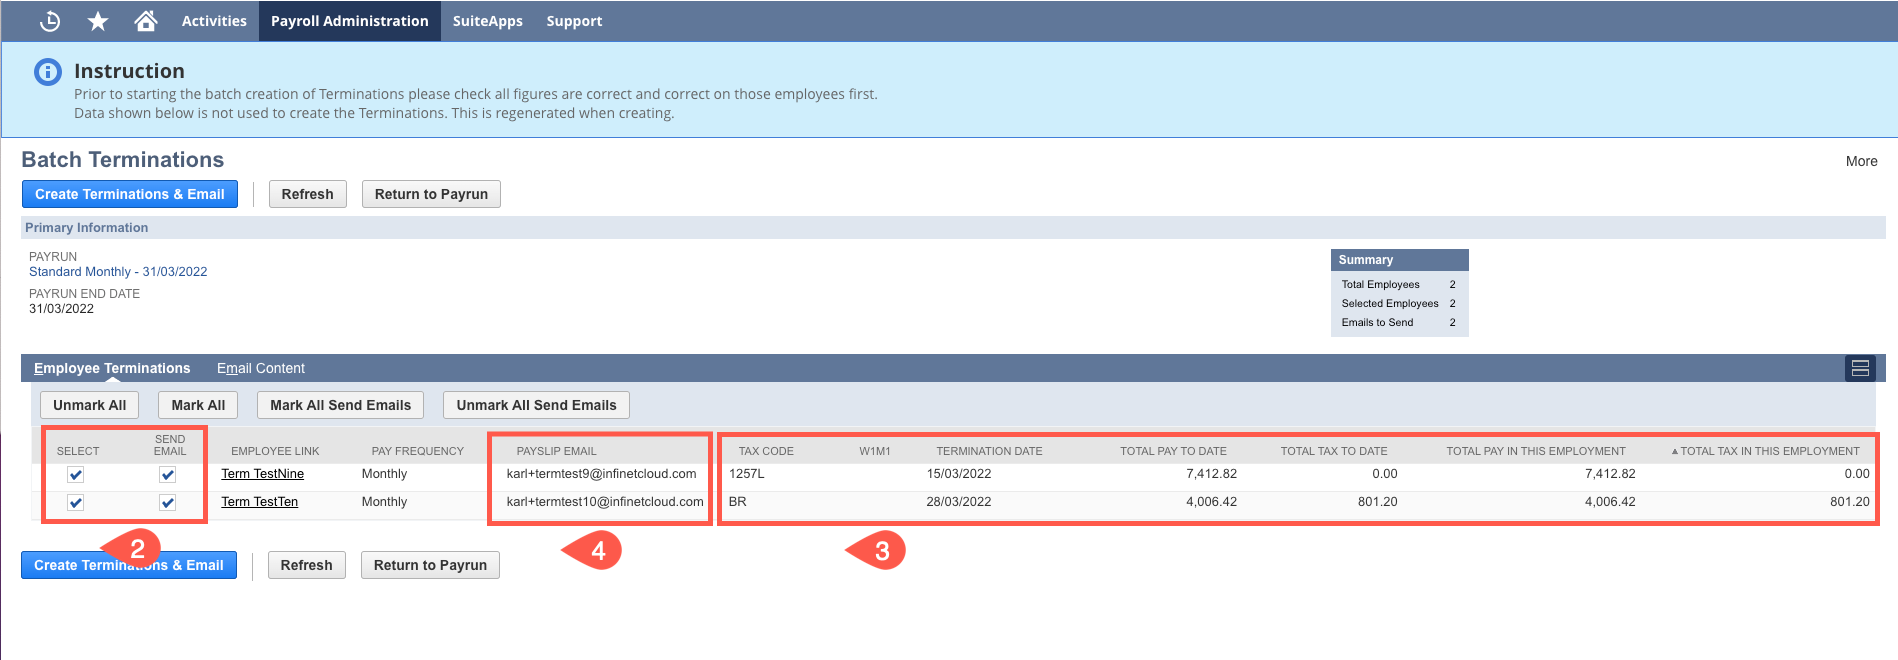
Once clicked this will open the Batch Terminations page. Review the employees that are being included in the Batch Termination process - ensure that only those who you intend to terminate are included. If there is an employee who should not be you can unselect them, or if there is an employee who you want to delay emailing their P45 PDF you can unselect that their P45 be emailed.
Check that the information is correct - Tax Code and Termination Date etc.
Check that the email address the P45 PDF will be sent to is correct, if it is not you will need to amend this on the Employee Record > Payroll Tab under the “Email For Payslips” field and refresh the page.
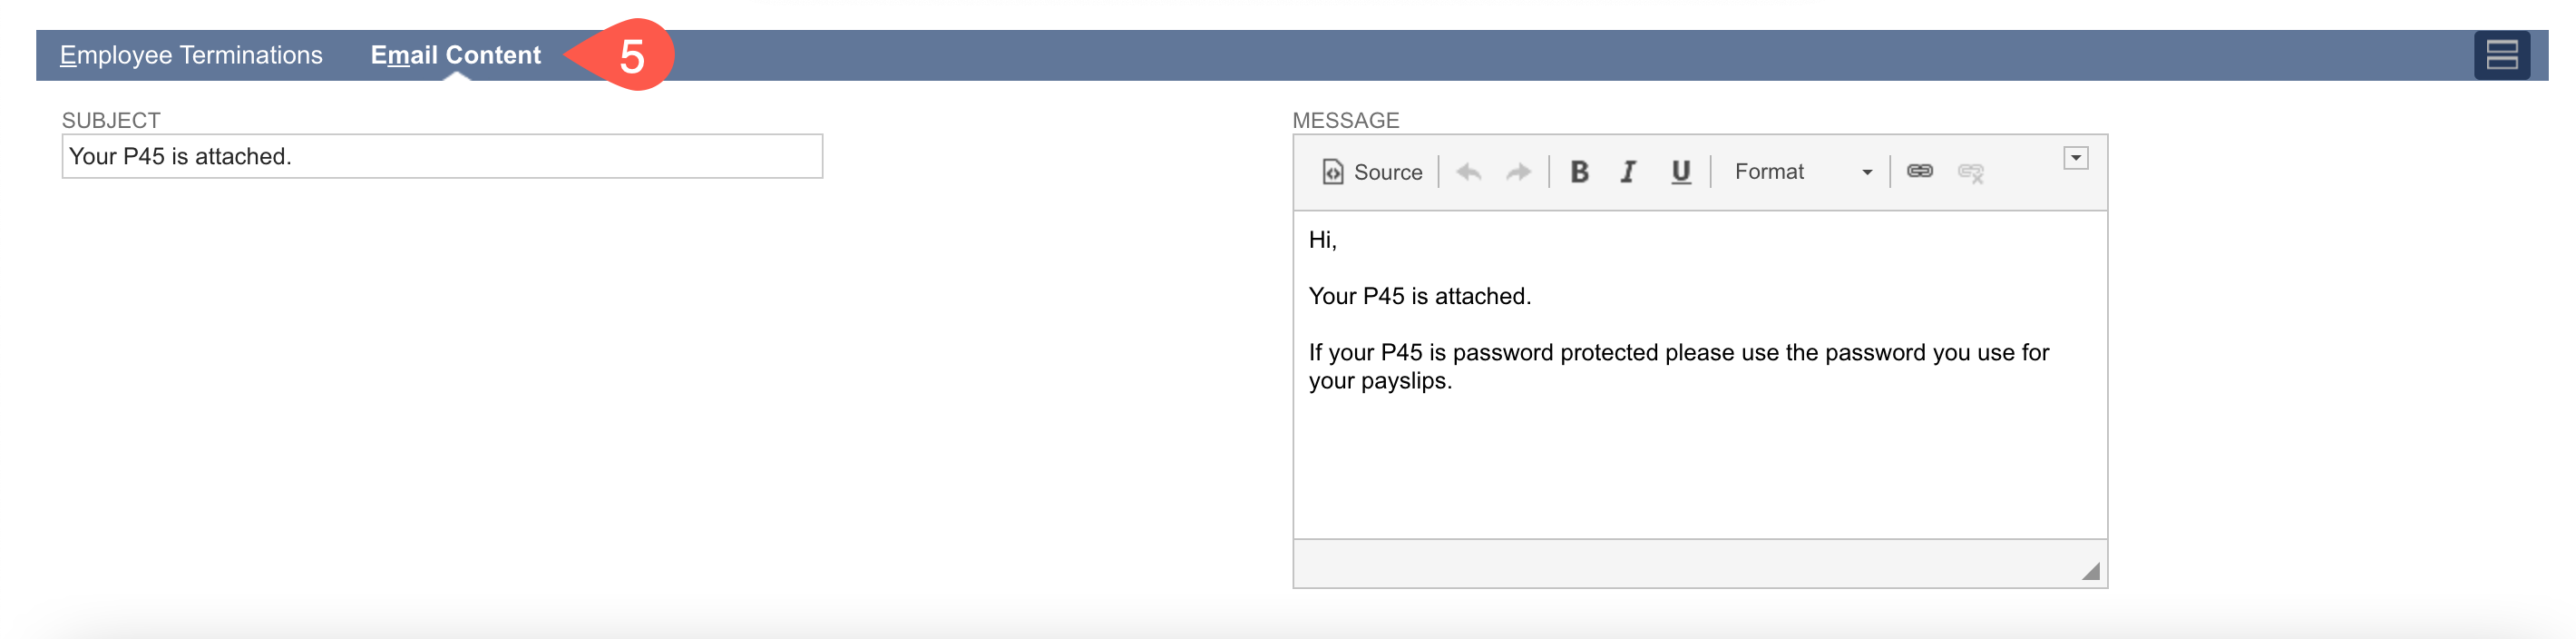
You can review and amend the email that will be sent on the Email Content Tab.
Once confirmed that all the information is correct and only the required employees are included you can click “Create Termination & Email” - this will create the Termination Record, the P45 PDF and will email these out to the employees. If this is for two or less employees this will be an inline process - once complete you will be taken back to the Pay Run page.

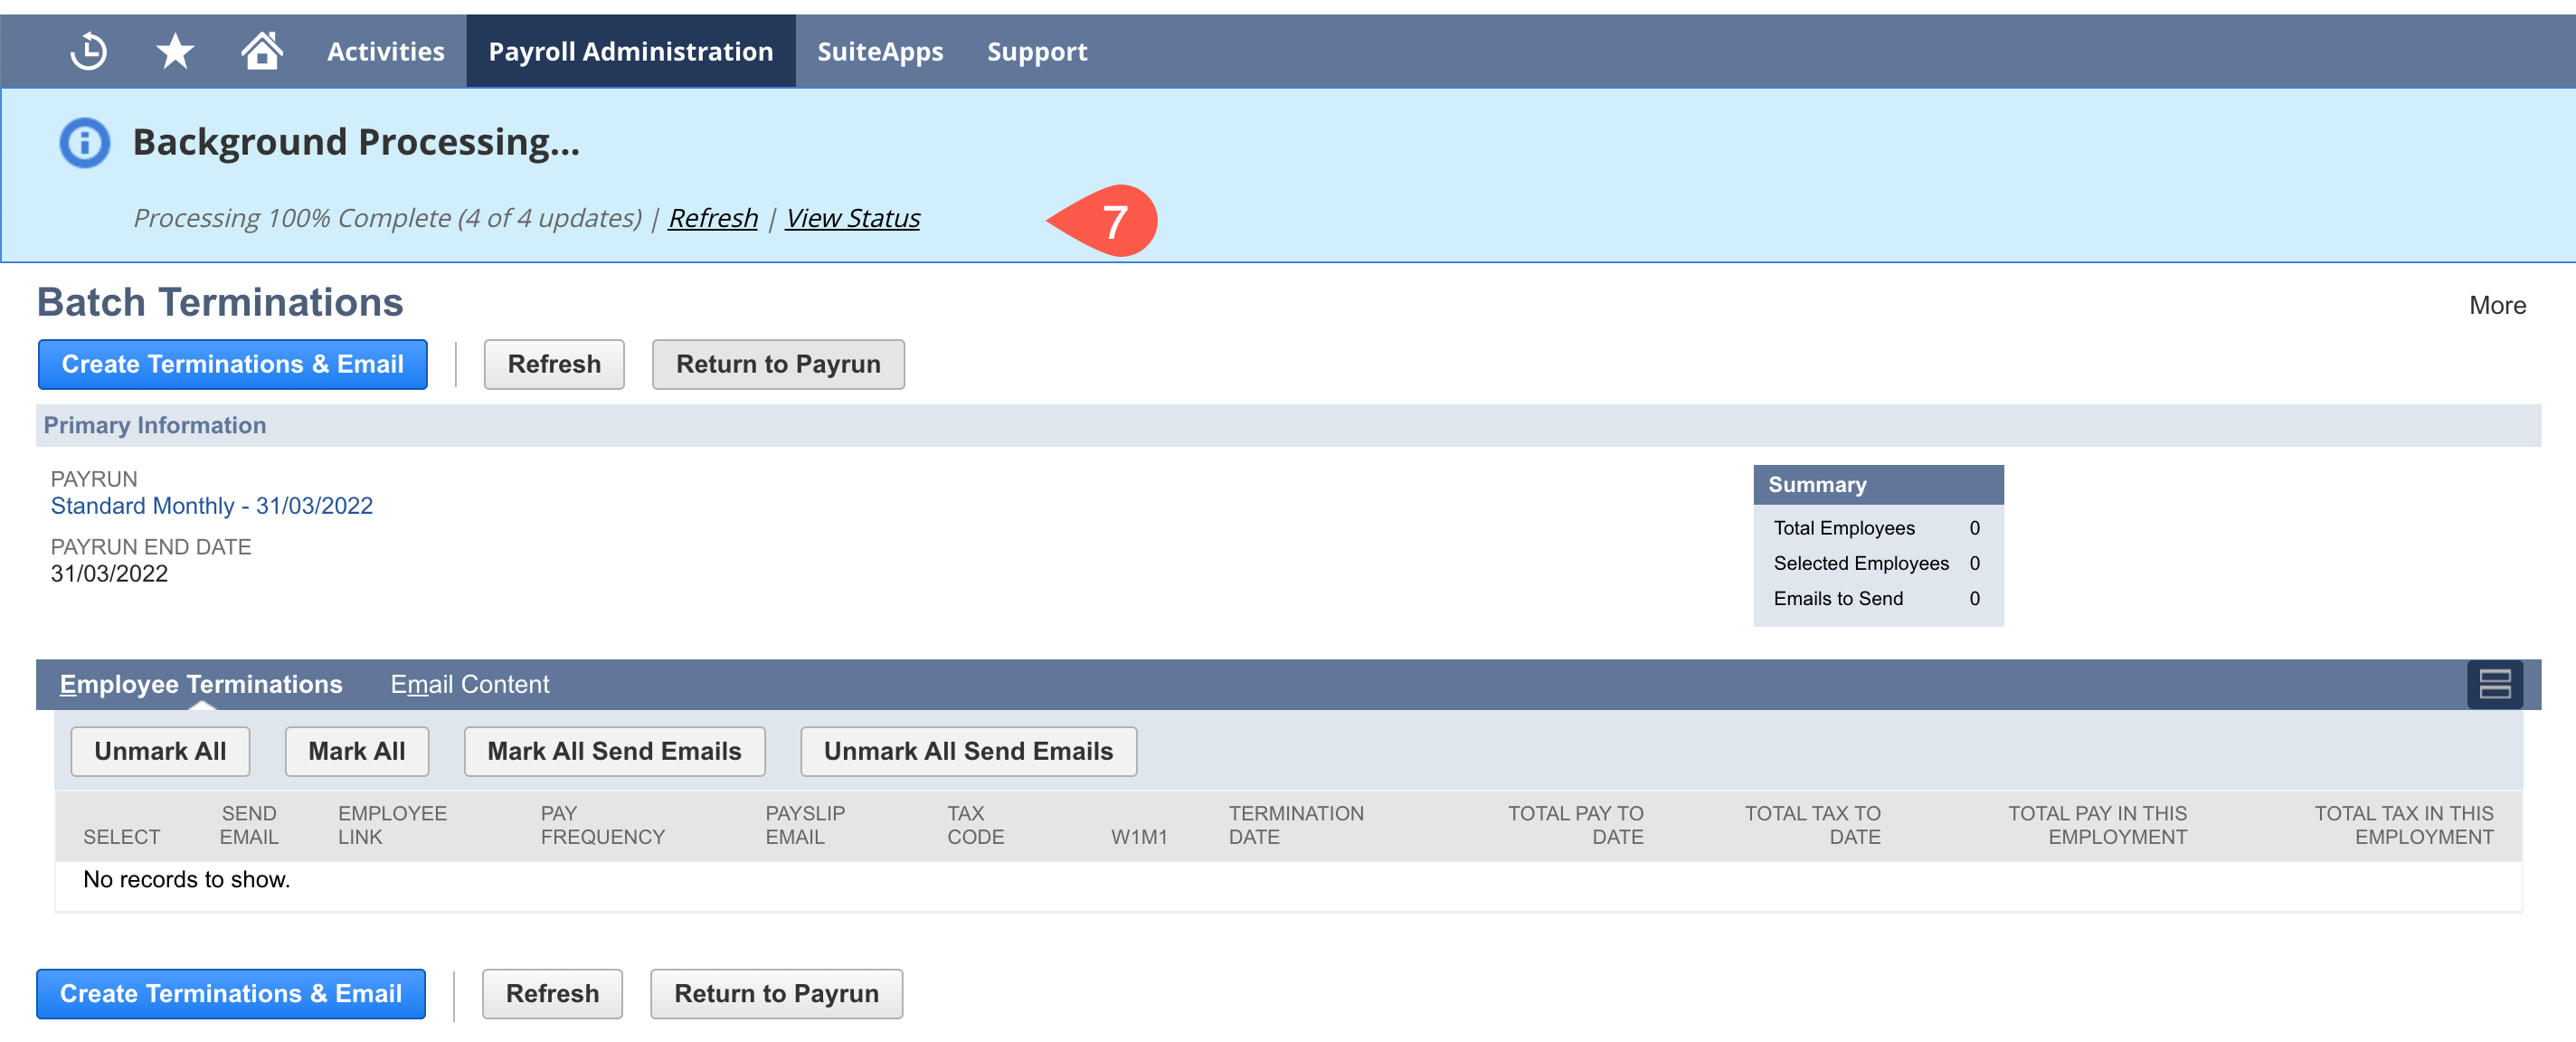
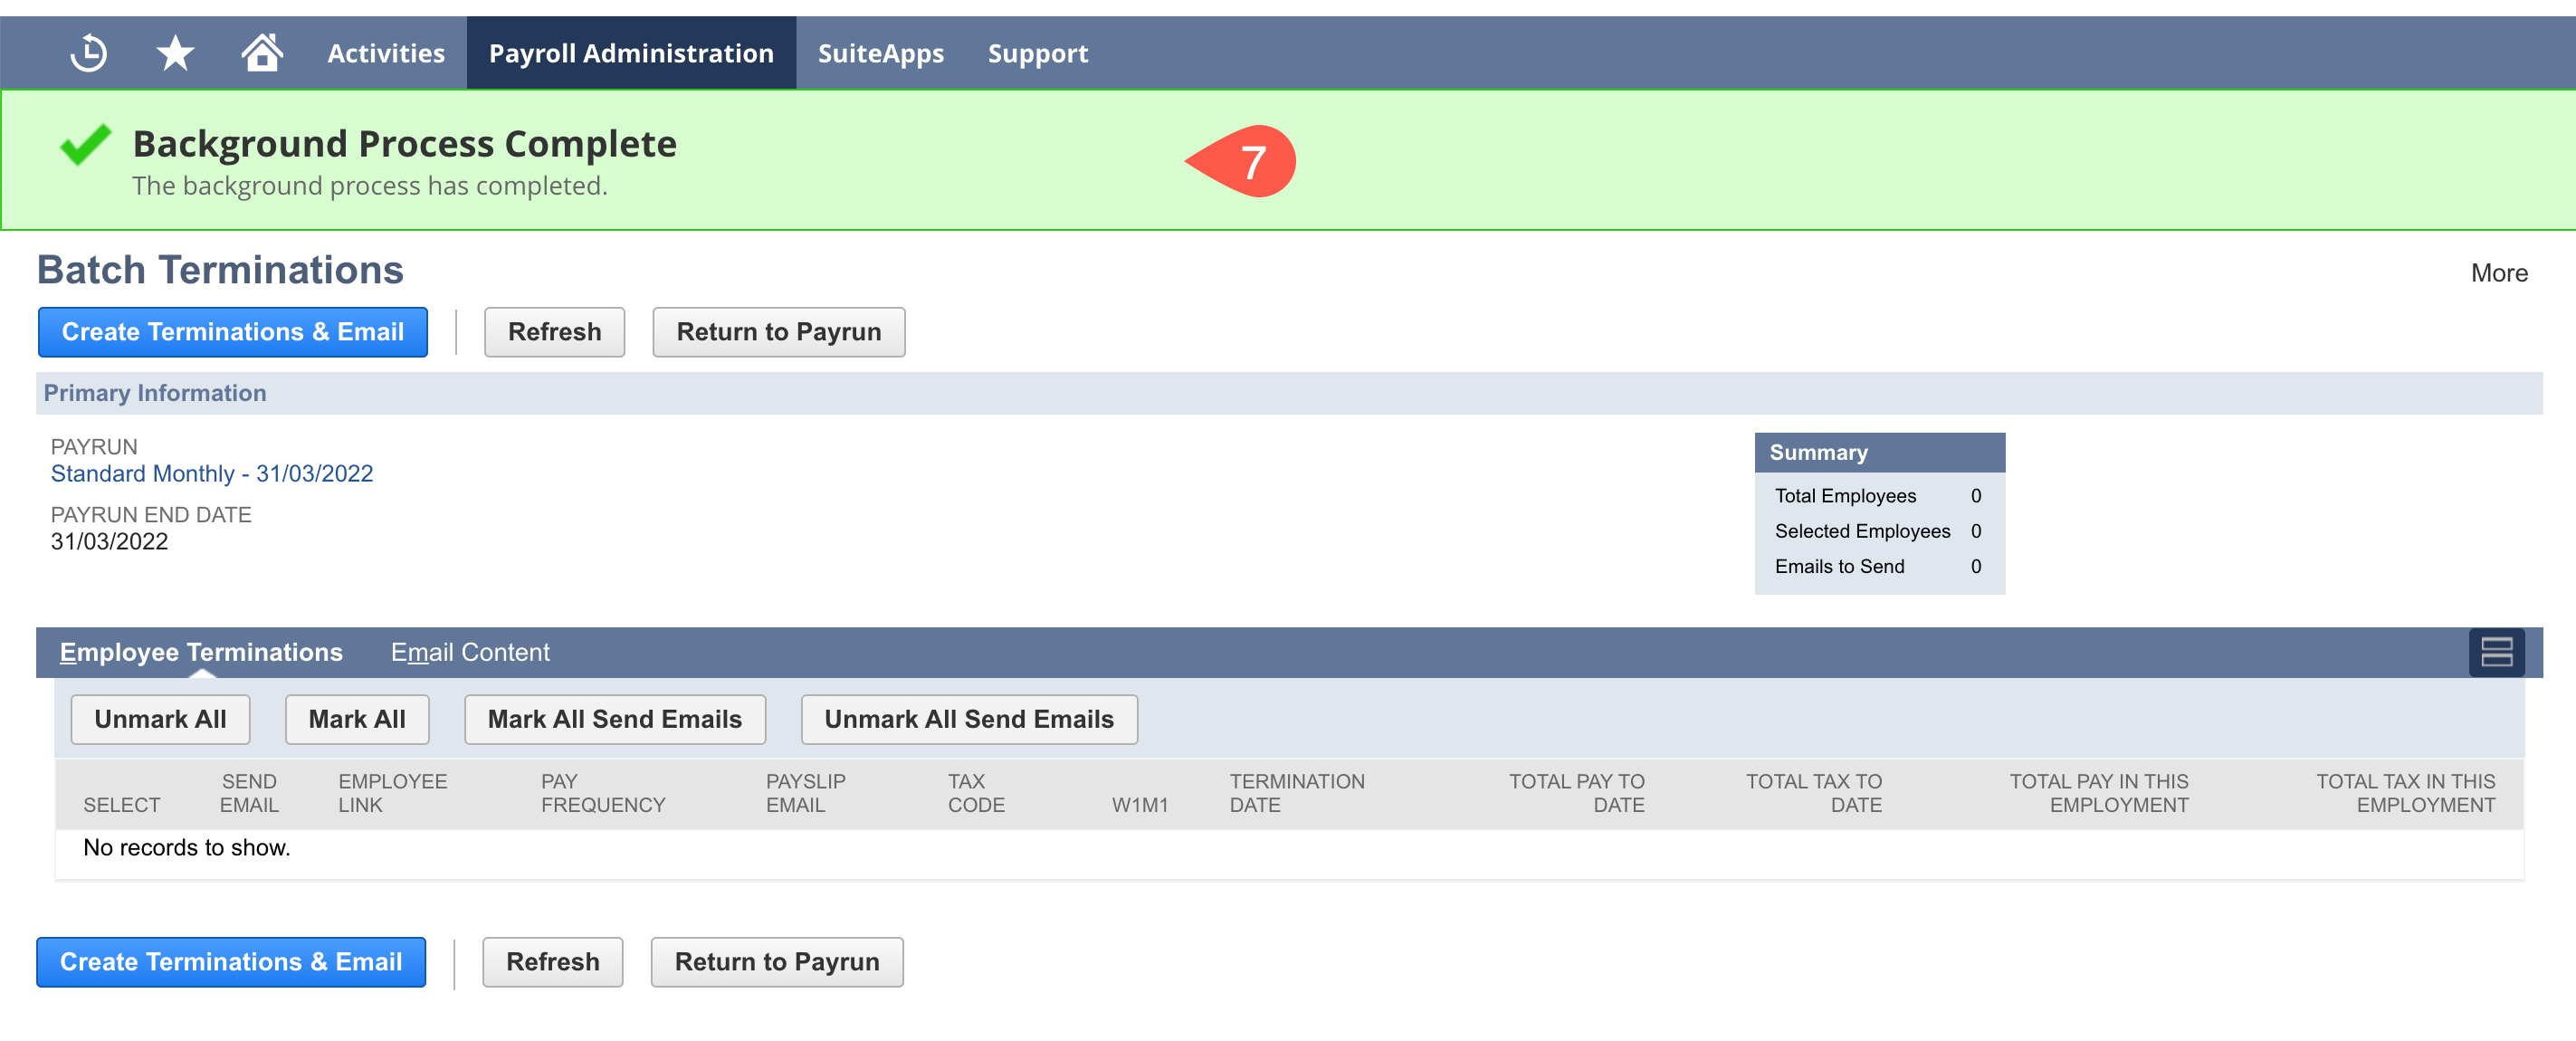
If there are more than two employees included in this process then it will run as a Map Reduce - you will see the status above state that the process is running in the background. You will then be able to refresh this process until you receive a message to say it is completed.
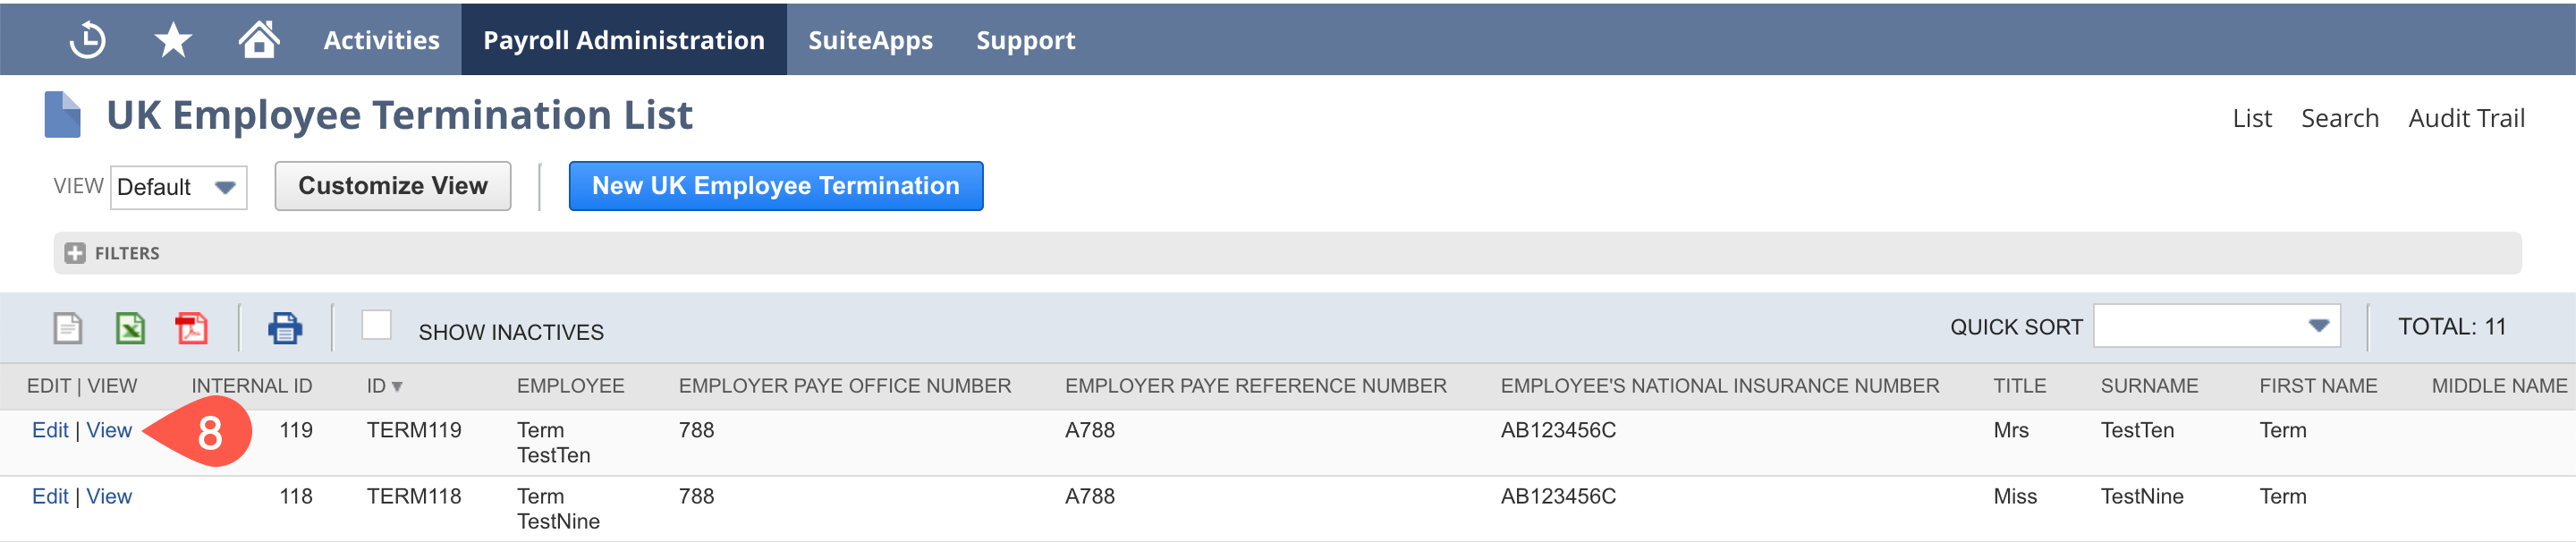
To review the documents that have been generated and emailed you can navigate to Payroll Administration > UK Reports > Employee Termination for the list of Termination Records. You can click into the record you wish to review and if necessary review the PDF.
Payment After Leaving
If you have to pay an employee after they leave
- use tax code 0T on a ‘week 1’ or ‘month 1’ basis (S0T if the Scottish rate or C0T if at the Welsh rate)
- deduct National Insurance (unless it’s a redundancy payment) and any student loan repayments
- report the payment and deductions in your next FPS, using the employee’s original ‘Date of leaving’ and payroll ID, and set the ‘Payment after leaving’ indicator
- give the employee written confirmation of the payment showing the gross amount and deductions
Do not give the employee another P45.
Processing the Payment
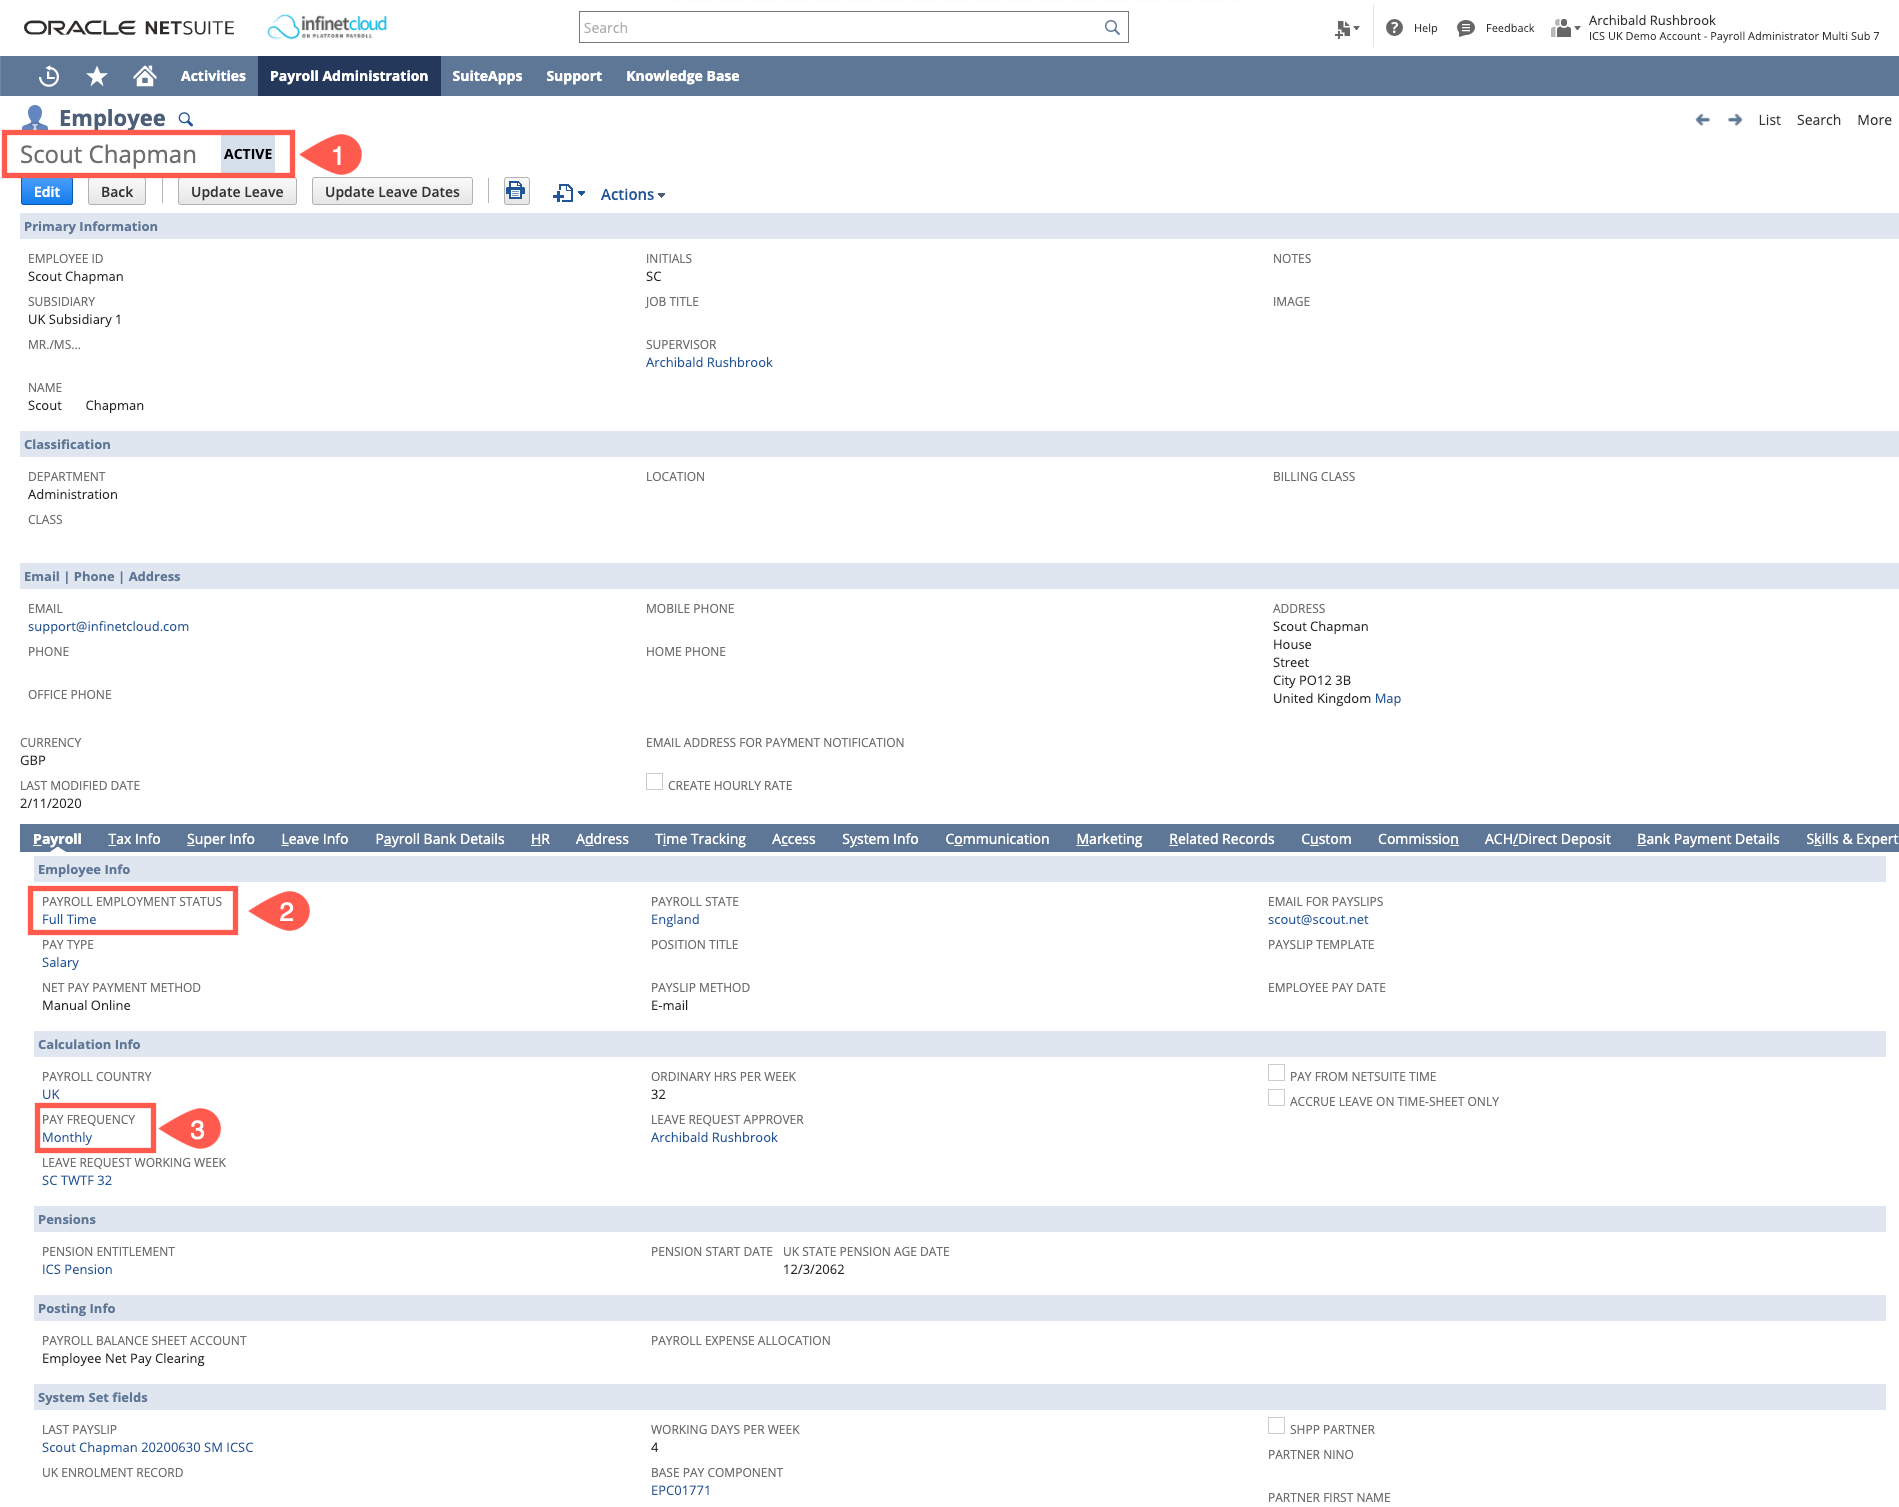
- Navigate to the employee record
- Ensure that their Payroll Employment Status is not "Terminated" but is their previous status (e.g. Full Time)
- Ensure the employee's pay frequency is not "exclude from payrun" and is set to their previous frequency (e.g. Monthly)
- If you do not need to pay any regular payments (e.g. Base Salary) leave these Pay Components with the pay frequency of Exclude from Pay Run and an end date
- Create the one off details you wish to pay the employee as in
- Add the employee into your next pay run as you would usually do
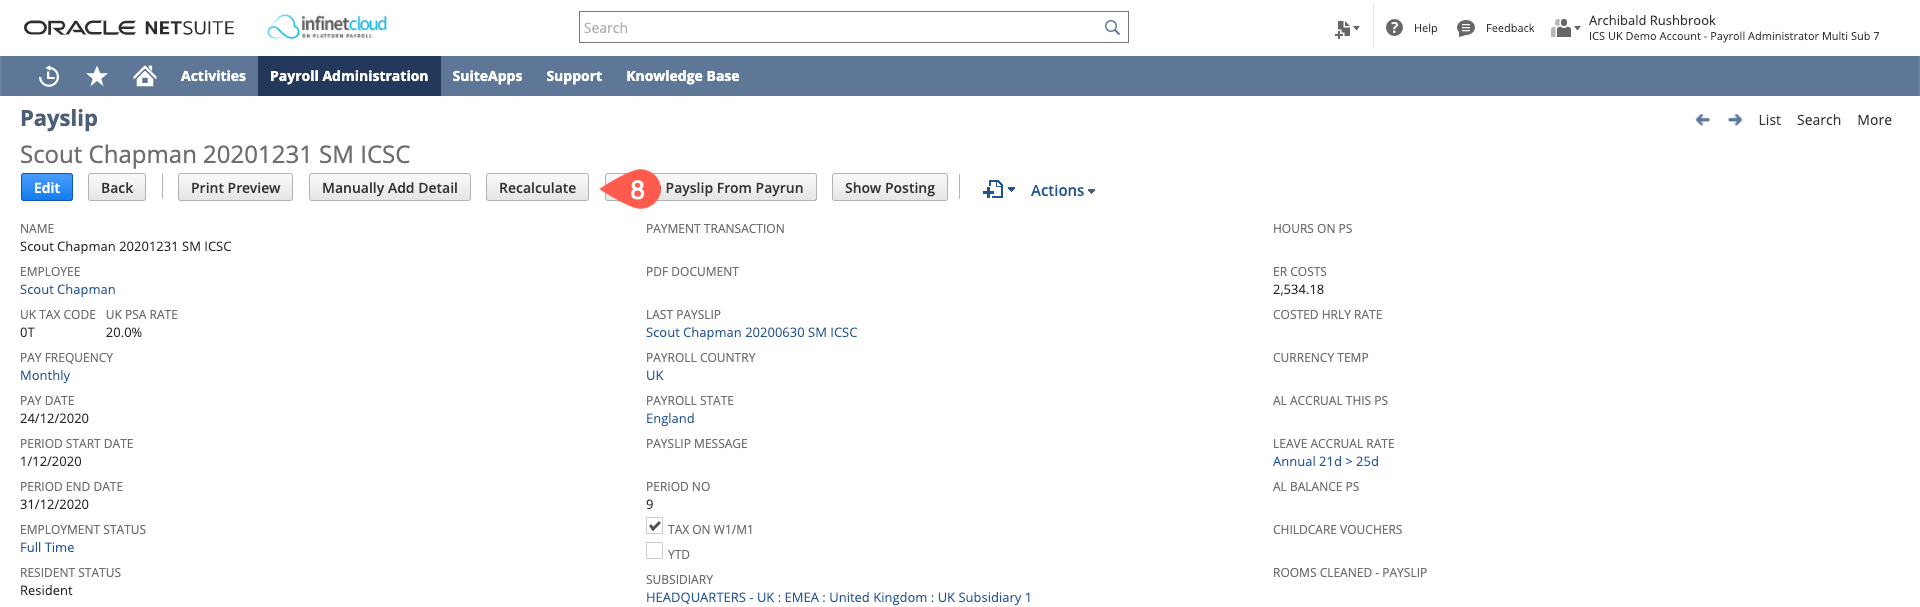
- When at the process payslips stage in the payrun open the employee's payslip record
- Click recalculate
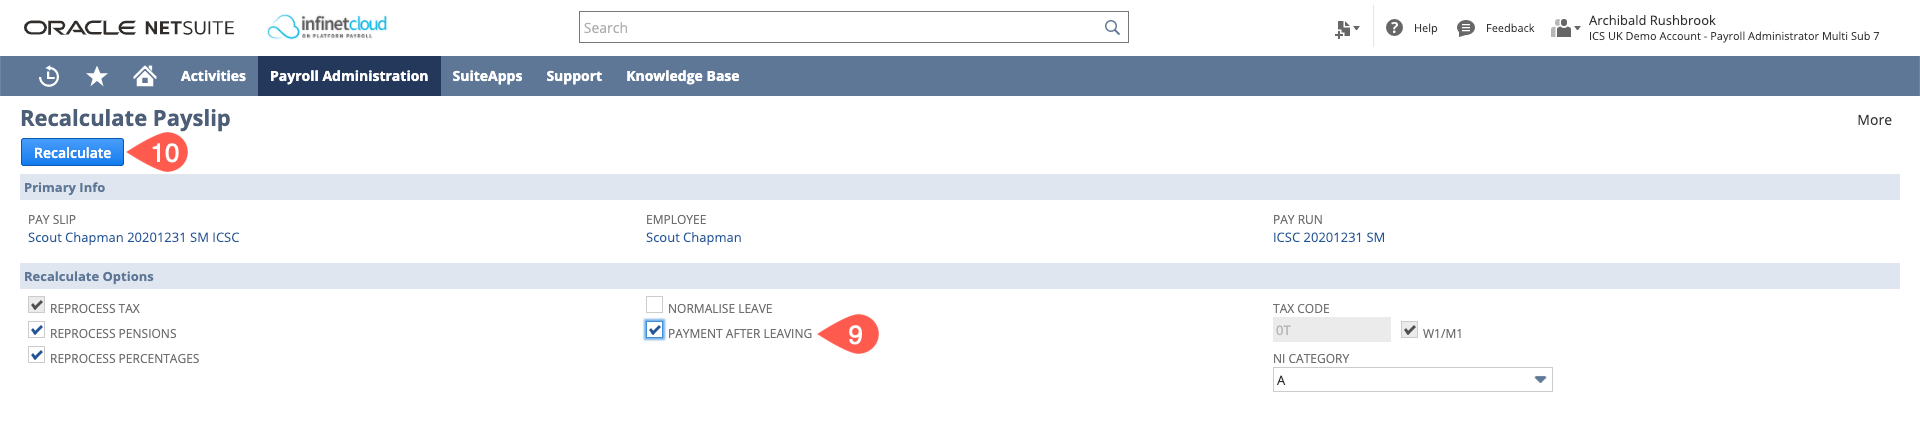
- When on the recalculate payslip page ensure you tick "Payment After Leaving" this will set the tax code to 0T and tick the W1/M1 flag.
- Click Recalculate
- Review the payslip to ensure it only includes what is required and is as expected - you will see the indicator is set on the payslip record

- Continue with the payrun as usual
- Check that the employee is being reported correctly on the FPS - original leave date, Payroll ID etc.
After you have run the payroll you will need to set the employee's pay frequency back to "exclude from payrun" and set their Payroll Employment Status back to "Terminated" - Excluding an Employee from Payroll