/
4. Payroll tab
4. Payroll tab
- Former user (Deleted)
- Infinet Support (Unlicensed)
- Former user (Deleted)
Owned by Former user (Deleted)
Last updated: Dec 30, 2019 by Infinet Support (Unlicensed)
Most of the information here will default from your company's Payroll Configuration. Regardless, it's important to check that all fields are set correctly.
Employee Info 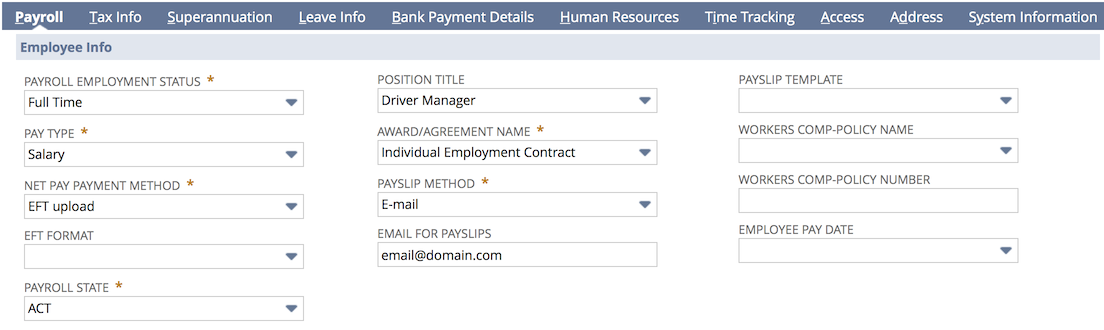
- Payroll Employment Status - select the employee's employment status. The dropdown includes an option for Excluding an Employee from Payroll
- Pay Type - select Salary or Wages
- Net Pay Payment Method - select EFT Upload, Cheque, Cash or Manual Online
- EFT Format - leave blank unless multiple bank formats are used for employees from one pay run
- Payroll State - select the state for public holidays and in Australia for payroll tax liability calculations. This field is also used in Leave Management
- Position Title - select or create a position title for the employee. This information will appear in a number of places including their payslip
- Award / Agreement Name - select their Award or Agreement. This information will appear on their payslip
- Payslip Method - select how the employee should receive their payslip - email, print or online
- Email for Payslips - this does not default from email field and is usually a personal email address where the employee wants their payslips sent to
- Payslip Template - only set this if you want to override the template defined during configuration
- Workers Comp Policy Name - this defaults from the configuration
- Workers Comp Policy Number - this defaults from the configuration
- Employee Pay Date - set this if the employee needs to be paid on a different cycle/pay date to other employees
Employee Setup Guide
Calculation Info

- Payroll Country - defaults from the configuration, can be used as a filter on the pay run
- Pay Frequency - select the employee's pay frequency - either Bi-Monthly, Fortnightly, Monthly, Weekly or Exclude from Payrun (see Excluding an Employee from Payroll for more info)
- Salary Packaging for Super - mark this checkbox if the employee is paid Superannuation based on salary packaging
- Ordinary Hrs Per Week - enter the number of hours in a working week (e.g. 38). This drives the leave accrual calculations
- Leave Request Working Week - select the working week which best describes the hours for calculations on leave accruals. The rostered options are for casual employees who do not work on set days, but have a maximum number of hours per day. You can create new leave request working weeks for other situations not covered by those created by ICS
- Leave Request Approver - select the employee that will approve any leave requests
- Payroll Currency - leave blank unless the employee should be paid in a different currency to the currency in the jurisdiction they are in
- Pay from NetSuite time - only applicable to Waged employees. Check this box if the employee is to be paid based on time logged (e.g. Timesheets) in NetSuite. Any timesheet for normal time will be ignored if this option is unchecked.
- Accrue Leave on Time-sheet only - select this if you want to accrue leave based on the hours entered on timesheets, this may be if the employee works different hours per week. Usually this is used for casuals or part timers (on wages)
Posting Info

- Payroll Balance Sheet Account - select the clearing account that the net pay will post to
- Super Expense Account - select the P&L Superannuation expense account
- Payroll Expense Allocation - only set this field if you wish to allocate the employee's payroll expenses to a different set of accounts than what is in the configuration
System Set Fields

Most of these fields update once pay components are created. You may need to enter the following:
- Payroll ID - if you have an alternate identification number for the Employee then enter it here. For example, if you are migrating from a different Payroll system that had its own IDs for employees.
Go to step 5. Tax Info tab
, multiple selections available,
Related content
5. Tax Info tab
5. Tax Info tab
More like this
Payroll Support
Payroll Support
More like this
8. Bank Payment Details tab
8. Bank Payment Details tab
Read with this
7. Leave Info tab
7. Leave Info tab
Read with this
MyPay - Your Employee Self Service Portal
MyPay - Your Employee Self Service Portal
More like this
11. Add Pay Components
11. Add Pay Components
Read with this