Leave Request Adjustment (and Reversal) Guide
Configuration
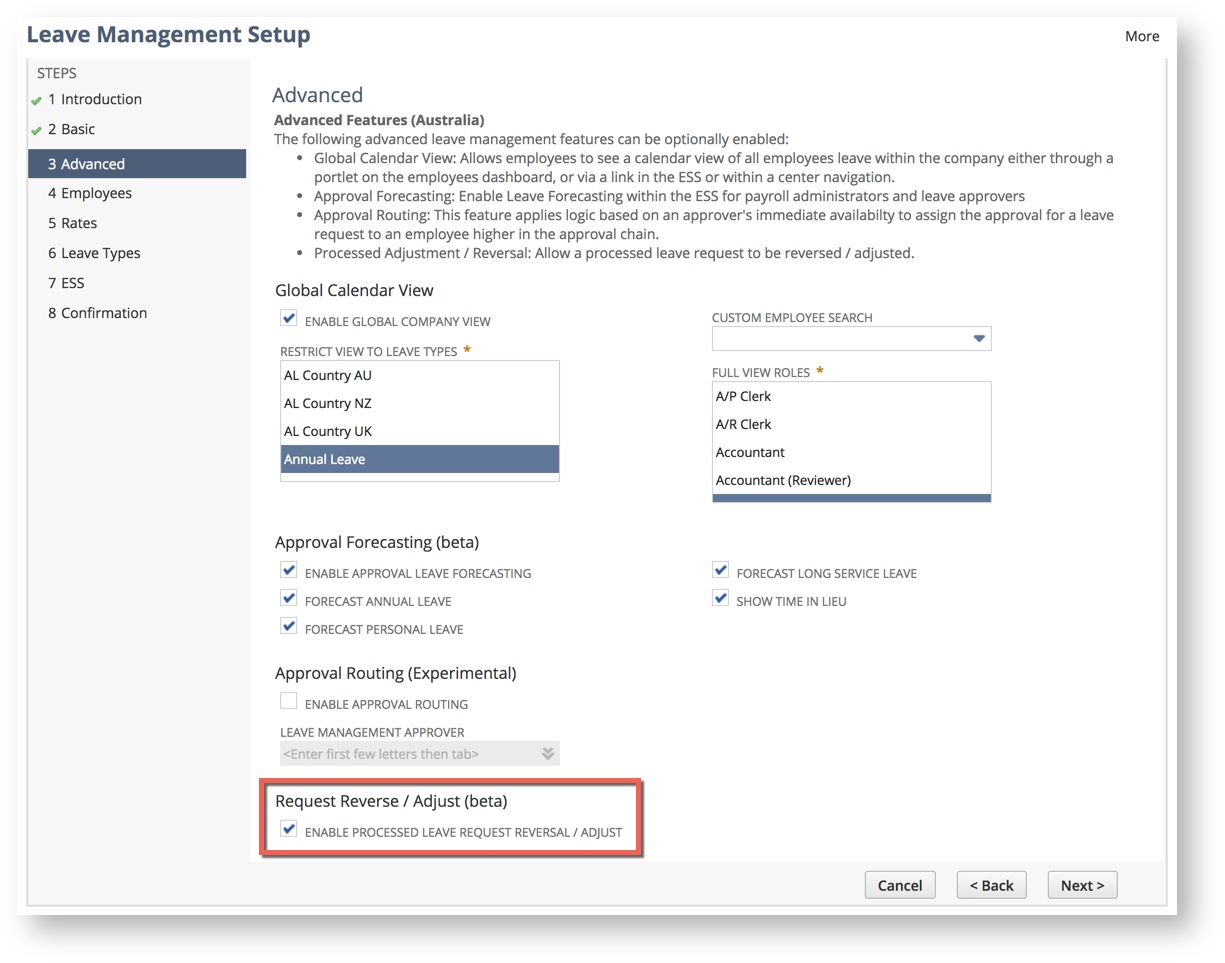
To enable the Reverse/Adjust functionality, open the Leave Wizard (Payroll Administration > Payroll Setup > Leave Wizard) and click next to "3: Advanced".
Check the checkbox for "Enable Processed Leave Request Reversal/Adjust".
Continue through the wizard by clicking "Next" and "Finish" at "8: Confirmation" to save the updated preference.
Initiate
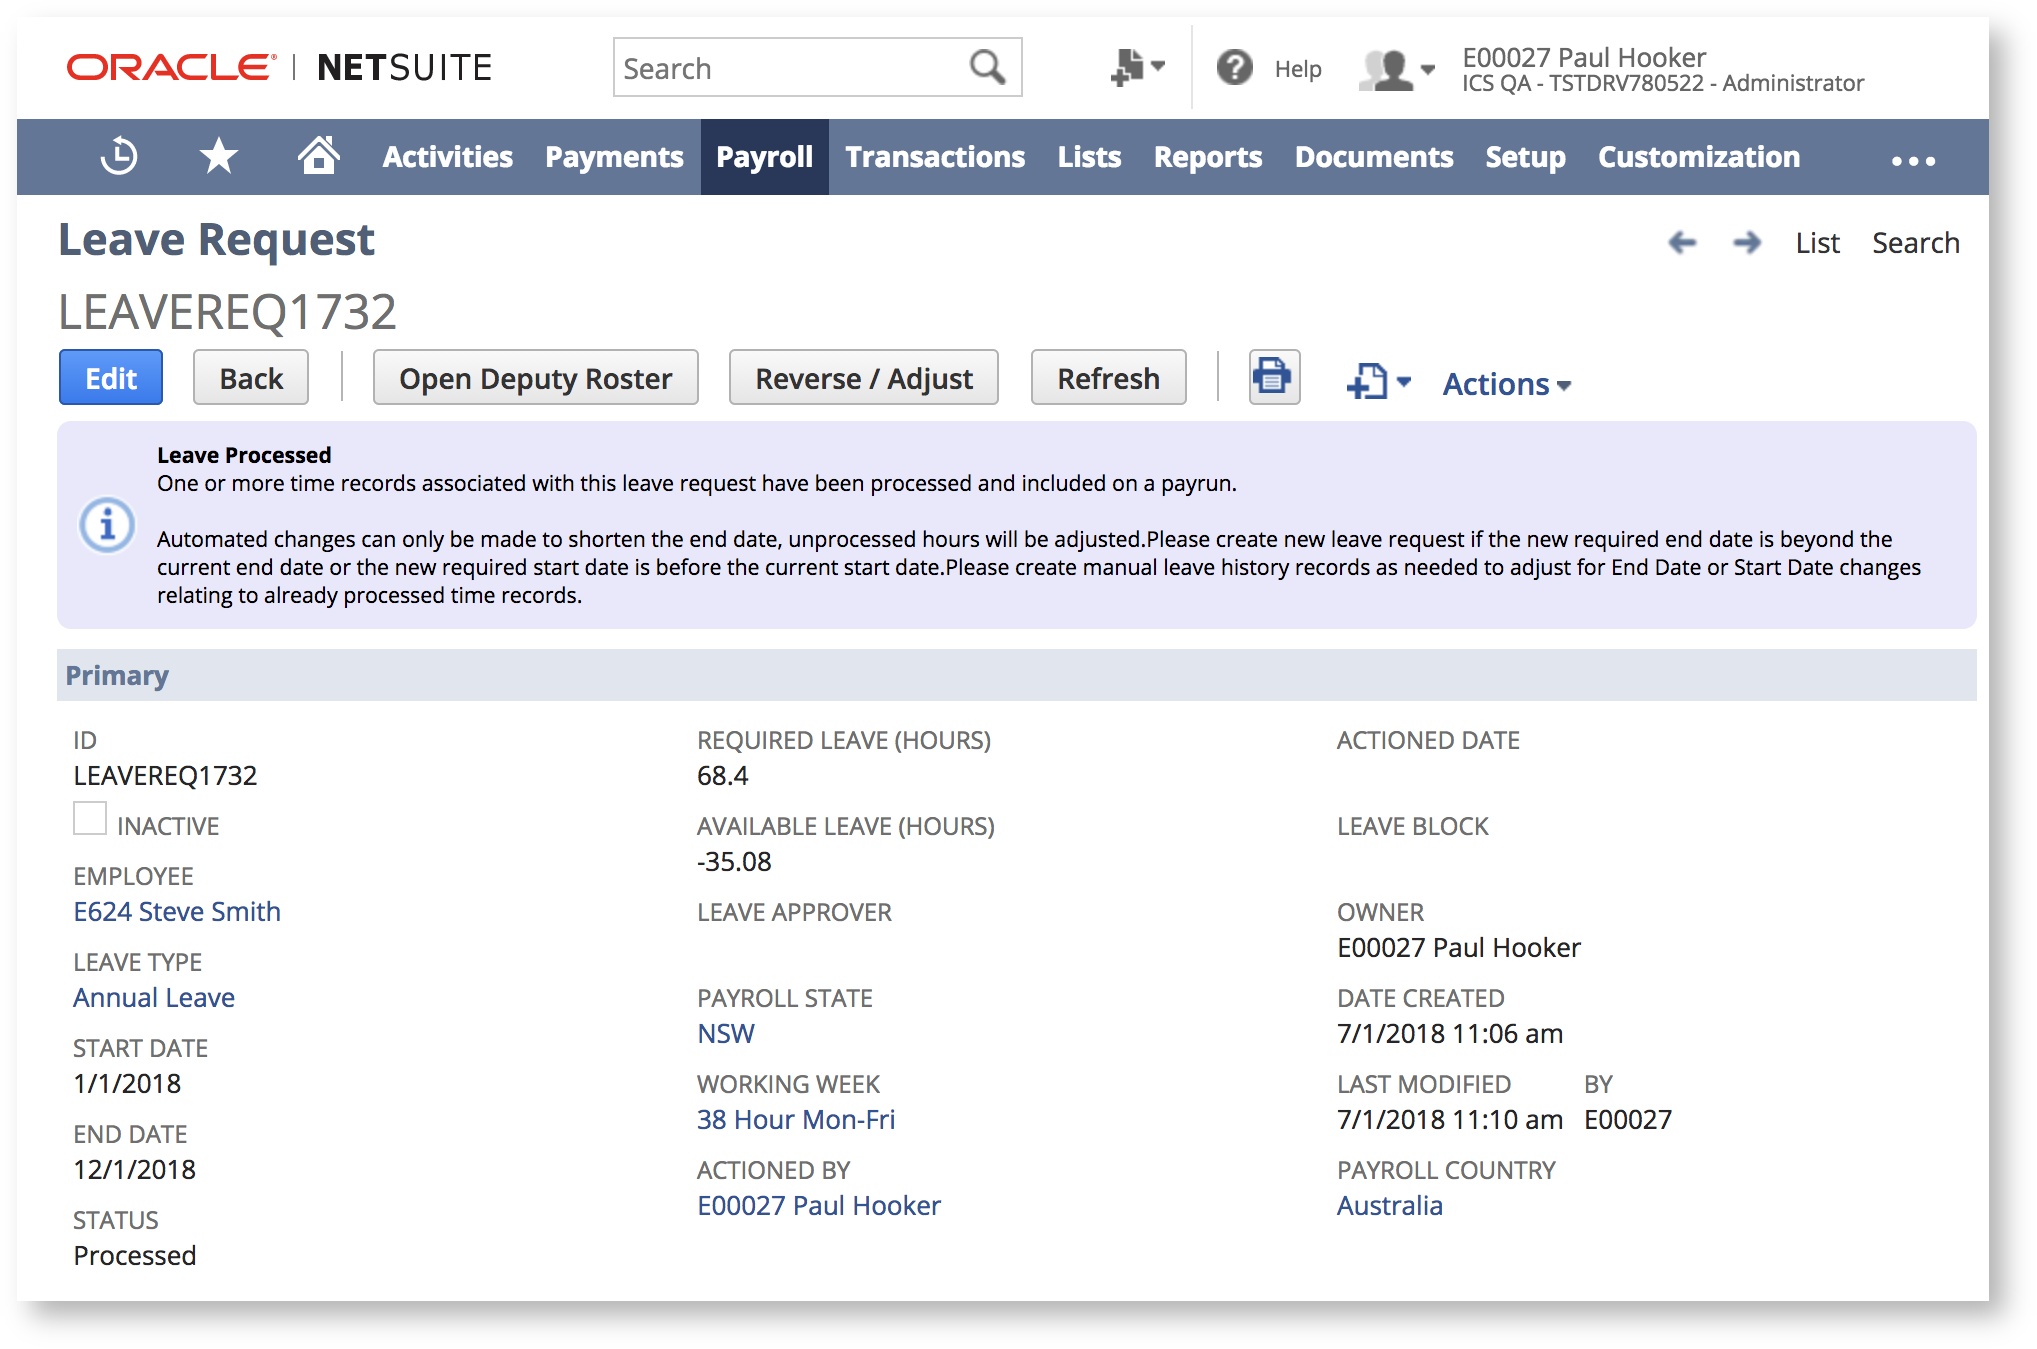
To start the process, navigate to the specific Leave Request record and click the "Reverse/Adjust" button.
If you don't see the button check the Status of Leave Request. The status must be 'Processed'.
Also, check the feature is enabled (see 'Configuration' steps above).
Adjust
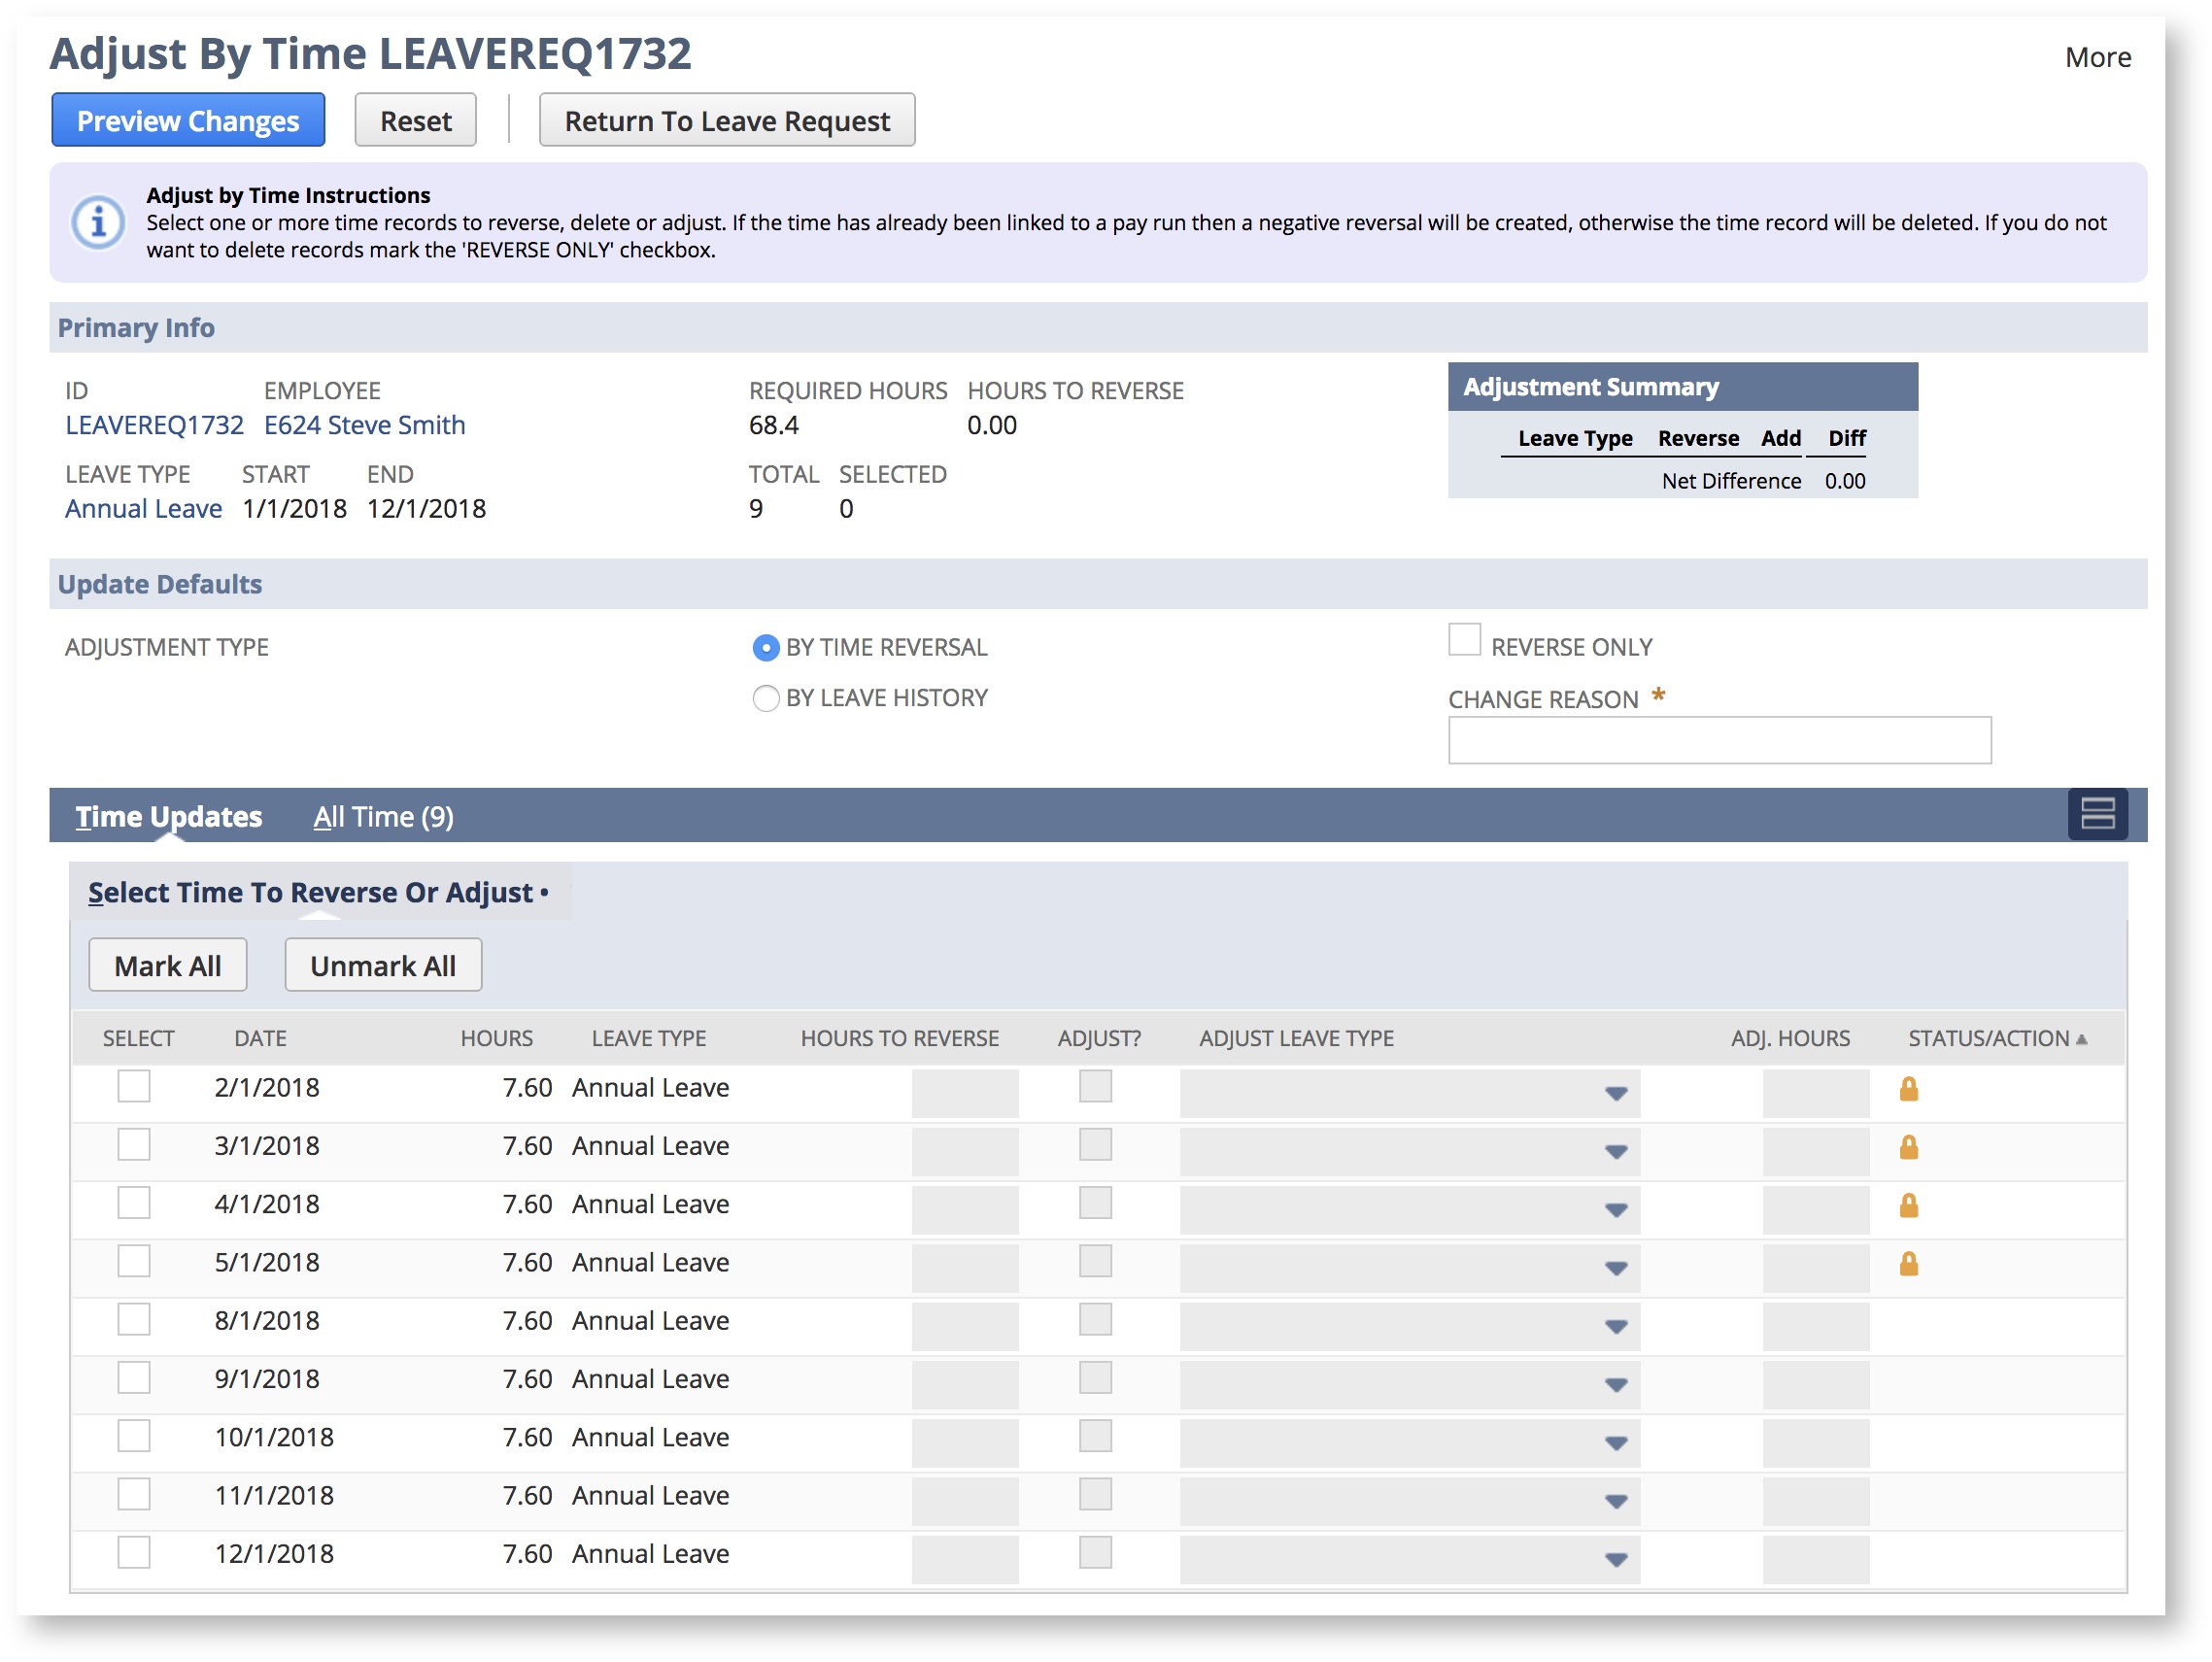
The adjustment form displays primary information about the Leave Request. It displays a list of Time Records associated with the Leave Request. It is the Time Records that will form the basis of the reversal adjustment.
The four main components of the form are:
- Primary Info:
- Leave Request Details
- Leave Request ID
- Employee
- Leave Type
- Start and End Date
- Required Hours
- Summary Table
- displays a summary of the changes that will be made
- Totals
- Selected Lines based on the selected lines in the Time Update Sublist
- Leave Request Details
- Update Defaults:
- Adjustment Type
- Select the type of adjustment you wish to make (By Time Reversal / By Leave History)
- Adjust by Time Instructions
Select one or more time records to reverse, delete or adjust. If the time has already been linked to a pay run then a negative reversal will be created, otherwise the time record will be deleted. If you do not want to delete records mark the 'REVERSE ONLY' checkbox. Adjust by Leave History Instructions
Select one or more time records to be summed and adjusted by leave history record. Note: No changes will be made to the existing time records and once an adjustment leave history record is linked to a leave request no further adjustments can be made.
- Adjust by Time Instructions
- Select the type of adjustment you wish to make (By Time Reversal / By Leave History)
- Reverse Only
- If checked, existing time records will not be updated or deleted (By Time Reversal Only)
- Change Reason
- The reason for the change which will be recorded as a user notes on the leave request (mandatory)
- Adjustment Type
- Time Updates
- A sublist of the Time Records associated to the Leave Request
- All Time
- A sublist of all Time Records associated to the Leave Request
The columns displayed in the Time Updates list are as follows:
- Select: Only those lines checked will be updated
- Date: The date of the time record
- Hours: The current hours on the time record
- Leave Type: The leave type on the time record
- Hours To Reverse: The number of original hours to reverse (this defaults to the current hours)
- Adjust: Check to make an adjustment for that day to a different leave type.
- Adjust Leave Type: The adjustment leave type
- Adj.Hours: the adjustment hours to use for the adjustment leave type.
- Status/Action: Updates automatically to reflect the action that will be performed based on the line information
Note: When Adjusting/Reversing 'By Leave History' the Status/Action column displays slightly different action denoting a credit for reversal hours, or a debit for adjustment hours.
Adjustment Types Explained
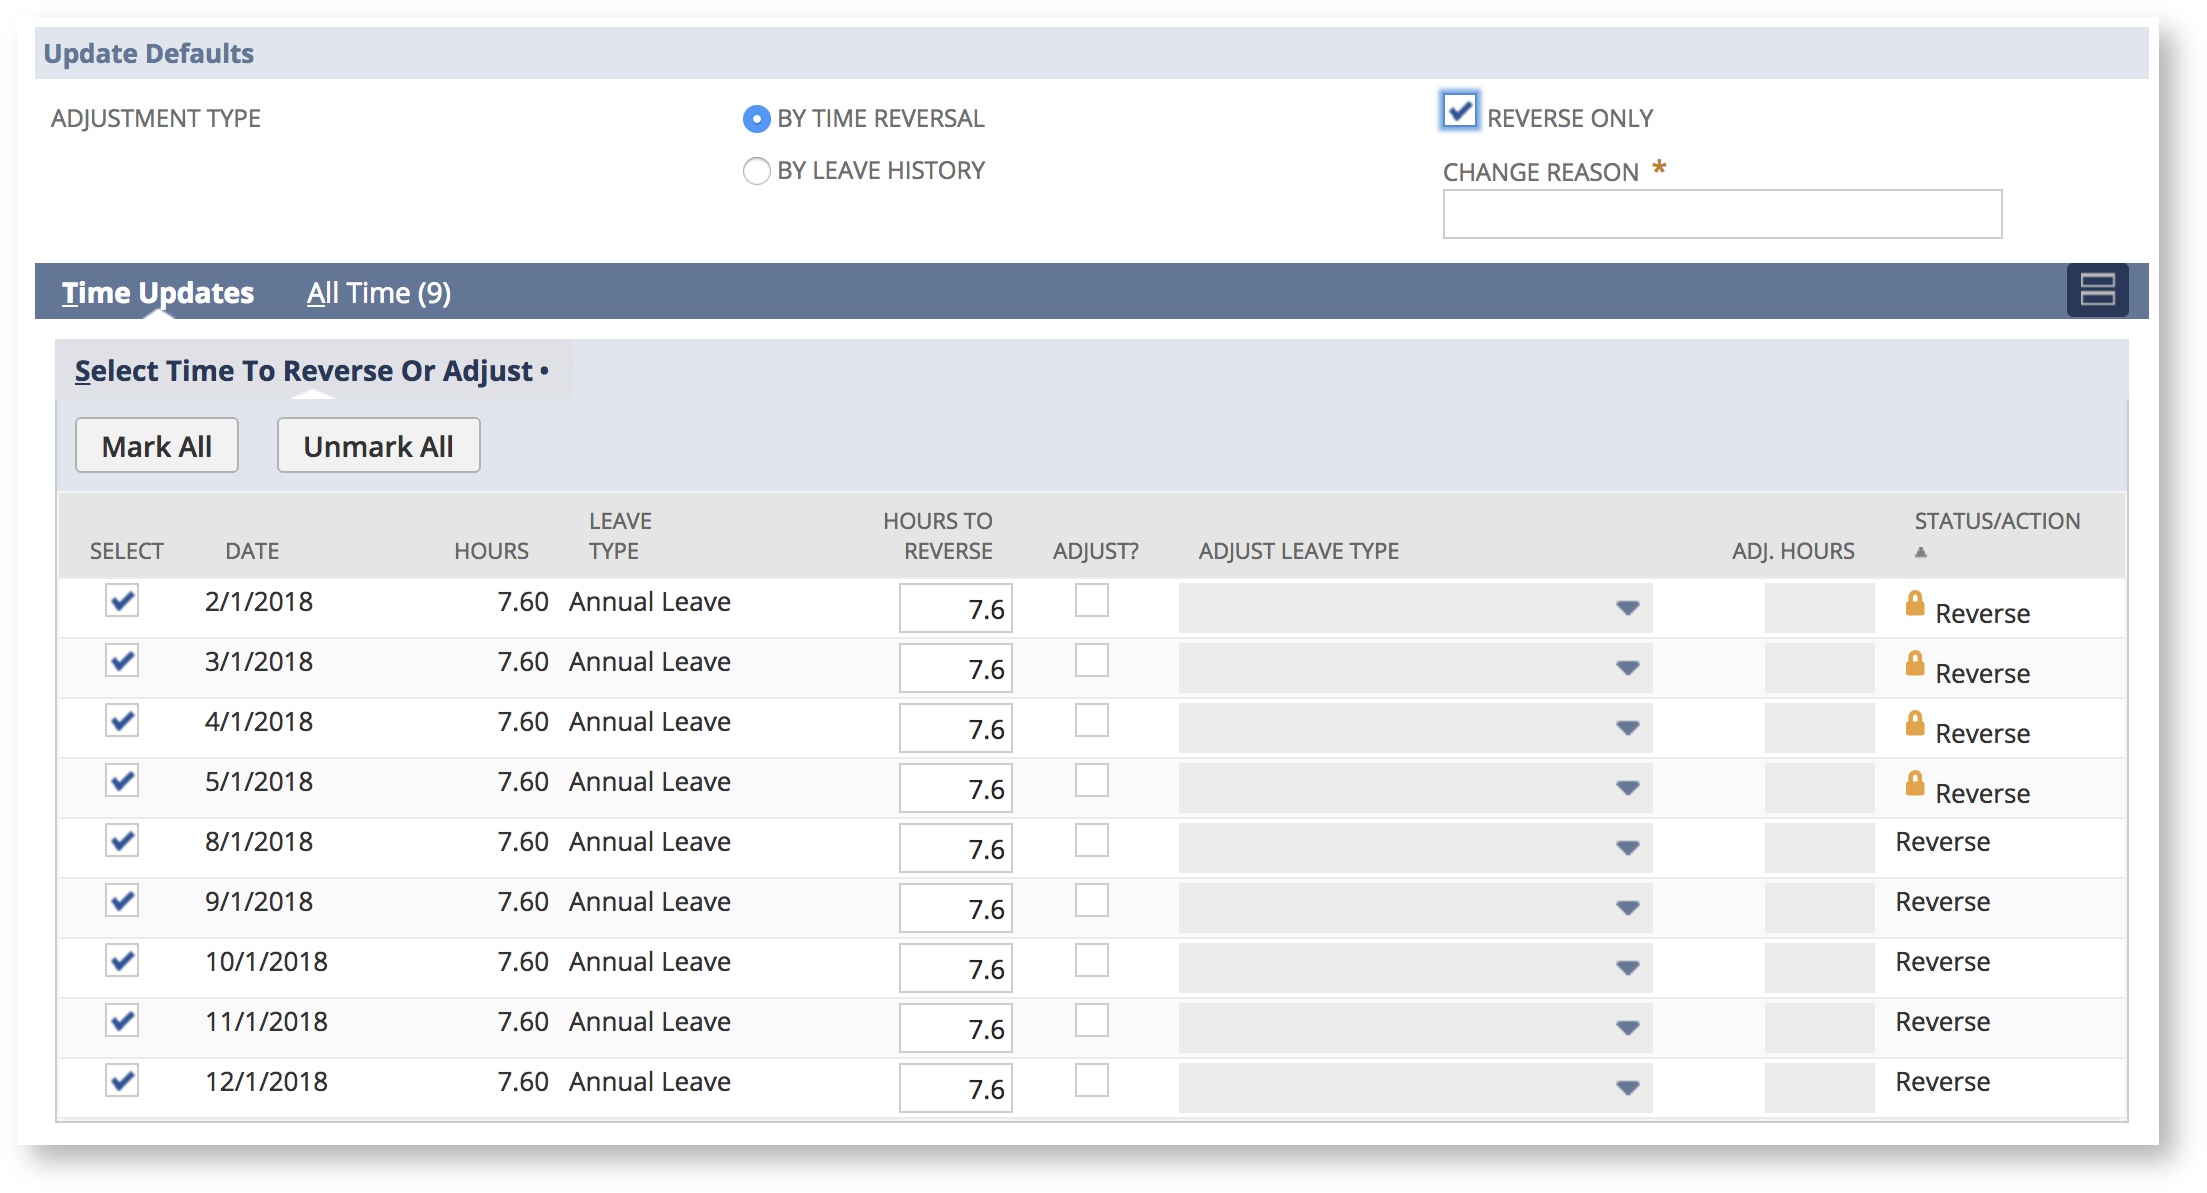
The sample screenshot below shows a Leave Request Adjustment for a Leave Request covering a two week period where half of the time has already been processed by a Pay Run.
The first week, (2/1/2018 - 5/1/2018) has already been included on a pay run (denoted by the padlock icon in the Status/Action column).
Placing the cursor over the padlock icon displays the Pay Run title. Alternatively, switch to the All Time tab to see more Pay Run details.
Enter the Reverse/Adjustment Details:
- Select the Adjustment type;
- Note: system defaults to By Time Reversal but for a Leave Request of standard leave types (ie. Annual Leave, Personal Carers Leave, Long Service Leave, Time In Lieu) you can also select By Leave History
- Using 'By Time Reversal' option select 'Reverse Only' to ensure existing time records that have not been processed are not deleted or updated
- Enter a Change Reason for example: Employee returned to work early.
- Select one or multiple time records to reverse or adjust
Select Time Records:
Each line in the Time Updates sublist represents available Time Records associated to the Leave Request for adjustment.
Hours to Reverse
- Update 'Hours to Reverse' (eg. the employee may have ended up taking a part day)
- Review the commentary in the Status/Action column
Adjustment
- Adjust Check box
- Check this box to allow an alternative leave type adjustment.
- Review/Enter Adjustment hours
- Review the commentary in the Status/Action column
Example of time selection By Time Reversal
Example of time selection By Leave History
Adjustment By Time Reversal
'By Time Reversal' will create, edit or delete Time Records to reflect the adjustment that needs to be made based on the preferences.
The default behaviour is to reverse a Time Record only if that time record has been processed on a Pay Run. Unprocessed Time Records any will be edited or deleted.
Reverse Only
'Reverse only' changes the default behaviour of 'By Time Reversal' for Time Records that have not yet been linked to a Pay Run.
When unchecked the system will update or delete the existing record.
The following table outlines the change.
| Action | Reverse Only Unchecked | Reverse Only Checked |
|---|---|---|
| Reverse Hours | Delete Time Record | Create A Reversal Time Record of Negative Reversal Hours |
| Reverse & Adjust | Update Time Record | Create A Reversal Time Record of Negative Reversal Hours, Create Time Record For Adjustment Leave Type |
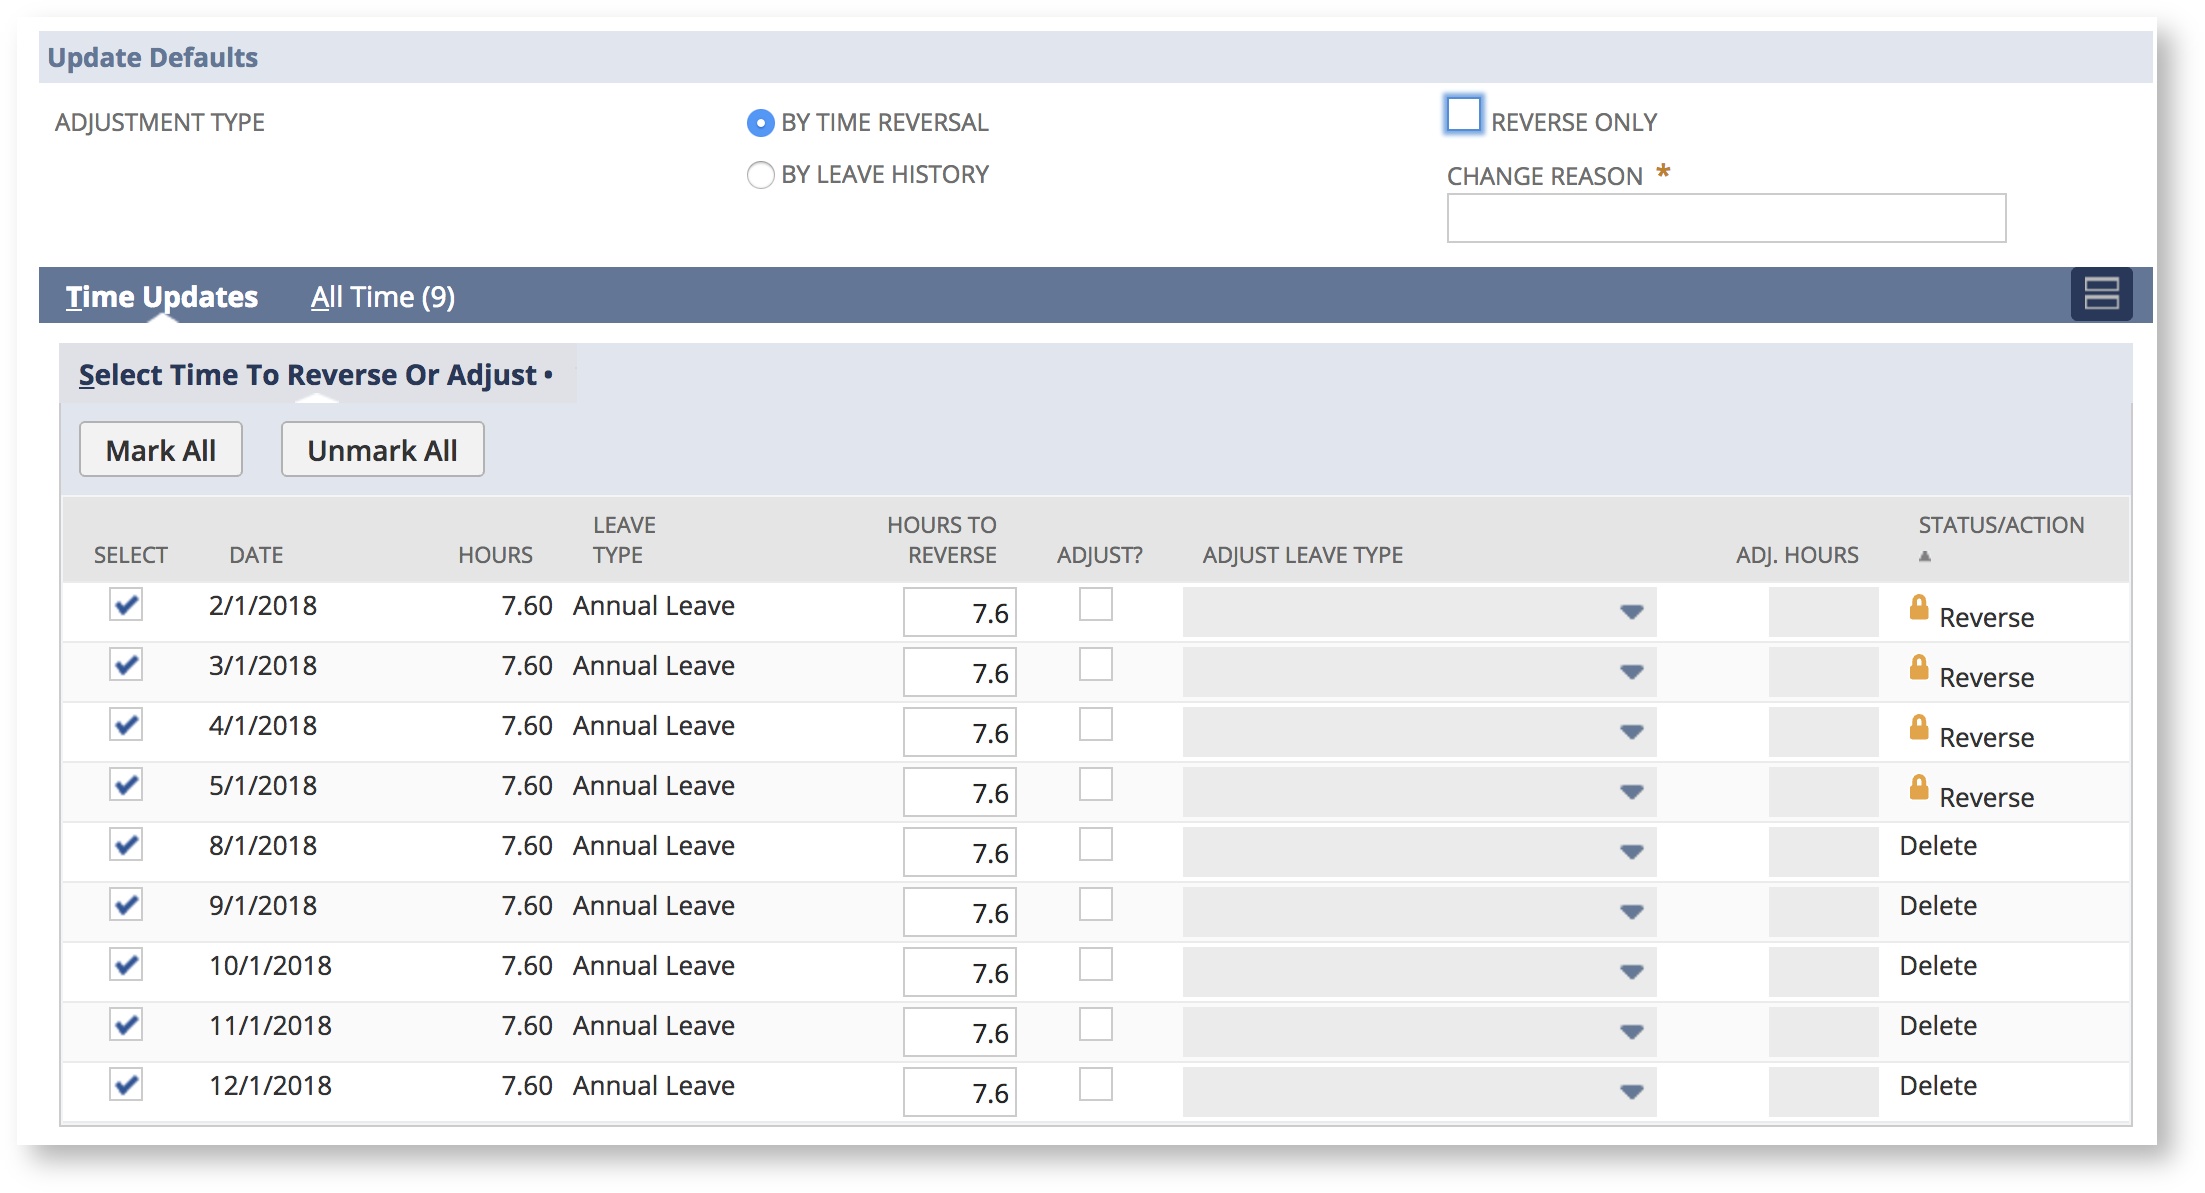
To illustrate the difference; compare the two screenshots below and the status / action column.
| Reverse Only (Unchecked) | Reverse Only (Checked) |
|---|---|
Actions:
| Actions:
|
The result on the employee's payslip will be the same, a line of annual leave for -68.4 hours. However the time linked to the Pay Run will be different:
Reverse Only Unchecked: will have 5 time records (4 x 7.6 for the 2/1 - 5/1)
Reverse Only Checked: will have 14 time records (9 x -7.6, and 5 x 7.6 for the 8/1 - 12/1)
Adjustment By Leave History
For standard leave types Adjustment/Reversal can be applied by creating one or more Leave History records and not changes to associated Time Records.
This approach is useful for retrospective corrections, that would appear on the payslip if additional time records have already been created.
When using this approach:
- Hours to Reverse will result in a credit to the employees leave balance
- Hours to Adjust will result in a debit to the employees leave balance
Updated Leave Balance
The Employee Leave Balance does not update automatically after the Adjustment/Reversal is submitted. Navigate to Employee record and manually 'Update Leave' for the change to take effect.
Review
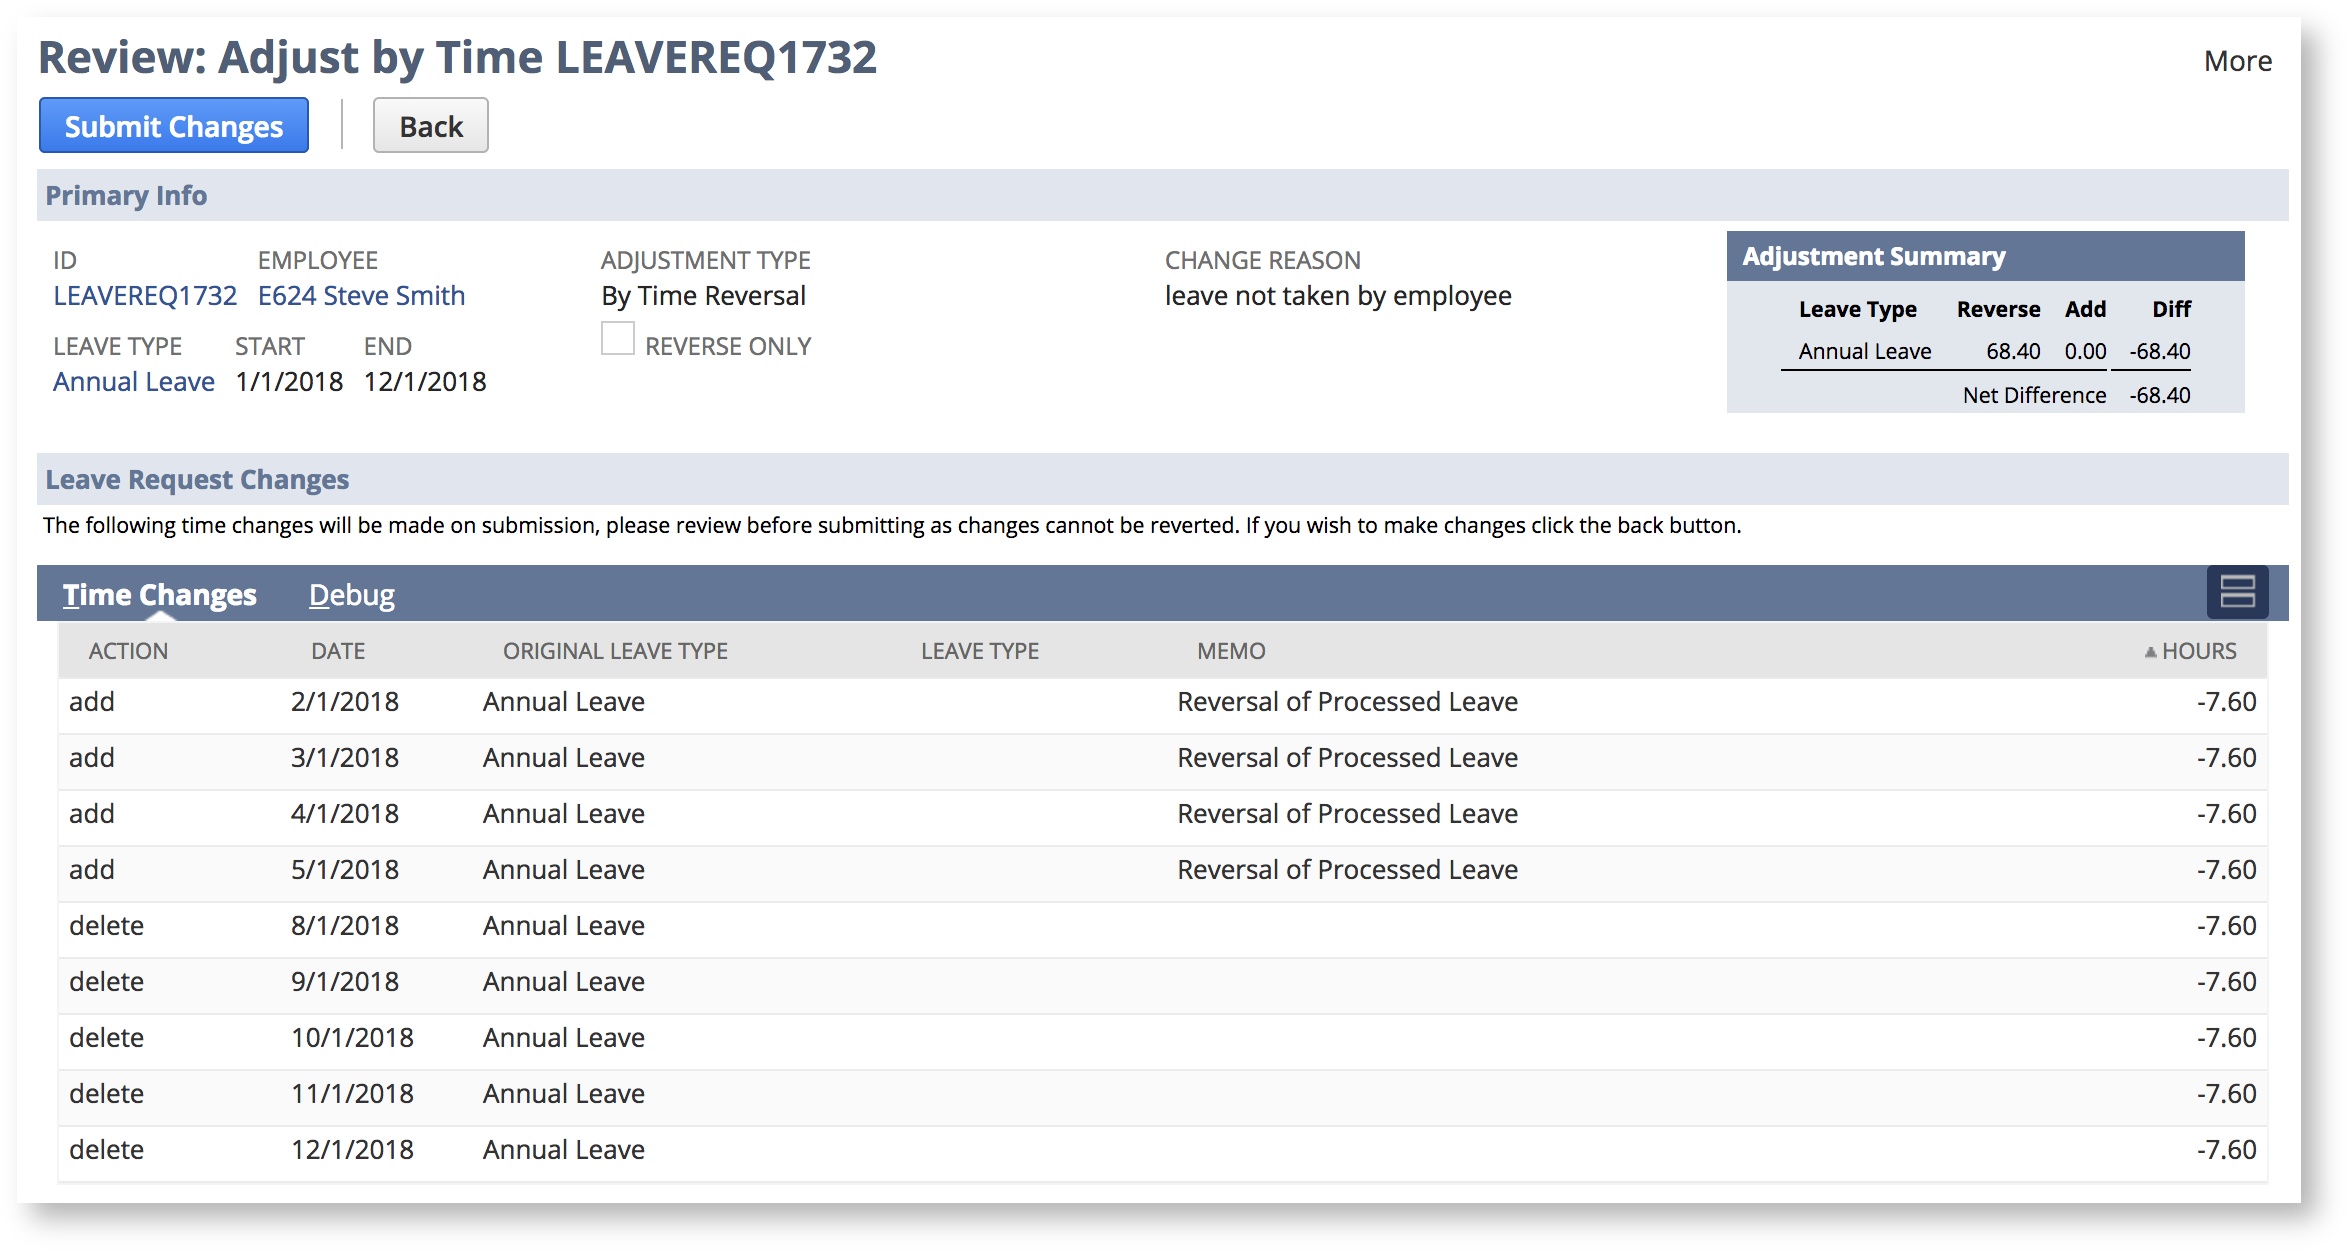
The Review stage displays the summary of actions that will occur upon clicking 'Submit Changes'.
The screenshots below illustrate the differences between the two Adjustment Types.
When using adjust 'By Time Reversal' the page displays the individual time record actions that will be performed.
In this example you can see the creation of reversal time records for the 4 days of previously processed Time Records and the deletion of the remaining 5 days.
'By Leave History' the adjustments are grouped by leave type and reversal or adjustment.
Identified a Change?
If you identified a change during the Review stage, click the Back button. This will return you to the Adjust stage with the form data pre-populated.
Simply make your changes and continue with the process.
Otherwise, click 'Submit Changes' and 'OK' to complete
Submit Changes
On submit of the Adjustment/Reversal the following actions are performed:
- User Notes are created on the Leave Request to record the data and change details
- For 'By Time Reversal' adjustments: Time Records are created, updated, or deleted
- For 'By Leave History' adjustments: Leave History records are created
- Updates to Leave Request records to reflect changes made to Start Date/End Date, Required Hours and Leave Type.
Once the process has completed you will be redirected to the Leave Request and a confirmation message will be displayed.
Creating User Notes
User notes are created for audit purposes and provision of information. Data changes are recorded in system notes. The information can be used retrospectively to understand the interpretation of the change action.
Create / Update / Delete Time Record
When a new Time Record is created its copied from the source Time Record, and then the changes made. Any newly created records will have the following fields set:
| Field | FieldId | Description |
|---|---|---|
| hours | hours | the duration in hours |
| time reversal | custcol_pr_reversal_time | set to checked for added records |
| memo | memo | set to one of: Reversal of Leave Reversal of Processed Leave Adjustment of Leave Adjustment of Processed Leave |
| payrun | custcol_pr_payrun | empty |
| leave type | custcol_pr_pcst | (set for adjustment only) |
Update Leave Requests
The following fields are updated on the leave request based on the actions performed:
| Field | FieldId | Description |
|---|---|---|
| Status | custrecord_pr_lr_status | set to Reversed if the sum of required hours is 0 |
| Start Date | custrecord_pr_lr_start | set to new Start Date if changed |
| End Date | custrecord_pr_lr_end | set to new End Date if changed |
| Leave Type | custrecord_pr_lr_leave_type | set to the leave type with the largest sum of hours |
| Required Hours | custrecord_pr_lr_requiredhours | set to the new total required hours after adjustment |
Updating The Leave Request (Time)
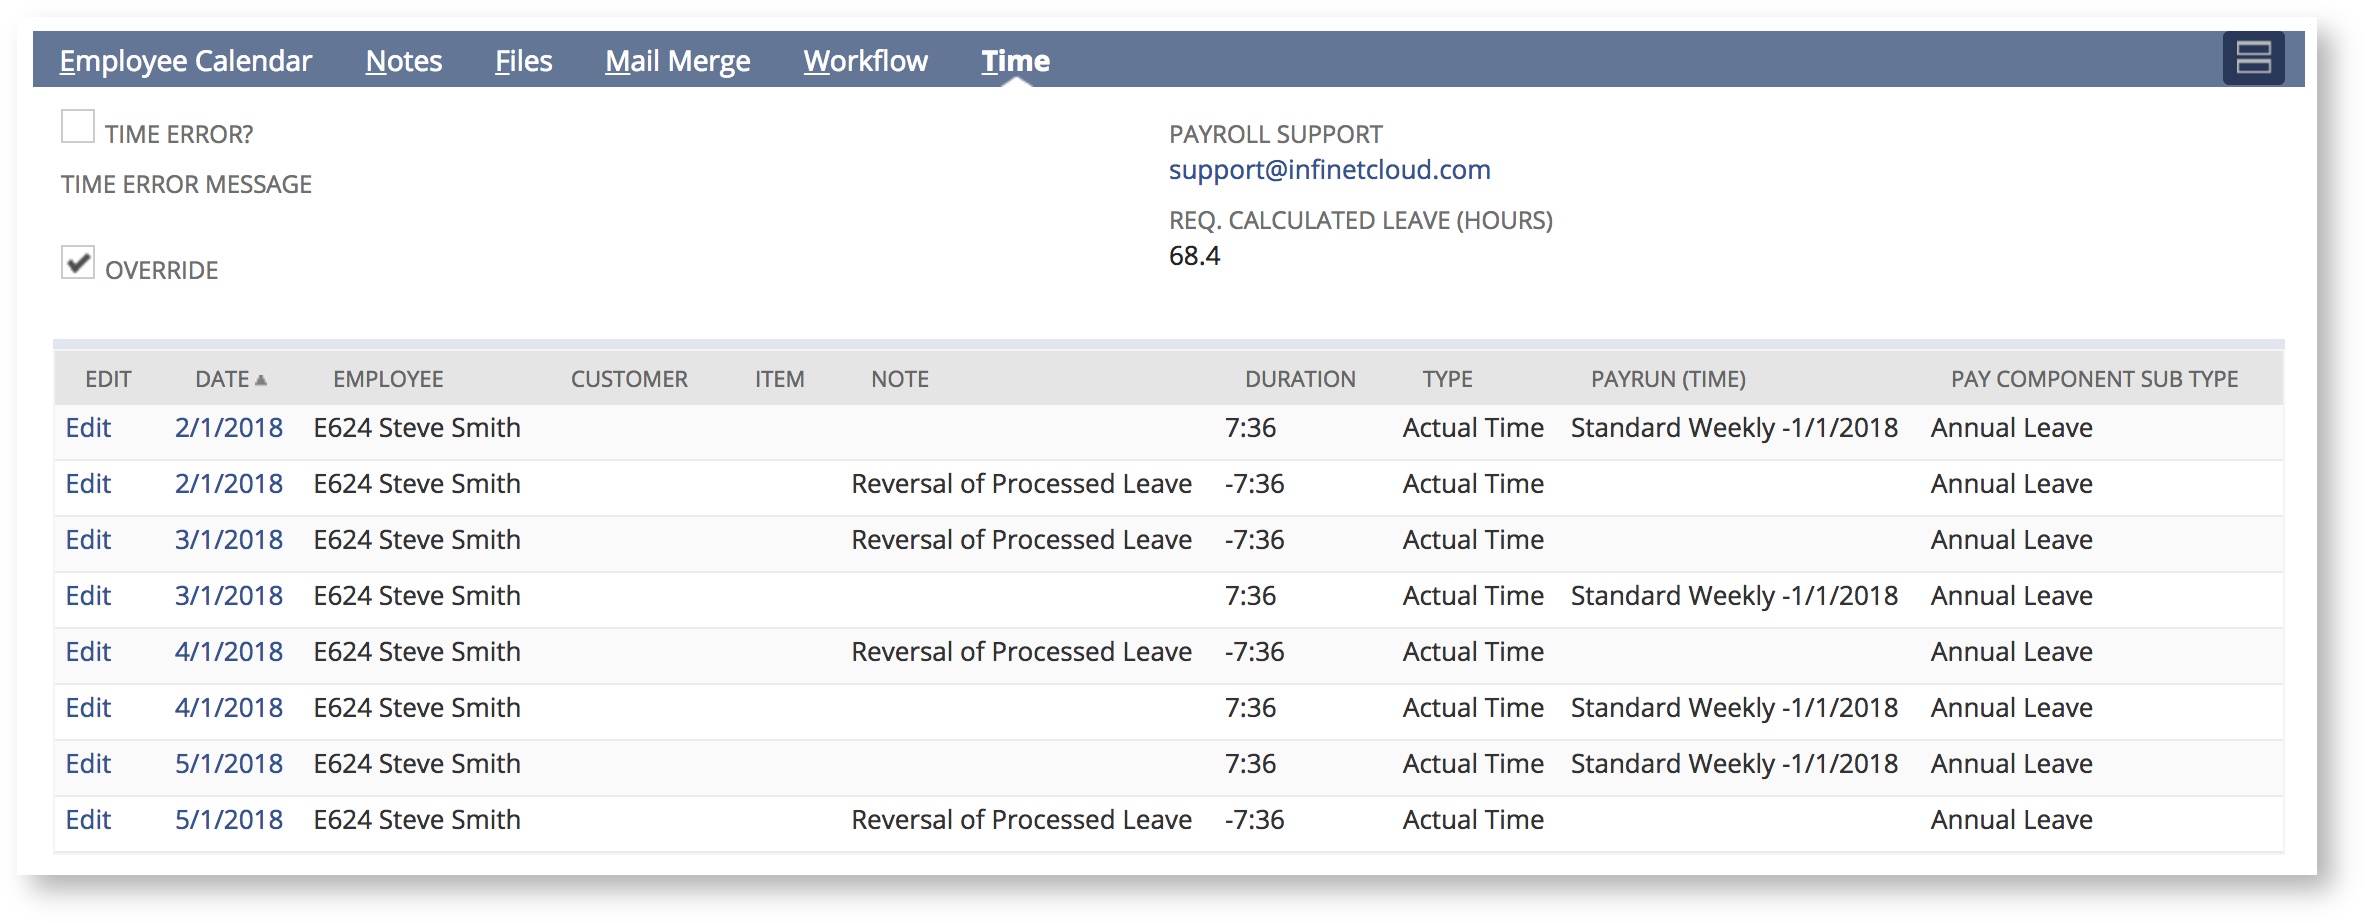
When the reversal has completed the newly created "reversal" time will be visible in the time tab on the leave request.
Updating the Leave Request (Leave History)
When the reversal has completed the newly created Leave History records will display in a new tab on the leave request.
Managing Errors
Whilst every effort has been made to ensure errors do not occur during the reversal process, it is possible that configuration / changes within the general NetSuite setup could cause problems when creating or updating time records.
Two potential errors can occur:
- Adjustment Cancelled - The underlying data has changed since submitting the adjustment.
- Submit Error - On submit on the preview an error occurs applying the actions to create / edit / delete the time or leave history records.
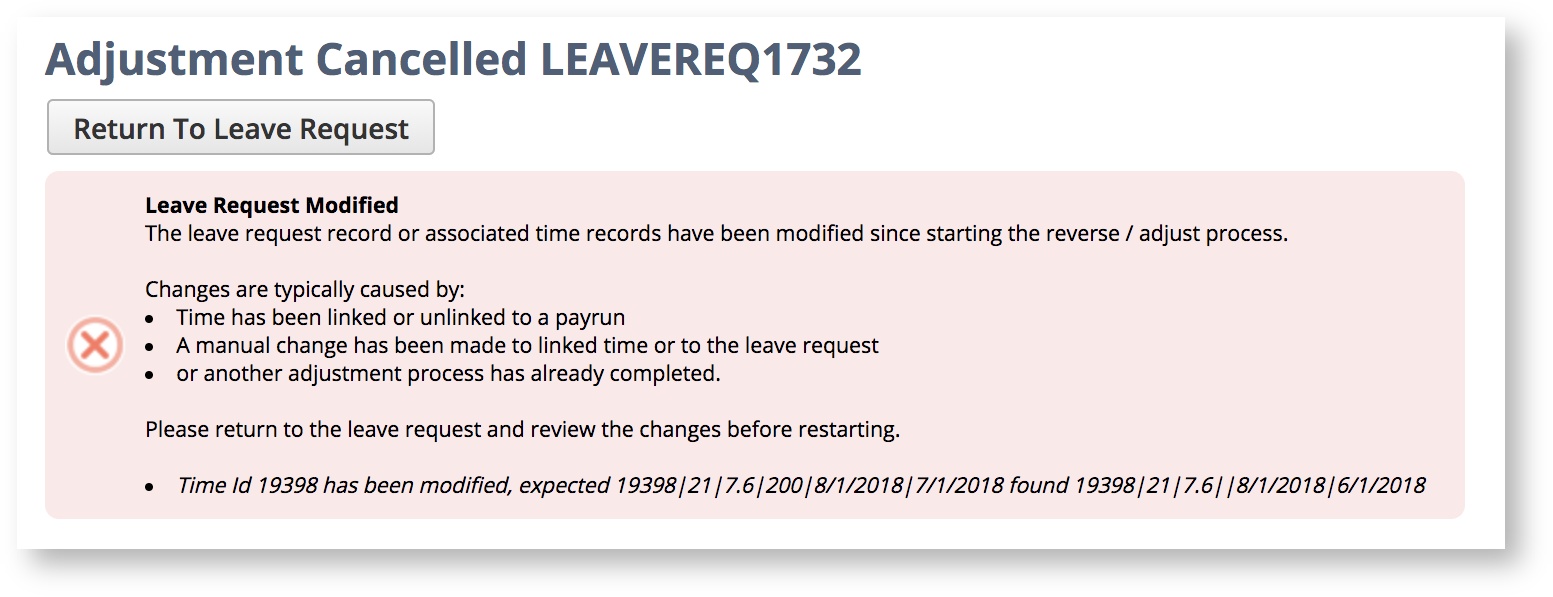
Error: Adjustment Cancelled
If the source data changes after initialising the Reversal/Adjustment, the system will display an error similar to the line below.
In this example the Time Id 19398 has changed. To resolve the issue return to the Leave Request and initiate the process again.
Updating Employees Leave Balances
If the Reversal/Adjustment is being made 'By Leave History' you must manually update the employee leave balance for the change to take effect.
On successful process of the Reversal/Adjustment the following confirmation message will be displayed providing instruction:
Process Adjustment/Reversal Time in Pay Run
If you have adjusted a leave request 'By Time Reversal', the change won't be reflected in the employee's balance until the Time Records are included on a standard or adjustment Pay Run (ie. the next Pay Run).
Initiate the Pay Run as per normal process ensuring not to check 'Skip Pay Components', and proceed.
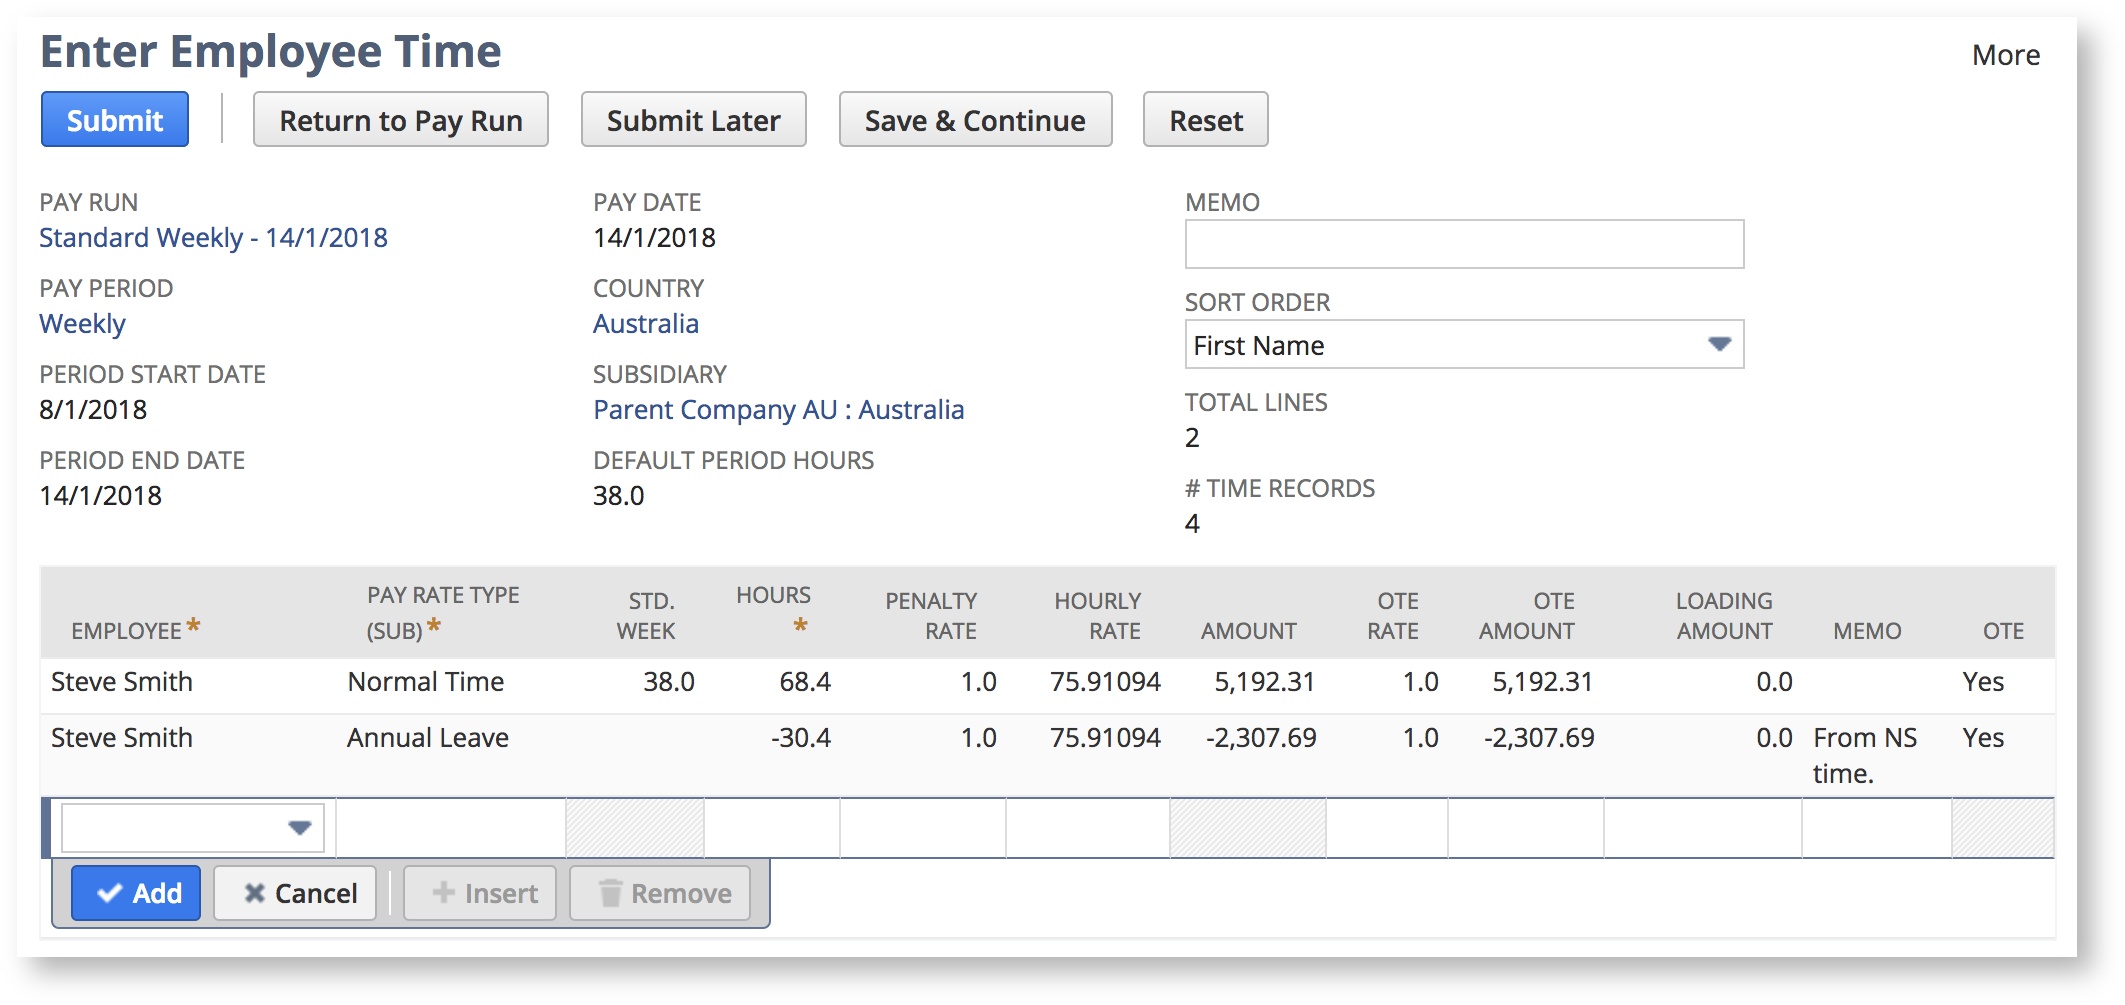
At the Enter Time page you will see that the negative Time Records created will increase the base salary line.
In the example below, you can see that the negative time of 30.4 has increased the Normal Time line from 38 hours to 68.4.
Incompatibility with Skip Pay Components
Negative time can only be included on a pay run where there is a salary line to normalise. This means negative time cannot be processed where skip pay components is set.
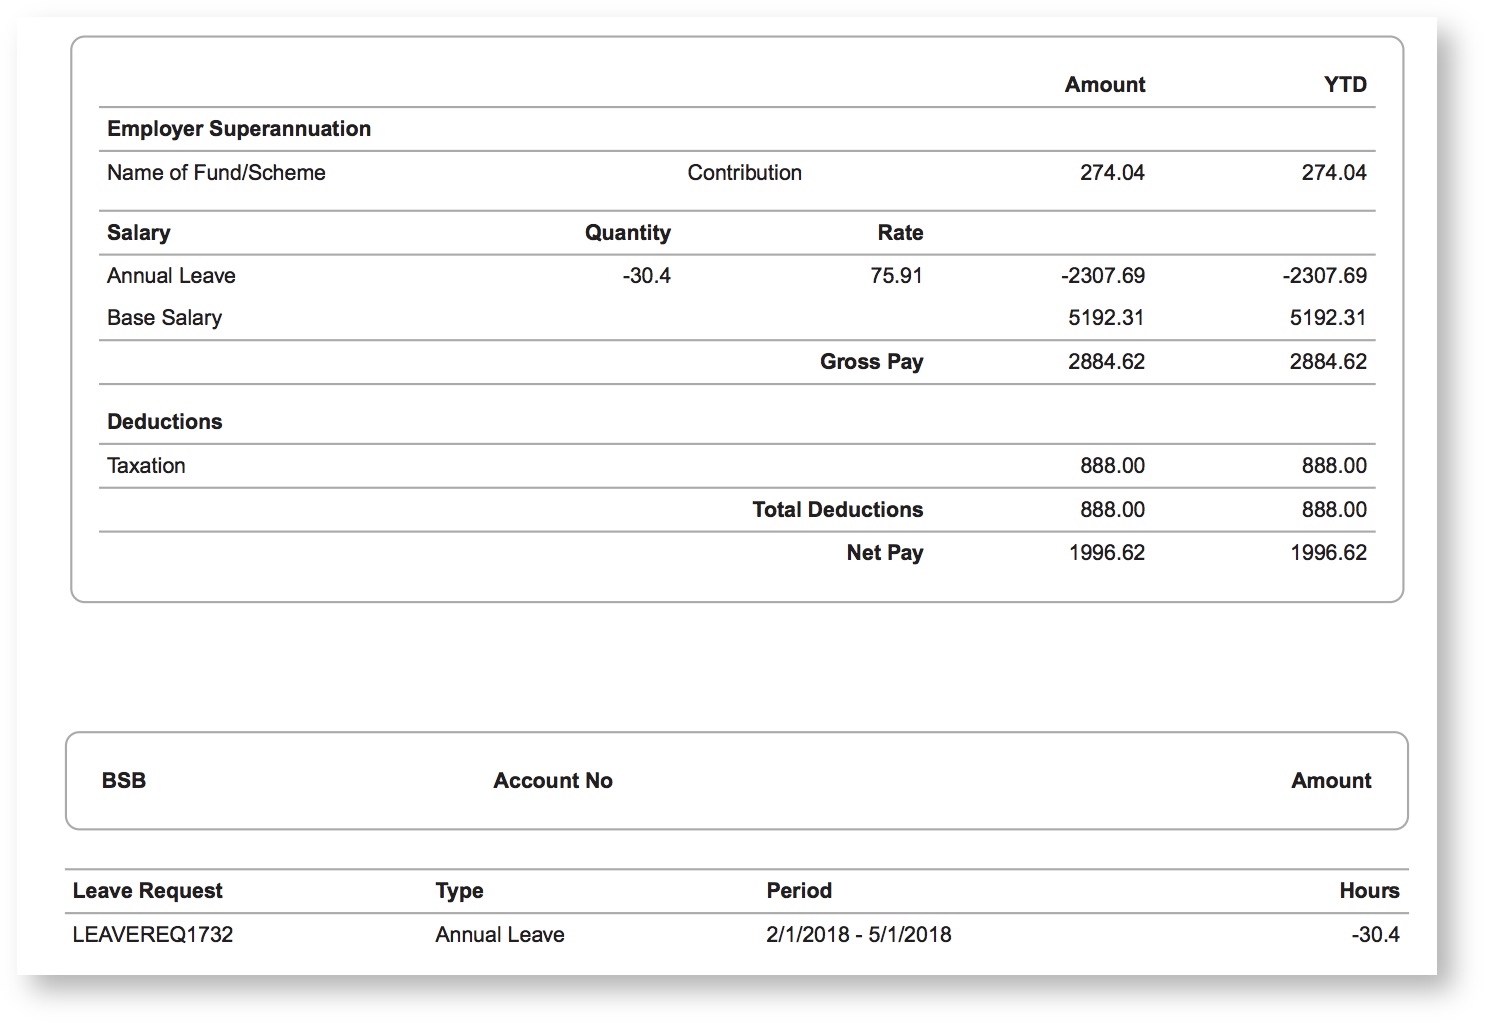
Review the payslip details and PDF payslip for details if you are using a payslip template that displays the leave request summary.
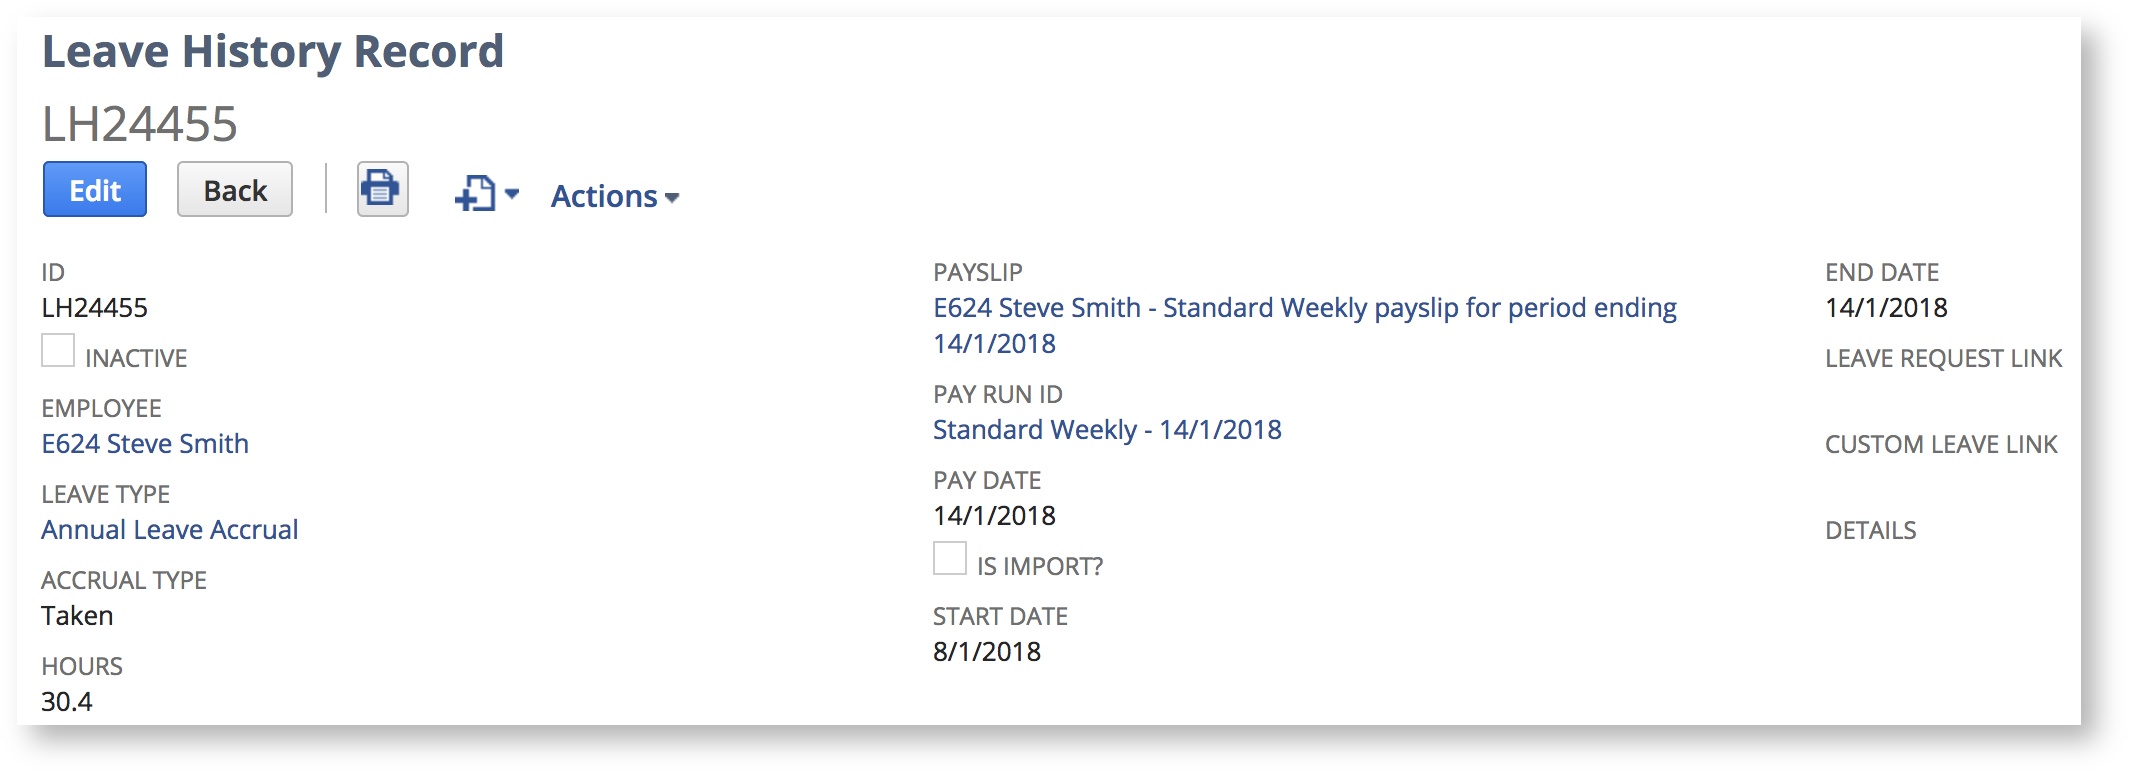
Finally reviewing the Leave History record generated during the Pay Run, you can see a positive annual leave accrual of 30.4 hours that increases the employees available balance.
Example Scenarios
Please note these example scenarios are provided to assist in understanding the Adjustment/Reversal process. They are not provided as guidance on statutory rules.
Leave Reversal
In this example, the employee took a day off in a previously processed pay period but has now informed you they did not take the leave as planned.
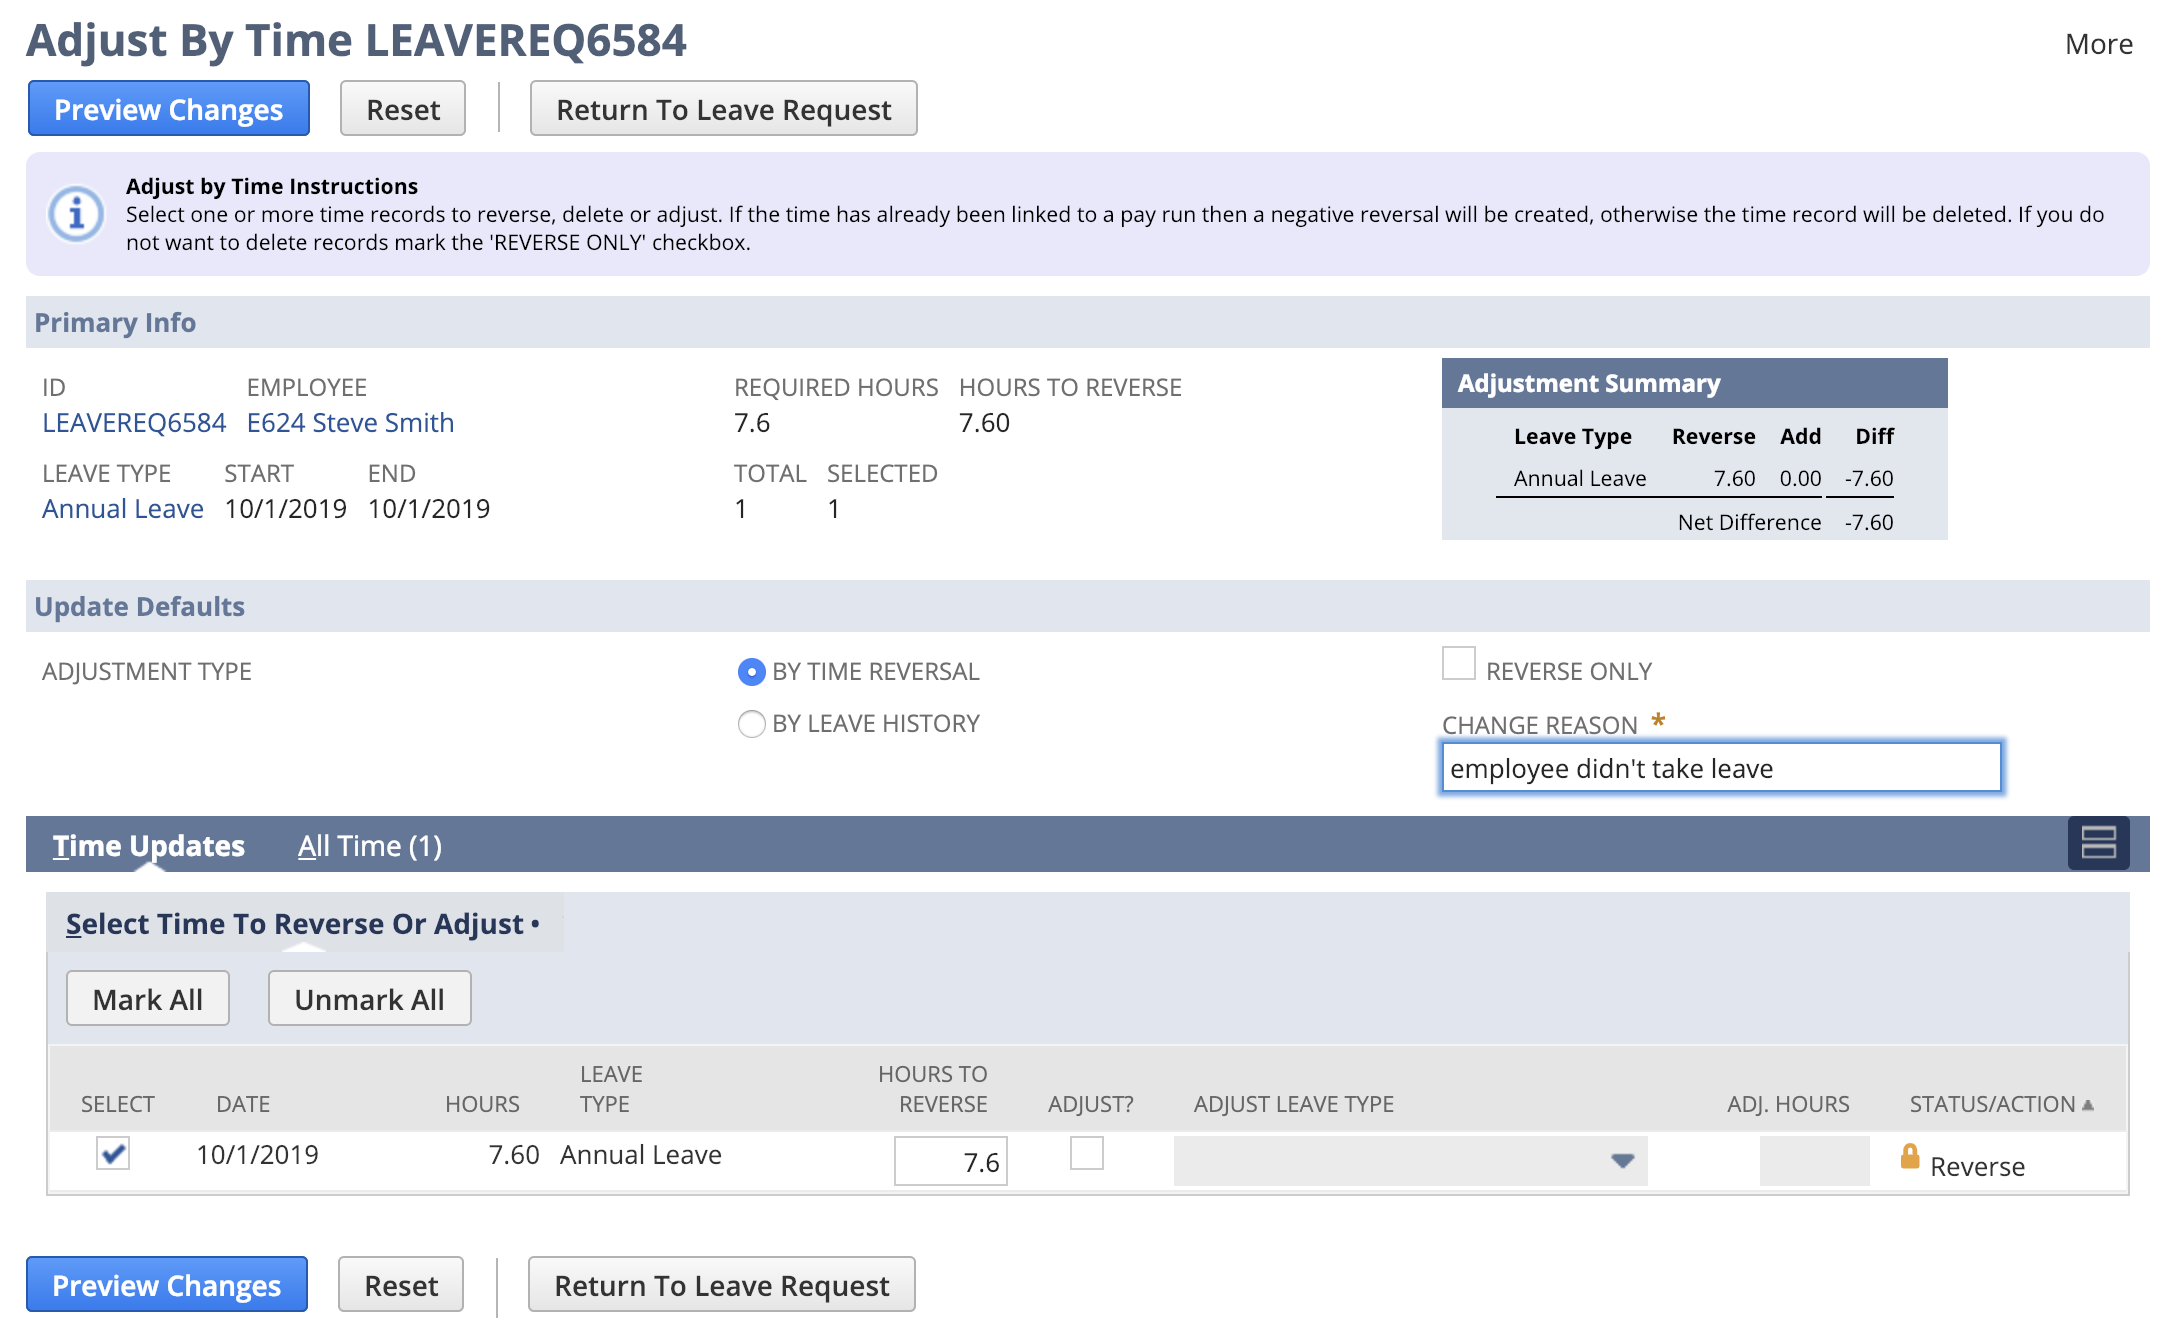
- Select Reverse/Adjust from the Leave Request where the Time Records are associated.
- Select the Time Record and observe the default populated 'Hours to Reverse' (the 7.6 hours).
- Status/Action is 'Reverse' meaning this process will create a negative Time Record that will be included in the next Pay Run.
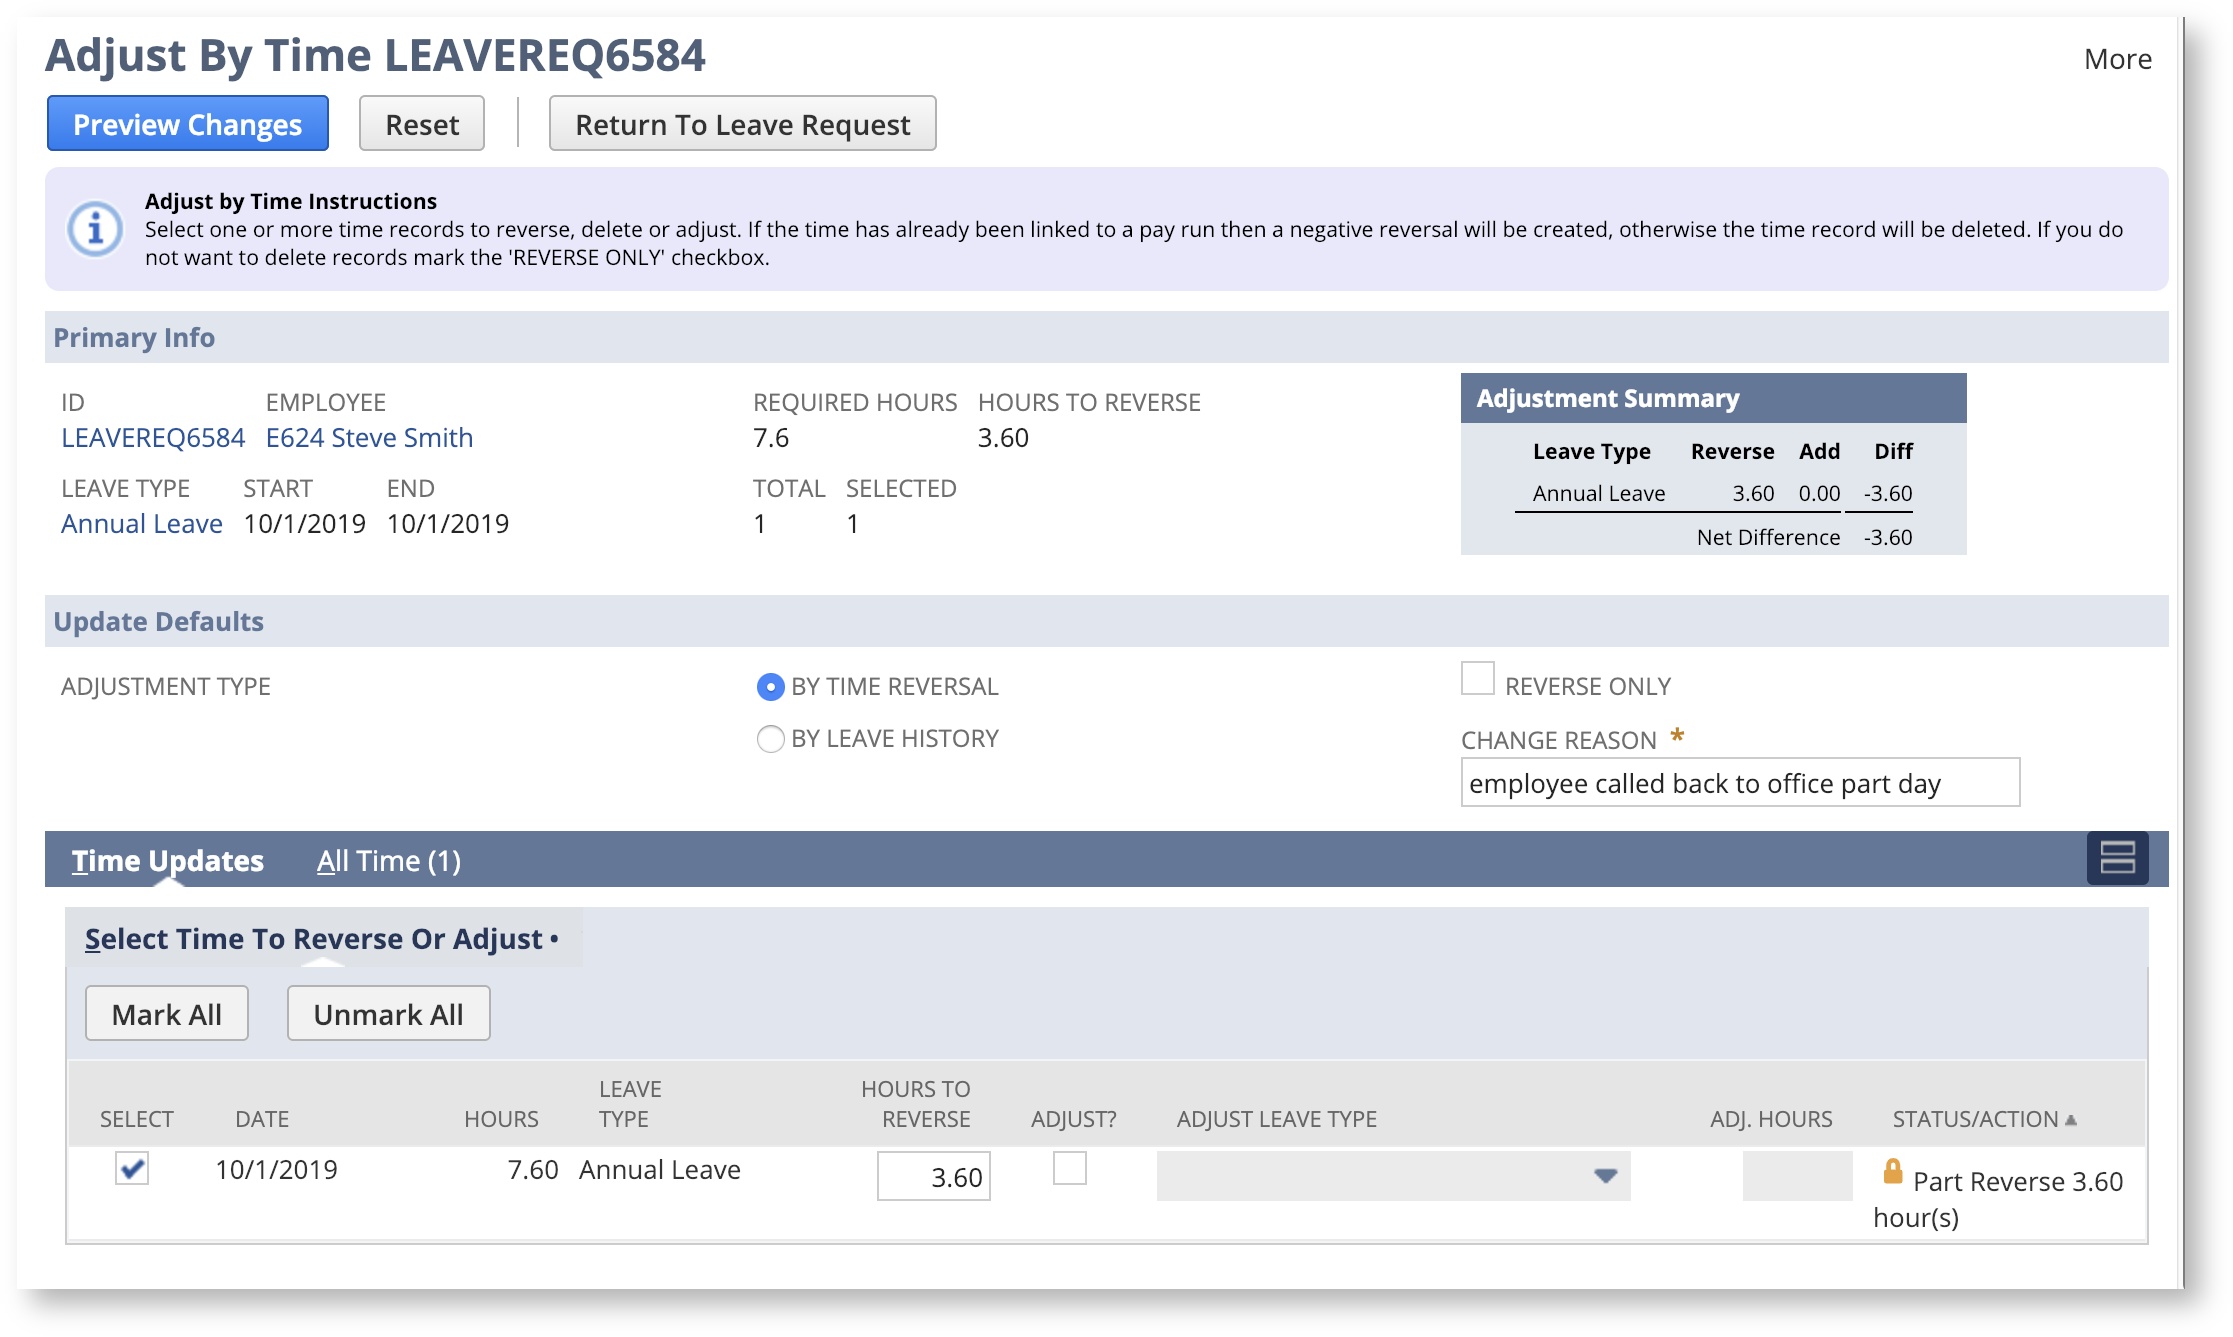
Part Leave Day Taken
You have previously processed a full day Leave for the Employee (7.6 hrs). The employee was called back to work and worked 3.6 hours of the planned leave.
- Select Reverse/Adjust from the Leave Request where the Time Records are associated.
- Select the Time Record and observe the default populated 'Hours to Reverse' (the 7.6 hours).
- Enter the number of hours that were worked (3.6 hours) and need to be reversed.
**'By Time Reversal' will create, edit or delete Time Records to reflect the adjustment that needs to be made. The default behaviour is to reverse the previously processed Time Record and create a Time Record that can be processed in the next Pay Run**
Employee Returns To Work Early
An employee has booked 14 days leave but has notified the office they will be returning 2 days early.
- Select Reverse/Adjust from the Leave Request where the Time Records are associated.
- Select the Time Records for the last two days of the Leave Request, which will be set for deletion.
This action will also update the Leave Request by changing the End Date and reducing the Required Hours.
Changes the Leave Request will also be reflected in the Leave Calendar.
Change Leave Type For Full Leave Period
An employee has been previously paid for three days Annual Leave. Upon returning to work they have advised the time was spent caring for a sick relative.
- Select Reverse/Adjust from the Leave Request where the Time Records are associated.
- Select the Time Records and observe the default populated 'Hours to Reverse' (the 7.6 hours).
- Select 'Adjust' and change the Adjust Leave Type to 'Personal/Carers Leave-Paid'.
To save time, select 'Adjust' and change 'Adjust Leave Type' for the first Time Record, and the system will ask if you would like to apply this to every selected line.
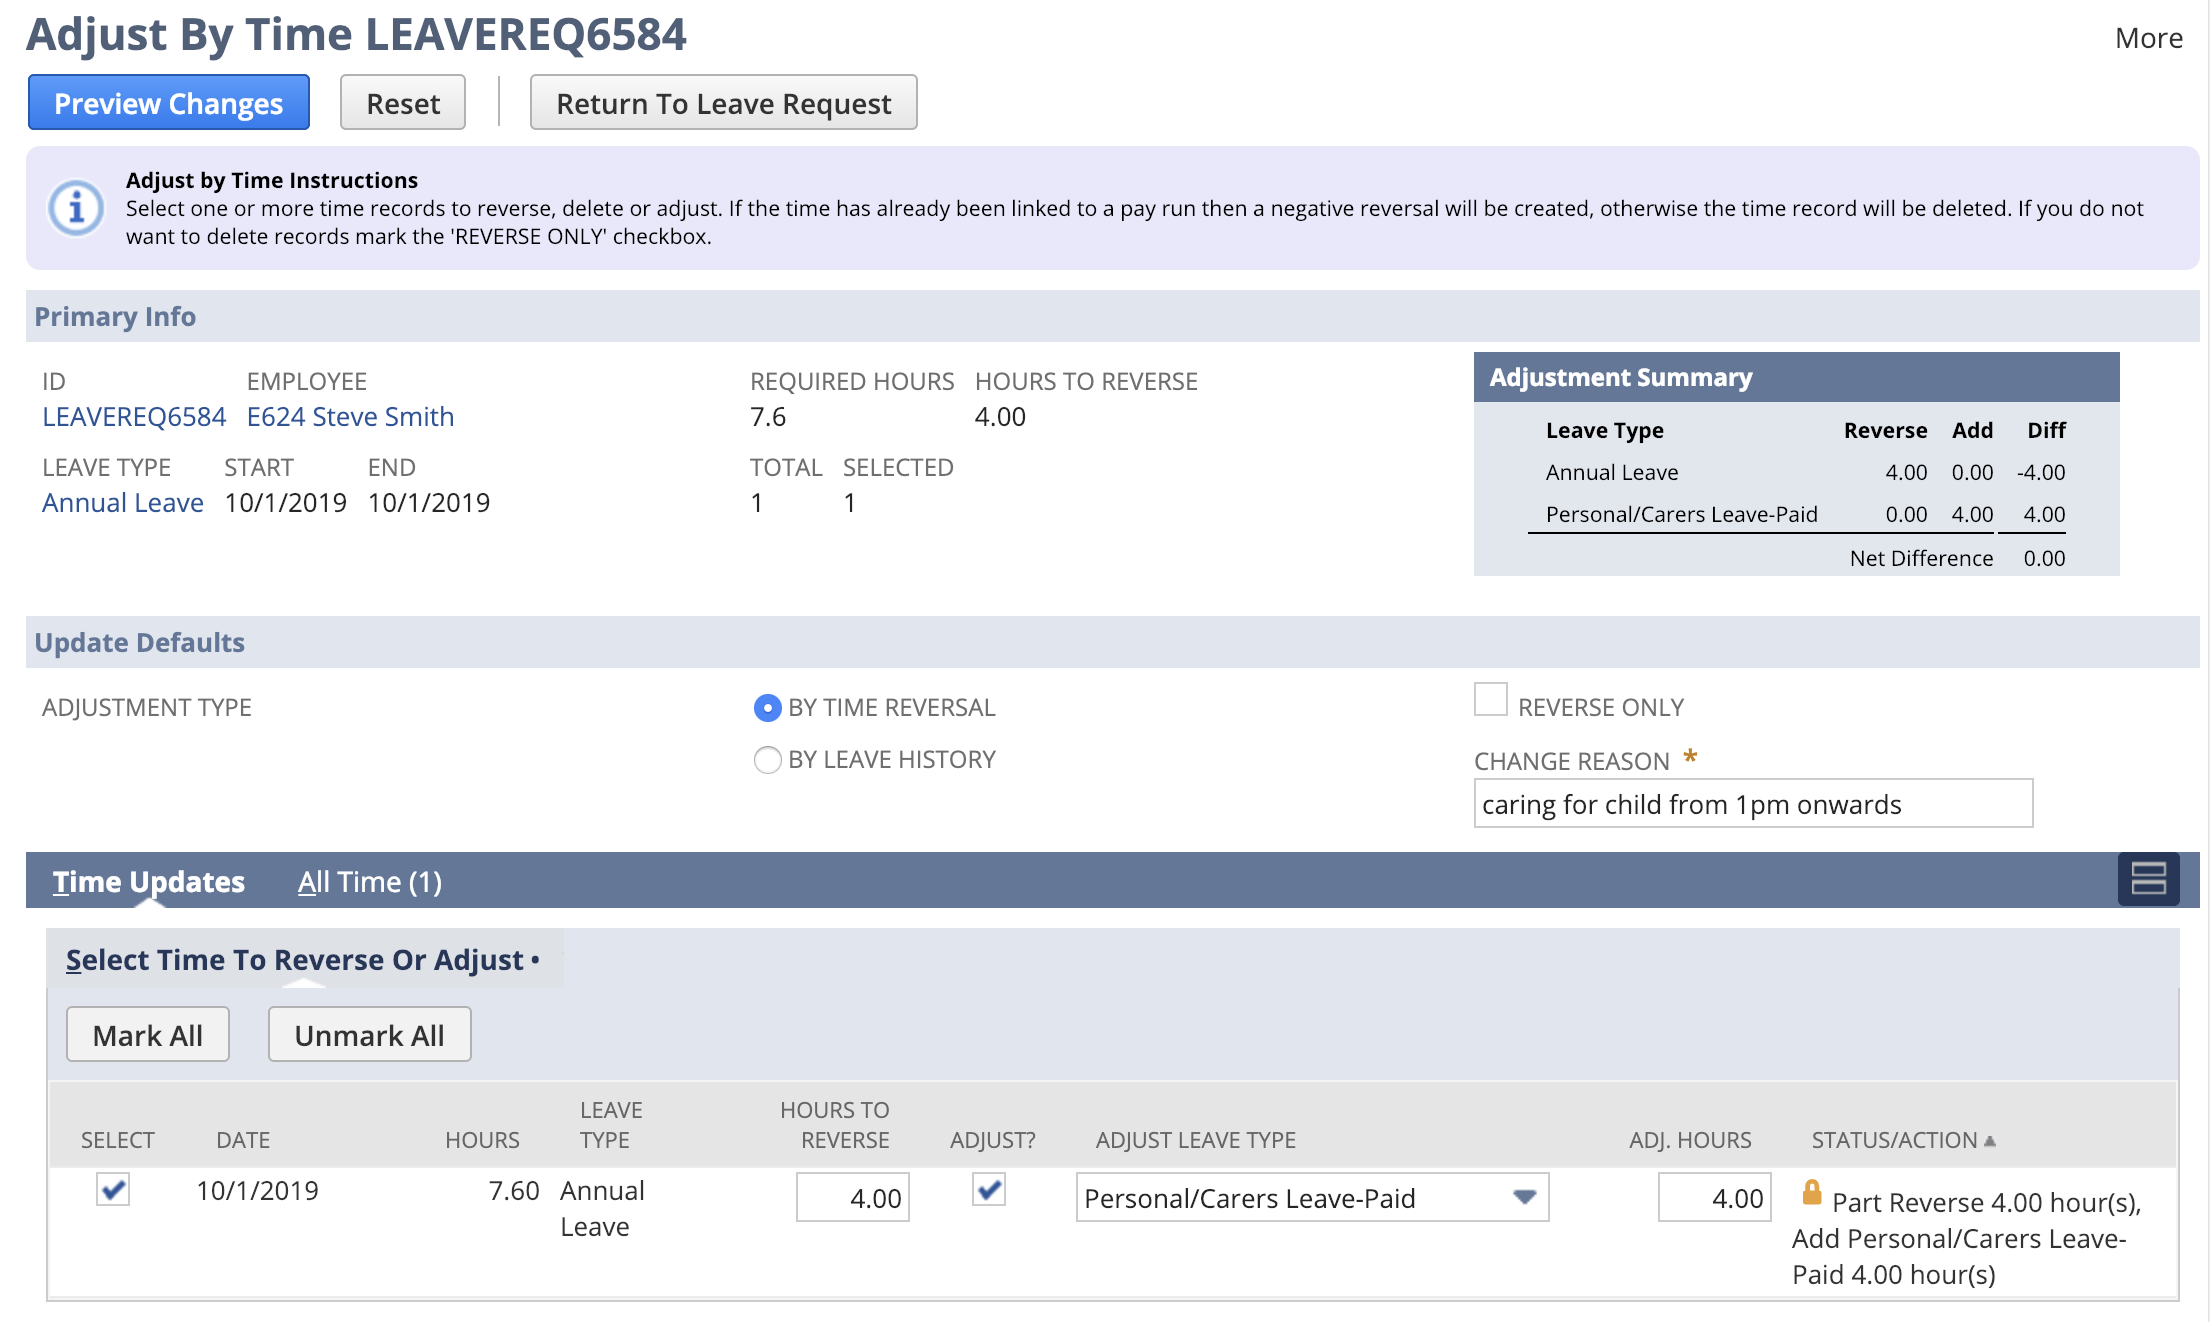
Change Leave Type - Part Day
Employee booked a days annual leave, mid way through the day they were called to pickup their child from school as they were unwell.
As a result, the Leave Request needs to reflect 4 hours of Annual Leave, and 3.6 hours of Personal/Carer Leave-Paid.
- Select Reverse/Adjust from the Leave Request where the Time Records are associated.
- Select the Time Record and observe the default populated 'Hours to Reverse'.
- Enter the variance between the planned Annual Leave Hours (4) and the hours for Personal/Carers Leave Adjustment (4)
Frequently Asked Questions
Q: Why can't I add additional dates to the processed leave request ?
A: Adjustment/Reversal functionality is only designed to adjust an existing request and shorten the period of leave taken. Additional dates can be entered on a new Leave Request.
Q: Does the system check Leave Balances for additional hours for leave adjustments?
A: No the Adjustment/Reversal process is for Payroll Administrators only. It is assumed that the Payroll Administrator will have verified additional hours for leave adjustments independently.
Q: Does the Adjustment/Reversal process take into account Statutory Holidays?
A: No
Q: Does the Adjustment/Reversal process inform the employee or leave approver?
A: No, the process does not generate any emails
